private static readonly Lazy<IBucket> Bucket = new Lazy<IBucket>(() =>
{
    var uri = ConfigurationManager.AppSettings["couchbaseUri"];
    var bucketName = ConfigurationManager.AppSettings["couchbaseBucketName"];
    var bucketPassword = ConfigurationManager.AppSettings["couchbaseBucketPassword"];
    var cluster = new Cluster(new ClientConfiguration
    {
        Servers = new List<Uri> { new Uri(uri) }
    });
    return cluster.OpenBucket(bucketName, bucketPassword);
});Posts tagged with 'csharp'
UPDATE: The calendar is full. You can sign up to be an alternate, in case someone drops out or fails to deliver. I can't give you a date though, so you'd essentially have to have a post ready to go as soon as December 1st. And please, don't let the lack of an advent date keep you from writing that C# blog post! Finally, due to the tremendous response, I will double up the slots next year (from 25 to 50), assuming this advent goes well :)
I heard about the F# Advent Calendar, a traditional that's been carried on since 2010 (2014 in English). I think this is a great idea, and there needs to be one for C# too!
(I asked Sergey Tihon for permission!)
So, I need you to write a C# blog post!
Here are the rules:
- Reserve a slot on Twitter (with hash tag #csadvent) or leave a comment on this post. You do not have to announce your topic until the day you reserve.
- Prepare a blog post (in English).
- Add a link in your blog post that links back to here, so that your readers may find the entire advent.
- Publish your blog post on the specified date. Your post must be related to C# in some way, but otherwise the content is completely up to you. I've posted a few ideas below to get your creativity flowing.
- Post the link to your post on Twitter with hashtags #csharp and #csadvent
Below are all the slots, and who has claimed each date. I chose to go with 25 total slots (yes I know some advent calendars are 24).
I will do my best to keep this up to date. The slots will be first come first serve. I have already claimed December 25th for myself, since I assume that will be the least desirable date. But I'm happy to swap if you really really want that day.
Alternates:
- Leave a comment or tweet with #csadvent to be put on this list!
Some ideas:
- Introduction to [your favorite NuGet package]
- X C# Tricks and Tips
- JSON (De)serialization
- Streams
- The newer C# 6 and 7 features
- Async/await
Thanks to everyone who is participating! I hope this goes well and it can become an annual tradition.
This is a repost that originally appeared on the Couchbase Blog: Azure Functions and Lazy Initialization with Couchbase Server.
Azure Functions are still new to me, and I’m learning as I’m going. I blogged about my foray into Azure Functions with Couchbase over a month ago. Right after I posted that, I got some helpful feedback about the way I was instantiating a Couchbase cluster (and bucket).
I had (wrongly) assumed that there was no way to save state between Azure Function calls. This is why I created a GetCluster() method that was called each time the function ran. But, initializing a Couchbase Cluster object is an expensive operation. The less often you instantiate it, the better.
You can follow along with the updated source code for this blog post on Github.
Static state
I had a hard time finding documentation on whether I could use a static object for reuse between function calls. I suppose I should have experimented, like fellow Microsoft MVP Mark Heath did. Instead, I posed the question to StackOverflow.
In short: yes. A Cluster, instantiated and saved to a static member, can is reusable between function calls. According to Mark’s post above, there’s no guarantee how long this value will survive. But that’s an expected trade-off that you make when going "serverless".
Lazy initializing within Azure Functions
Simply using a static member would work, but it’s not thread-safe. There are a few ways to tackle that issue, but an easy way that’s built right into the .NET framework is to use Lazy Initialization with Lazy<T>.
First, I removed the GetBucket and GetCluster methods. Next, I created a Lazy<IBucket> property to replace them.
I just made a single property for a bucket, since that’s all I need for this example. But if you need to use the cluster, you can easily make that its own Lazy property. (Once you have a cluster, getting a bucket is a relatively cheap operation).
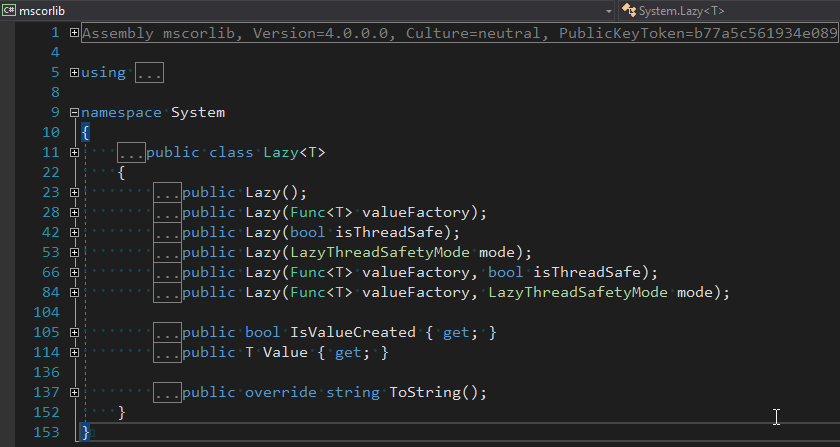
Using a Lazy property
When you instantiate a Lazy<T> object, you supply it with an initialization lambda. That lambda won’t execute until the Value property is actually called for the first time.
var lazyObject = new Lazy<string>(() =>
{
    // this code won't be called until 'lazyObject.Value' is referenced
    // for the first time
    return "I'm lazy!";
});
For instance, notice the Value between Bucket and GetAsync in the updated version of my Azure Functions:
var doc = await Bucket.Value.GetAsync<MyDocument>(id);If that’s the first time Value is used, the cluster will be initialized. Otherwise, it will use the already initialized cluster (try experimenting with a Guid instead of a Bucket).
Summary
State can be saved between Azure Function calls by using a static member. Make sure that it’s thread-safe (by using Lazy<T> or something like it). Don’t make any assumptions about how long that object will be around.
Anything else I missed? Are you using Azure Functions with Couchbase? I would love to hear from you. Please leave a comment below or ping me on Twitter @mgroves.
This is a repost that originally appeared on the Couchbase Blog: Azure Functions with Couchbase Server.
Azure Functions are Microsoft’s answer to Amazon’s Lambdas or Google’s Cloud Functions (aka "serverless" architecture). They give you a way to deploy small pieces of code, and let Azure handle the underlying server. I’ve never used them before, so I thought I would give them a try beyond "Hello, World", by getting them to work with Couchbase Server.
There are more options in Azure Functions beyond simple HTTP events (e.g. Blob triggers, GitHub webhooks, Azure Storage queue triggers, etc). But, for this blog post, I’m going to focus on just HTTP events. I’ll create simple "Get" and "Set" endpoints that interact with Couchbase Server.
Before beginning, you can follow along by getting the source code for this blog post on GitHub.
Also, please read the Azure Functions and Lazy Initialization with Couchbase Server post. It contains an important update about using Couchbase Server and Azure Functions.
Getting setup to develop Azure Functions
For this blog post, I decided to try Visual Studio Preview.

I did this because there is a handy tool for creating Azure Function projects in Visual Studio.
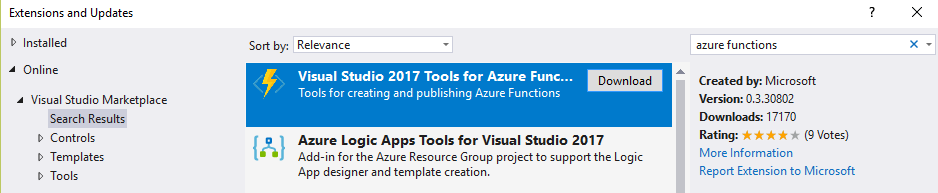
But it only works for the preview version at this time. You don’t have to use these tools to develop Azure Functions, but it made the process simpler for me.
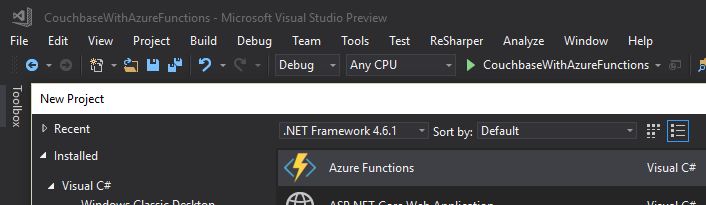
Once I had this tooling in place, all I had to was to File→New→Project. Then under "Cloud", select "Azure Functions".
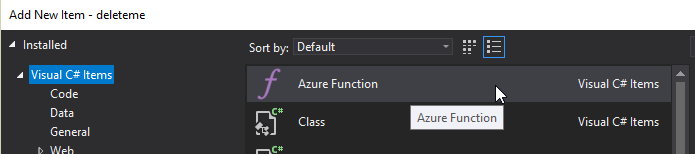
Once you do this, you’ll have an empty looking project with a couple of JSON files. Right click on the project, add item, and select "Azure Function".
Next, you’ll need to select what kind of Azure Function you want to create. I chose "HttpTrigger". I also chose "Anonymous" to keep this post simple, but depending on your use case, you may want to require an authentication token. After you do this, a very simple shell of a function will be generated (as a C# class). You can execute this function locally (indeed, that is what the local.settings.json file is for) so you can test it out without deploying to Azure yet.
Writing a "Get" function
First, I decided that I wanted two Azure Functions: one to "get" a piece of data by ID, and one to "set" a new piece of given data. I started by defining the shape of my data with a simple C# POCO:
public class MyDocument
{
    public string Name { get; set; }
    public int ShoeSize { get; set; }
    public decimal Balance { get; set; }
}
Here is the Azure function that I wrote to "get" that document from Couchbase Server:
public static async Task<HttpResponseMessage> Get([HttpTrigger(AuthorizationLevel.Anonymous, "get", Route = null)]HttpRequestMessage req, TraceWriter log)
{
    // parse query parameter
    var id = req.GetQueryNameValuePairs()
        .FirstOrDefault(q => string.Compare(q.Key, "id", true) == 0)
        .Value;

    using (var cluster = GetCluster())
    {
        using (var bucket = GetBucket(cluster))
        {
            var doc = await bucket.GetAsync<MyDocument>(id);
            return req.CreateResponse(HttpStatusCode.OK, doc.Value, new JsonMediaTypeFormatter());
        }
    }
}
Some things to note:
-
I remove the
"post"that was generated by the tooling, since I want this to only be a"get"function. -
Parsing the query parameter seems like a lot of extra code for this simple case. You can alternatively create a "function with parameters"
-
GetClusterandGetBucketwill be discussed later in this post. But the short story is that I want this code to work both locally and deployed to Azure
Next, run this function locally, and you’ll get a console screen that looks similar to this:
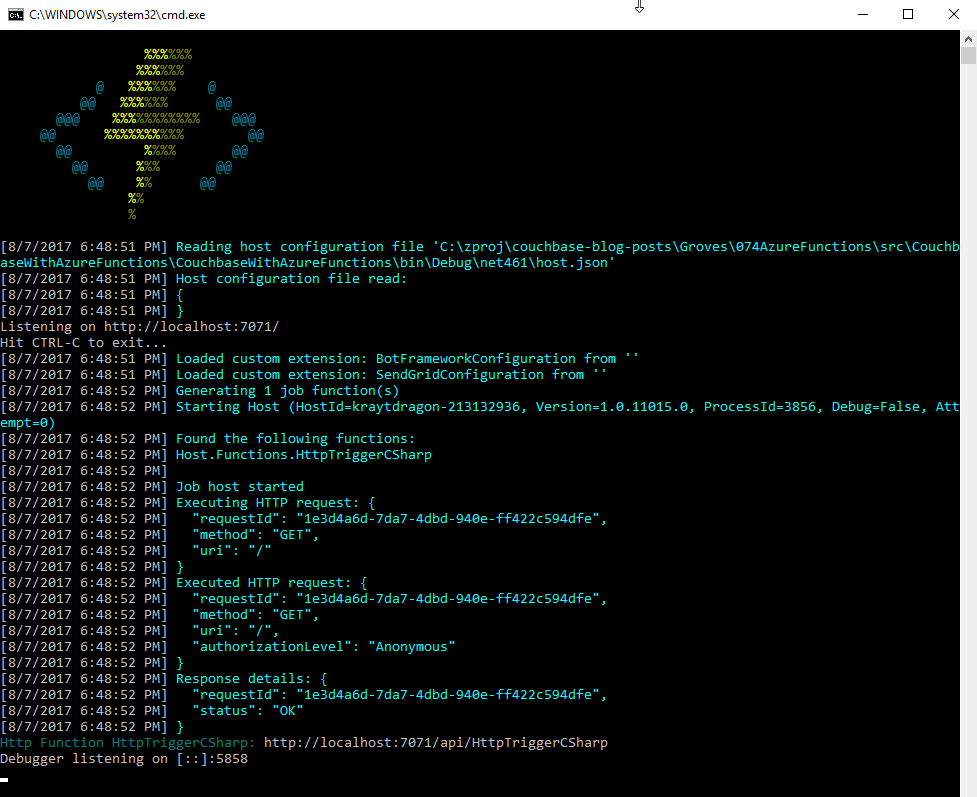
At the bottom, you’ll notice that it tells you the Azure Function URL(s). Assuming I had a document in Couchbase (I don’t yet), I could create an HTTP request with a tool like Postman to: http://localhost:7071/api/HttpTriggerCsharpGet?id=123456
Currently, if I do that, I’ll get "null" as a response (since I don’t have any validation or error checking code). So let’s move on and create a "Set" function.
Writing a "Set" function
The "Set" function will be slightly different. I want document information POSTed to it, and I want it to return a message like "New document inserted with ID 123456".
public static async Task<HttpResponseMessage> Set([HttpTrigger(AuthorizationLevel.Anonymous, "post", Route = null)] MyDocument req, TraceWriter log)
{

    var id = Guid.NewGuid().ToString();

    using (var cluster = GetCluster())
    {
        using (var bucket = GetBucket(cluster))
        {
            await bucket.InsertAsync(id, req);
        }
    }

    return new HttpResponseMessage
    {
        Content = new StringContent($"New document inserted with ID {id}"),
        StatusCode = HttpStatusCode.OK
    };
}
This function has a similar shape to the Get, but some important things to note:
-
There is only
"post"in the HttpTrigger attribute. -
Instead of
HttpRequestMessageas the first parameter, I’ve decided to useMyDocument, and let Azure Functions do the binding for me. -
Since I don’t have
HttpRequestMessage, I can’t call itsCreateResponsemethod, so instead I instantiate a newHttpResponseMessagedirectly to return the success message at the end.
To create a request in Postman, I’ll use a URL of http://localhost:7071/api/HttpTriggerCsharpSet. In the headers, I’ll set Content-Type to "application/json". Finally, the body will be JSON:
{
    "Name": "matthew",
    "Balance": 107.18,
    "ShoeSize": 14
}
Now, when I POST that to the endpoint, I’ll get a response message of "New document inserted with ID f05ea97e-7c2f-4f88-b72d-19756f6a6f35".
Connecting to Couchbase Server
I have glossed over how these functions connect to Couchbase Server.
Previously, I mentioned two methods, GetCluster and GetBucket that will connect to the cluster and bucket, respectively.
private static Cluster GetCluster()
{
    var uri = ConfigurationManager.AppSettings["couchbaseUri"];
    return new Cluster(new ClientConfiguration
    {
        Servers = new List<Uri> { new Uri(uri) }
    });
}

private static IBucket GetBucket(Cluster cluster)
{
    var bucketName = ConfigurationManager.AppSettings["couchbaseBucketName"];
    var bucketPassword = ConfigurationManager.AppSettings["couchbaseBucketPassword"];

    return cluster.OpenBucket(bucketName, bucketPassword);
}
At this point, most of this code should be familiar if you’ve used Couchbase Server and the Couchbase .NET SDK before. I’m connecting to a single node cluster, and then connecting a bucket that has a password set (I’m using Couchbase Server 4.6).
But, the important thing to point out here is the use of Configuration.AppSettings. In the local.settings.json file, I’ve added these Couchbase settings to the Value section:
{
  "IsEncrypted": false,
  "Values": {
    "AzureWebJobsStorage": "",
    "AzureWebJobsDashboard": "",
    "couchbaseUri": "http://localhost:8091",
    "couchbaseBucketName": "azurefunctions",
    "couchbaseBucketPassword": "Password88!"
  }
}
When running Azure Functions locally, this file is used for configuration. I have Couchbase Server running locally with a bucket called "azurefunctions". Anything in "Values" can be accessed via Configuration.AppSettings.
Deploying to Azure
Before deploying the Azure Functions, I’ll need to create a Couchbase Cluster on Azure. This is very easy to do, thanks to Ben Lackey’s great work on the Azure Marketplace. Once that’s deployed, deploying the Azure Functions are also easy, thanks to Visual Studio.
Deploying Couchbase Server to Azure
Here is a short video walking you through the process of creating a Couchbase Server cluster on Azure.
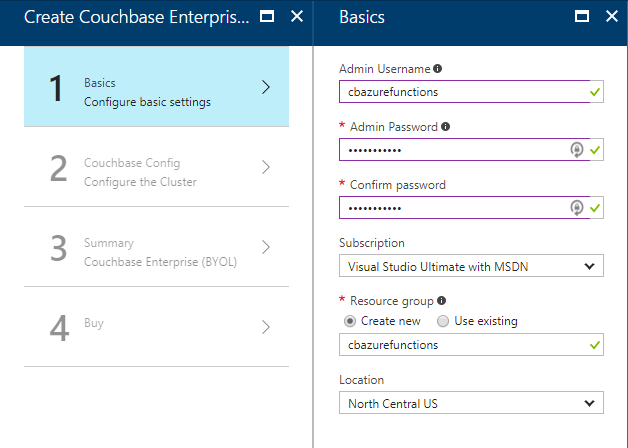
For my example, I followed that video closely. Here is step 1, where I configure the username, password, and resource group.
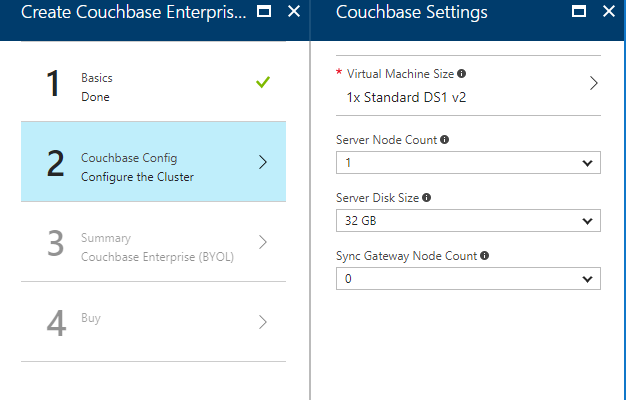
For the second step, I only created a single node cluster on the smallest, cheapest VM (DS1 v2). I created 0 Sync Gateway nodes, since I’m not using Sync Gateway for this example.
Step 3 is just a summary, and step 4 is a confirmation. It will take 3-5 minutes for the Couchbase Cluster to start up in Azure.
Once the cluster is created, find the URL for the first node in the cluster (just as demonstrated in the above video). My URL looked something like: http://vm0.server-hsmkrefstzg2t.northcentralus.cloudapp.azure.com:8091. Go to this URL, login, and create a bucket (I called mine "azurefunctions", just like I did locally).
Deploying Azure Functions to Azure
Now, Couchbase Server is running. So let’s deploy the Azure Functions that will interact with it.
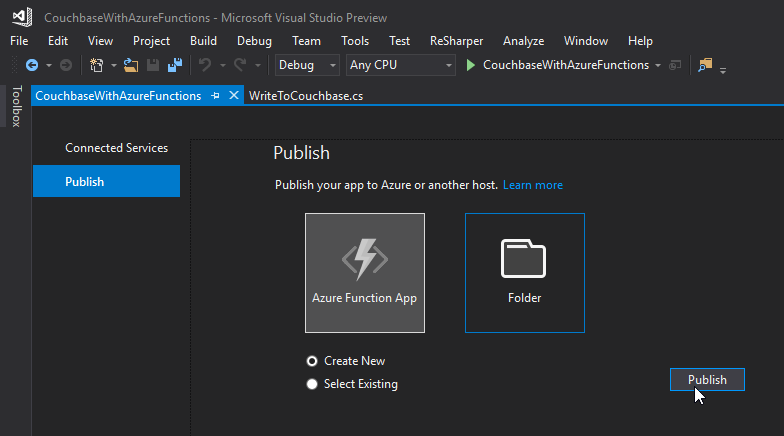
To begin, right-click the project in Visual Studio and select "publish". You’ll need to create a new publish profile the first time you do this, but that’s easy.
Give your functions an app name, select a subscription, select a resource group (you can create a new one, or use the same group that you created above for Couchbase), select a service plan, and finally a storage account. You can create new ones when necessary.
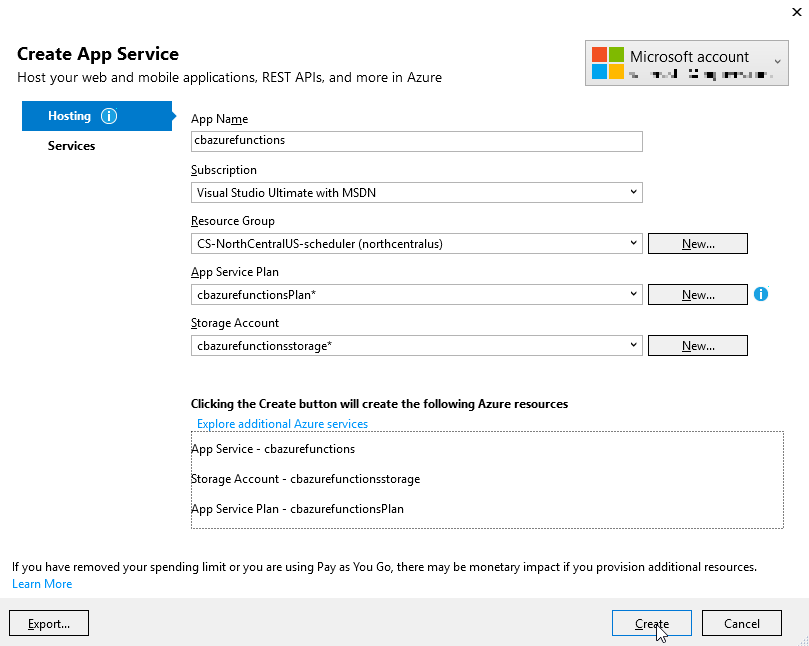
Click "create" and these items will start to be created in Azure (it may take a minute or two).
Trying out the Azure Functions
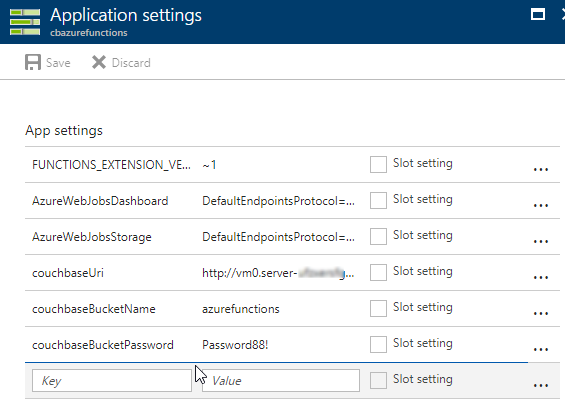
Finally, remember that the Azure Functions need to know the URI, bucket name, and password in order to connect to Couchbase Server. That information is in local.settings.json, but that file is not used for actual Azure deployments.
In the Azure portal, navigate to the Azure function (I called mine cbazurefunctions), and then select "Application Settings". Under "App settings", enter those three settings: couchbaseUri, couchbaseBucketName, and couchbaseBucketPassword.
Now, repeat the Postman process mentioned above to try out the Azure functions and make sure they work. Your URL will vary, but mine was http://cbazurefunctions.azurewebsites.net/.
Summary
This is my first time trying out Azure Functions. This blog post shows a simple demo, but there are other factors to consider before you start using this in production:
-
Authentication - I used anonymous Azure Functions to keep it simple. Azure Functions can also provide authentication tokens to use that prevent access except to authorized users.
-
App settings - Setting them manually in the portal may not be the best solution. There is probably a way to automate that portion, and that’s something I’ll look into in the future.
-
HTTPS/TLS - You will likely want to have some level of encryption as you are getting and posting data to your Azure Functions. The above example transmits everything in clear text.
Anything I missed? Any more tips or suggestions to share to make this process easier or better? Please leave a comment below or ping me on Twitter @mgroves.
This is a repost that originally appeared on the Couchbase Blog: SQL Server and Couchbase side-by-side (video).
SQL Server is compared (and contrasted) with Couchbase Server in this video.
If you are averse to video, you can check out the corresponding blog post series I wrote a few months ago that covers the same material:
The source code demonstrated in this video is available on GitHub.
If you have questions or feedback, please contact me at [email protected], or on @mgroves at Twitter, or just leave a comment below.
This is a repost that originally appeared on the Couchbase Blog: XML to JSON conversion with Json.NET.
XML data can be converted to JSON, which can be loaded into Couchbase Server (Couchbase Server 5.0 beta now available). Depending on the source of the data, you might be able to use a tool like Talend. But you may also want to write a simple C# .NET application with Newtonsoft’s Json.NET to do it.
XML data
For the purposes of this tutorial, I’m going to use a very simple XML example. If your XML is more complex (multiple attributes, for instance), then your approach will also have to be more complex. (Json.NET can handle all XML to Json conversions, but it follows a specific set of conversion rules). Here’s a sample piece of data:
            var xml = @"
<Invoice>
    <Timestamp>1/1/2017 00:01</Timestamp>
    <CustNumber>12345</CustNumber>
    <AcctNumber>54321</AcctNumber>
</Invoice>";
Notice that I’ve got this XML as a hardcoded string in C#. In a real-life situation, you would likely be pulling XML from a database, a REST API, XML files, etc.
Once you have the raw XML, you can create an XmlDocument object (XmlDocument lives in the System.Xml namespace).
XmlDocument doc = new XmlDocument();
doc.LoadXml(xml);
Conversion with Json.NET
Once you have an XmlDocument object, you can use Json.NET to convert that object into a Json representation.
var json = JsonConvert.SerializeXmlNode(doc, Formatting.None, true);In this example, I’m asking Json.NET to serialize an XML node:
-
I used
Formatting.None. If I wanted to display the actual Json, it might be better to useFormatting.Indented -
The last
truespecifies that I want to omit the root object. In the XML above, you can think of<Invoice></Invoice>as the root object. I just want the values of the Invoice object. If I didn’t omit the root node, the resultant Json would look like:{"Invoice":{"Timestamp":"1/1/2017 00:01","CustNumber":"12345","AcctNumber":"54321"}}
Saving the Json result
Finally, let’s put the Json into Couchbase. The easiest way to do this would be to again call on JsonConvert to deserialize the Json into a C# object. That object would then be used with Couchbase’s bucket.Insert(…) method.
object transactObject1 = JsonConvert.DeserializeObject(json);
bucket.Insert(Guid.NewGuid().ToString(), transactObject1);
With this method, the Json would be stored in Couchbase like so:

That might be fine, but often times you’re going to want more control of the format. With Json.NET, we can serialize to a given class, instead of just object. Let’s create an Invoice class like so:
public class Invoice
{
    public DateTime Timestamp { get; set; }
    public string CustNumber { get; set; }
    public int AcctNumber { get; set; }
}
Notice that there is some type information now. The Timestamp is a DateTime and the AcctNumber is an int. The conversion will still work, but the result will be different, according to Json.NET’s conversion rules. (Also check out the full Json.NET documentation if you aren’t familiar with it already).
Invoice transactObject2 = JsonConvert.DeserializeObject<Invoice>(json);
bucket.Insert(Guid.NewGuid().ToString(), transactObject2);
The result of that insert will look like:
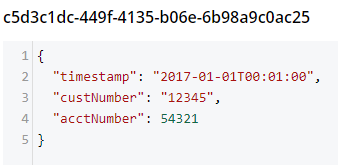
-
Notice that the timestamp field is different: it’s stored in a more standardized way.
-
The acctNumber field value is not in quotes, indicating that it’s being stored as a number.
-
Finally, notice that the field names are different. This is due to the way Json.NET names Json fields by default. You can specify different names by using the
JsonPropertyattribute.
That’s it
One more minor thing to point out: I used Guid.NewGuid().ToString() to create arbitrary keys for the documents. If you have value(s) in the XML data that you want to use for a key, you could/should use those value(s) instead.
This blog post was inspired by an email conversation with a Couchbase user. If you have any suggestions on tools, tips, or tricks to make this process easier, please let me know. Or, contact me if there’s something you’d like to see me blog about! You can email me or contact me @mgroves on Twitter.
