builder.Services.AddCouchbase(options =>
{
    options.ConnectionString = "couchbase://localhost";
    options.UserName = "Administrator";
    options.Password = "password";
});

// this adds auth to CMSprinkle
// if don't do this, it will be local only
// ExampleAuthClass enables anonymous public access, so don't use it as-is!
// builder.Services.AddTransient<ICMSprinkleAuth, ExampleAuthClass>();

// this adds CMSprinkle to your project
builder.Services.AddCMSprinkle(options =>
{
    // changes URL for cmsprinkle pages
    // if not specified, default is "cmsprinkle"
    // then URLs would be /cmsprinkle/home, etc
    options.RoutePrefix = "managecontent";

    // what message you want to show up when the
    // content hasn't been created yet
    // there is a default message if you don't specify this
    options.ContentNotFoundMessage = (contentKey) => $"ERROR: Can't find {contentKey}, did you add it yet?";
});

// this adds a Couchbase connection to CMSprinkle
builder.Services.AddCMSprinkleCouchbase("Example","_default","_default", createCollectionIfNecessary: true);

// or here's the SQLServer provider
// builder.Services.AddCMSprinkleSqlServer("Server=localhost;Database=Example;User Id=sa;Password=yourStrong(!)Password;TrustServerCertificate=True;", "SprinkleContent", "dbo", createTableIfNecessary: true);Posts tagged with 'couchbase'
Today, I’m presenting my C# Advent entry for December 25th, a project that emerged from the C# Advent series: CMSprinkle. (By the way, C# Advent merch is still on sale, but not for much longer).
What is CMSprinkle?
CMSprinkle is a micro content management system I developed specifically for the C# Advent website. Its creation was driven by the need for a straightforward and efficient way to manage small bits of content without the overhead of a full-blown CMS or even a headless CMS.
Features and Functionality
CMSprinkle is now available on NuGet and GitHub. It’s designed for ASP.NET Core web applications, particularly MVC projects. (It may also be adaptable to other ASP.NET Core projects, though this remains untested).
Here’s a quick walkthrough of setting up a new project with CMSprinkle:
-
Creating a New Project: Start with a new ASP.NET Core web application, targeting .NET 8. (Alternatively, you should be able to add CMSprinkle to any existing ASP.NET Core web project that you already have available).
-
Installing CMSprinkle: Add CMSprinkle from NuGet to your project. (
dotnet add package CMSprinkle) -
Choosing a Data Provider: Select from available data providers like Couchbase (used by the C# Advent site) or SQL Server. The system is designed to be extensible, so feel free to contribute or request additional database support.
-
Setting Up: After adding CMSprinkle, you’ll configure it in the views and program files: set up a tag helpers, and add services in your startup.
Managing Content
CMSprinkle aims to reduce friction in adding a CMS to your site. You define content keys directly in tag helpers and configure options like custom error messages for unfound content.
<div class="text-center">
    <h1 class="display-4">Welcome</h1>
    <p>Learn about <a href="https://learn.microsoft.com/aspnet/core">building Web apps with ASP.NET Core</a>.</p>

    @* this is how you sprinkle managed content into your pages *@
    @* make sure you add CMSPrinkle in _ViewImports.cshtml first *@
    @* this will say "ERROR: Content Not Found (HelloWorld)" until you actually create the content.*@
    <CMSprinkle contentKey="HelloWorld" />
</div>
The system also includes a management console for easy content addition and editing.
A Focus on Minimalism
The guiding principle of CM Sprinkle is minimalism. It’s ideal for existing ASP.NET Core websites that require very modest content management capabilities without the complexity of a full CMS. If you have specific features in mind that would make CMSprinkle more suitable for your project, feel free to submit an issue to the GitHub repository.
Video Introduction
You can watch a video introduction to CMSprinkle here, showing a demo in action:
Join the C# Advent Celebration
I invite you to dive into the rich collection of C# Advent entries for 2023. With 50 total entries on https://csadvent.christmas, there’s something for everyone.
I wish everyone a Merry Christmas and a Happy New Year! Thank you for participating in the C# Advent, and I hope to see you again next year.
This blog post is a part of the 2022 C# Advent. Every day of Advent, two contributions from C# enthusiasts are revealed. Thanks for reading, and Merry Christmas!
I’ve written about How I use Fluent Migrator and Lessons learned about Fluent Migrator. I like using Fluent Migrator when I worked with relational databases.
However, I spend most of my time working with the NoSQL document database Couchbase, these days. If the idea of Fluent Migrator for Couchbase sounds interesting, read on!
What are database migrations?
Database migrations (not to be confused with data migrations) are a series of scripts/definitions that build the structure of a database. For instance, the first script could create 15 tables. The next script might alter a table, or add a 16th table. And so on.
Why are they important?
Having database migrations are important because they make sure anyone interacting with the database is on the same page, whether they’re working on a local database, test database, staging database, production, etc. Migrations can be part of the CI/CD process, as well.
What good is that for NoSQL?
If you’re not familiar with NoSQL, you might think that migrations wouldn’t make any sense. However, NoSQL databases (especially document databases), while flexible, are not devoid of structure. For instance, in place of Database/Schema/Table/Row, Couchbase has the concepts of Bucket/Scope/Collection/Document that roughly correspond.
It’s true that a NoSQL migration would not have as much predefined detail (there’s nowhere to specify column names and data types, for instance), but the benefits of migrations can still help developers working with Couchbase.
Introducing NoSqlMigrator for Couchbase
I’ve created a brand new project called NoSqlMigrator, to offer the same style of migration as Fluent Migrator.
Important notes:
-
This is not a fork or plugin of Fluent Migrator. It’s a completely separate project.
-
This is not an official Couchbase, Inc product. It’s just me creating it as an open source, community project.
-
It’s very much a WIP/alpha release. Please leave suggestions, criticisms, PRs, and issues!
Setting up migrations in C#
The process is very similar to Fluent Migrator.
-
Create a project that will contain your migration classes (you technically don’t have to, but I recommend it).
-
Add NoSqlMigrator from NuGet to that project.
-
Create classes that inherit from
Migratebase class. Define anUpandDown. Add aMigrationattribute and give it a number (typically sequential). -
When you’re ready to run migrations, you can use the CLI migration runner, available as a release on GitHub, or you can use the
MigrationRunnerclass, and run the migrations from whatever code you like. (I recommend the CLI).
Currently, NoSqlMigrator only supports Couchbase. Unlike the relational world, there is a lot of variance in structure and naming in the NoSQL world, so adding support for other NoSQL databases might be awkward (But I won’t rule that out for the far future).
Creating your first migration
Here’s an example of a migration that creates a scope and a collection (a bucket must already exist) when going "Up". When going down, the scope is deleted (along with any collections in it).
[Migration(1)]
public class Migration001_CreateInitialScopeAndCollection : Migrate
{
    public override void Up()
    {
        Create.Scope("myScope")
            .WithCollection("myCollection1");
    }

    public override void Down()
    {
        Delete.Scope("myScope");
    }
}
If you are new to migrations, the Down can sometimes be tricky. Not everything can be neatly "downed". However, I find that I tend to only use Down during development, and rarely does it execute in test/integration/production. But it is possible, so do your best when writing Down, but don’t sweat it if you can’t get it perfect.
Running the migration
Here’s an example of using the command line to run a migration:
> NoSqlMigrator.Runner.exe MyMigrations.dll couchbase://localhost Administrator password myBucketNameThat will run all the Up implementations (that haven’t already been run: it keeps track with a special document in Couchbase).
You can also specify a limit (e.g. run all migrations up to/down from #5) and you can specify a direction (up/down). Here’s an example of running Up (explicitly) with a limit of 5:
> NoSqlMigrator.Runner.exe MyMigrations.dll couchbase://localhost Administrator password myBucketName -l 5 -d UpMore features for NoSQL migrations
Here are all the commands currently available:
-
Create.Scope
-
Create.Collection
-
Create.Index
-
Delete.Scope
-
Delete.Collection
-
Delete.FromCollection
-
Delete.Index
-
Insert.IntoCollection
-
Execute.Sql
-
Update.Document
-
Update.Collection
I’m working on a few more, and I have some GitHub issues listing commands that I plan to add. But if you can think of any others, please create an issue!
Tips and Conclusion
Many of the Lessons learned still apply to NoSqlMigrator.
In that post, I mention Octopus, but imagine any CI/CD/deployment tool of your choice in its place (e.g. Jenkins, GitHub Actions, etc).
I think NoSqlMigrator can be a very handy tool for keeping databases in sync with your team, checking knowledge into source control, and providing a quick way to get a minimum database structure built, to make your day of coding a little easier.
Please give it a try in your own project! If you’ve not used Couchbase, check out a free trial of Couchbase Capella DBaaS.

Calvin Allen talks with me on a variety of topics. This episode is sponsored by Smartsheet.
Show Notes:
-
I think Calvin may have done some rebranding since we recorded. Check out CalvinAllen83 on Twitch.
-
Streaming services mentioned: Mixer, YouTube, and Twitch.
-
restream.io, which I’m now using for…
-
Couchbase Coding with Matt Groves, a show where I’m streaming daily.
-
Jeff Fritz’s live stream: Fritz and Friends
-
Visual Studio extensions by Mads Kristensen
-
Calvin’s Open in Notepad++ extension (GitHub), Couchbase extension on GitHub
-
I used the term MVP in this episode to mean Minimum Viable Product
-
SSL Labs rating
Want to be on the next episode? You can! All you need is the willingness to talk about something technical.
Music is by Joe Ferg, check out more music on JoeFerg.com!
This is a repost that originally appeared on the Couchbase Blog: New Querying Features in Couchbase Server 5.5.
New querying features figure prominently in the latest release of Couchbase Server 5.5. Check out the announcement and download the developer build for free right now.
In this post, I want to highlight a few of the new features and show you how to get started using them:
-
ANSI JOINs - N1QL in Couchbase already has JOIN, but now JOIN is more standards compliant and more flexible.
-
HASH joins - Performance on certain types of joins can be improved with a HASH join (in Enterprise Edition only)
-
Aggregate pushdowns - GROUP BY can be pushed down to the indexer, improving aggregation performance (in Enterprise Edition only)
All the examples in this post use the "travel-sample" bucket that comes with Couchbase.
ANSI JOINs
Until Couchbase Server 5.5, JOINs were possible, with two caveats:
-
One side of the JOIN has to be document key(s)
-
You must use the
ON KEYSsyntax
In Couchbase Server 5.5, it is no longer necessary to use ON KEYS, and so writing joins becomes much more natural and more in line with other SQL dialects.
Previous JOIN syntax
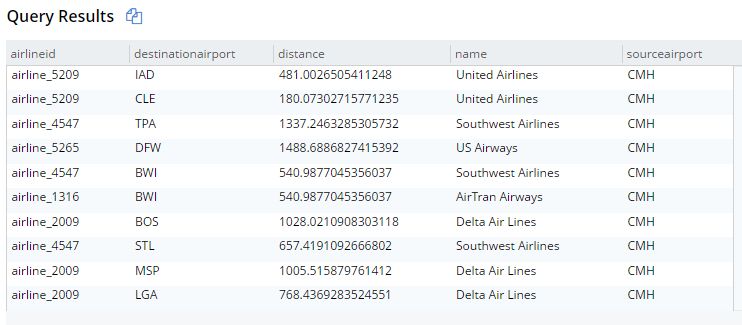
For example, here’s the old syntax:
SELECT r.destinationairport, r.sourceairport, r.distance, r.airlineid, a.name
FROM `travel-sample` r
JOIN `travel-sample` a ON KEYS r.airlineid
WHERE r.type = 'route'
AND r.sourceairport = 'CMH'
ORDER BY r.distance DESC
LIMIT 10;
This will get 10 routes that start at CMH airport, joined with their corresponding airline documents. The result are below (I’m showing them in table view, but it’s still JSON):
New JOIN syntax
And here’s the new syntax doing the same thing:
SELECT r.destinationairport, r.sourceairport, r.distance, r.airlineid, a.name
FROM `travel-sample` r
JOIN `travel-sample` a ON META(a).id = r.airlineid
WHERE r.type = 'route'
AND r.sourceairport = 'CMH'
ORDER BY r.distance DESC
LIMIT 10;
The only difference is the ON. Instead of ON KEYS, it’s now ON <field1> = <field2>. It’s more natural for those coming from a relational background (like myself).
But that’s not all. Now you are no longer limited to joining just on document keys. Here’s an example of a JOIN on a city field.
SELECT a.airportname, a.city AS airportCity, h.name AS hotelName, h.city AS hotelCity, h.address AS hotelAddress
FROM `travel-sample` a
INNER JOIN `travel-sample` h ON h.city = a.city
WHERE a.type = 'airport'
AND h.type = 'hotel'
LIMIT 10;
This query will show hotels that match airports based on their city.
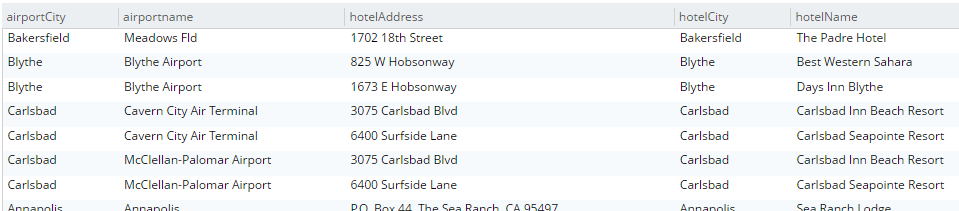
Note that for this to work, you must have an index created on the field that’s on the inner side of the JOIN. The "travel-sample" bucket already contains a predefined index on the city field. If I were to attempt it with other fields, I’d get an error message like "No index available for ANSI join term…".
For more information on ANSI JOIN, check out the full N1QL JOIN documentation.
Note: The old JOIN, ON KEYS syntax will still work, so don’t worry about having to update your old code.
Hash Joins
Under the covers, there are different ways that joins can be carried out. If you run the query above, Couchbase will use a Nested Loop (NL) approach to execute the join. However, you can also instruct Couchbase to use a hash join instead. A hash join can sometimes be more performant than a nested loop. Additionally, a hash join isn’t dependent on an index. It is, however, dependent on the join being an equality join only.
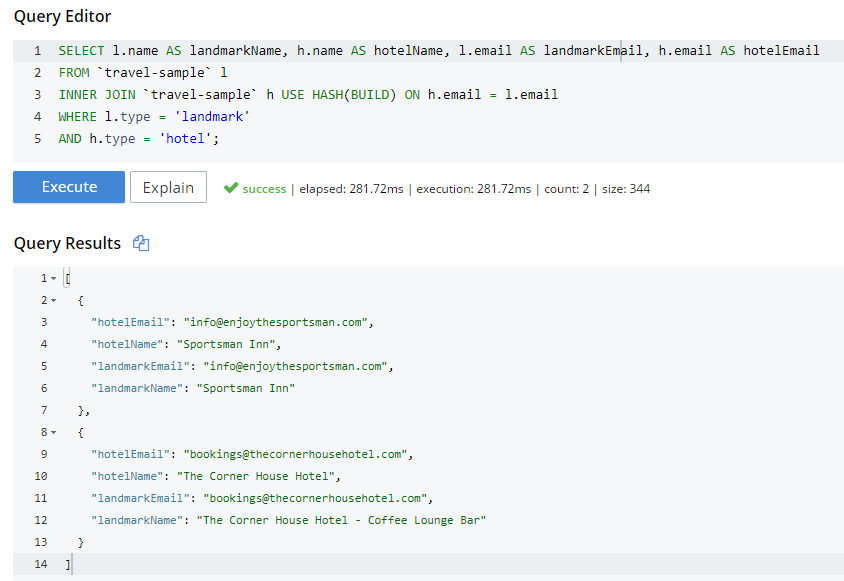
For instance, in "travel-sample", I could join landmarks to hotels on their email fields. This may not be the best find to find out if a hotel is a landmark, but since email is not indexed by default, it illustrates the point.
SELECT l.name AS landmarkName, h.name AS hotelName, l.email AS landmarkEmail, h.email AS hotelEmail
FROM `travel-sample` l
INNER JOIN `travel-sample` h ON h.email = l.email
WHERE l.type = 'landmark'
AND h.type = 'hotel';
The above query will take a very long time to run, and probably time out.
Syntax
Next I’ll try a hash join, which must be explicitly invoked with a USE HASH hint.
SELECT l.name AS landmarkName, h.name AS hotelName, l.email AS landmarkEmail, h.email AS hotelEmail
FROM `travel-sample` l
INNER JOIN `travel-sample` h USE HASH(BUILD) ON h.email = l.email
WHERE l.type = 'landmark'
AND h.type = 'hotel';
A hash join has two sides: a BUILD and a PROBE. The BUILD side of the join will be used to create an in-memory hash table. The PROBE side will use that table to find matches and perform the join. Typically, this means you want the BUILD side to be used on the smaller of the two sets. However, you can only supply one hash hint, and only to the right side of the join. So if you specify BUILD on the right side, then you are implicitly using PROBE on the left side (and vice versa).
BUILD and PROBE
So why did I use HASH(BUILD)?
I know from using INFER and/or Bucket Insights that landmarks make up roughly 10% of the data, and hotels make up about 3%. Also, I know from just trying it out that HASH(BUILD) was slightly slower. But in either case, the query execution time was milliseconds. Turns out there are two hotel-landmark pairs with the same email address.
USE HASH will tell Couchbase to attempt a hash join. If it cannot do so (or if you are using Couchbase Server Community Edition), it will fall back to a nested-loop. (By the way, you can explicitly specify nested-loop with the USE NL syntax, but currently there is no reason to do so).
For more information, check out the HASH join areas of the documentation.
Aggregate pushdowns
Aggregations in the past have been tricky when it comes to performance. With Couchbase Server 5.5, aggregate pushdowns are now supported for SUM, COUNT, MIN, MAX, and AVG.
In earlier versions of Couchbase, indexing was not used for statements involving GROUP BY. This could severely impact performance, because there is an extra "grouping" step that has to take place. In Couchbase Server 5.5, the index service can do the grouping/aggregation.
Example
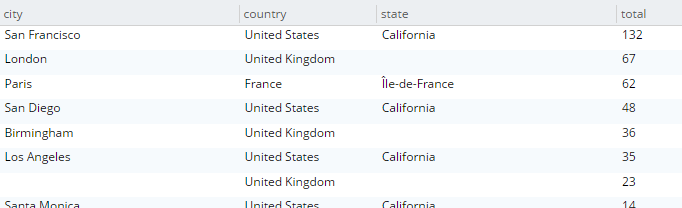
Here’s an example query that finds the total number of hotels, and groups them by country, state, and city.
SELECT country, state, city, COUNT(1) AS total
FROM `travel-sample`
WHERE type = 'hotel' and country is not null
GROUP BY country, state, city
ORDER BY COUNT(1) DESC;
The query will execute, and it will return as a result:
Let’s take a look at the visual query plan (only available in Enterprise Edition, but you can view the raw Plan Text in Community Edition).

Note that the only index being used is for the type field. The grouping step is doing the aggregation work. With the relatively small travel-sample data set, this query is taking around ~90ms on my single node desktop. But let’s see what happens if I add an index on the fields that I’m grouping by:
Indexing
CREATE INDEX ix_hotelregions ON `travel-sample` (country, state, city) WHERE type='hotel';Now, execute the above SELECT query again. It should return the same results. But:
-
It’s now taking ~7ms on my single node desktop. We’re taking ms, but with a large, more realistic data set, that is a huge difference in magnitude.
-
The query plan is different.

Note that this time, there is no 'group' step. All the work is being pushed down to the index service, which can use the ix_hotelregions index. It can use this index because my query is exactly matching the fields in the index.
Index push down does not always happen: your query has to meet specific conditions. For more information, check out the GROUP BY and Aggregate Performance areas of the documentation.
Summary
With Couchbase Server 5.5, N1QL includes even more standards-compliant syntax and becomes more performant than ever.
Try out N1QL today. You can install Enterprise Edition or try out N1QL right in your browser.
Have a question for me? I’m on Twitter @mgroves. You can also check out @N1QL on Twitter. The N1QL Forum is a good place to go if you have in-depth questions about N1QL.
This is a repost that originally appeared on the Couchbase Blog: Alexa Skills with Azure Functions and Couchbase.
Alexa Skills are the "apps" that you can build to run on Amazon devices like the Echo, Echo Dot, etc. In this blog post, you’ll learn how to build an Alexa skill using serverless Azure Functions and a Couchbase backend running on Azure. This post builds on a lot of blog posts I’ve written about Azure Functions, Serverless, and Couchbase on Azure in the past:
-
Serverless Architecture with Cloud Computing - What is serverless?
-
Azure Functions and Lazy Initialization with Couchbase Server - Recommendations when using Couchbase and Azure Functions together
-
Chatbot on Azure and Couchbase for Viber - A use case similar to an Alexa skill
-
Azure: Getting Started is Easy and Free - How to use the Azure Marketplace to easily create a Couchbase Cluster
What kind of Alexa skills am I building?
I work as a Developer Advocate, which means I often spend time at sponsor booths at developer events. I love doing this: I get to tell people how great Couchbase is, and I often get feedback from developers about what problems they’re trying to solve with Couchbase.
If there’s one thing I don’t like about working a booth, though, it’s repetition. I often get asked the same set of questions hundreds of times per events:
-
What is Couchbase? (distributed NoSQL document database with a memory first architecture)
-
How is Couchbase different than MongoDB? (they are both document databases, but Couchbase has major feature and architectural differences)
-
Is Couchbase the same thing as CouchDB? (No.)
I’m not complaining, mind you. It’s just that it’s hard to be enthusiastic when answering the question for the 100th time as the conference is about to close down.
But you know who is always enthusiastic? Alexa! So, if I bring my Echo Dot to the next event, maybe she can help me:
-
What is Couchbase? - Alexa will say a random interesting fact about Couchbase
-
How is Couchbase different than MongoDB? Alexa will say a random architectural or feature difference.
-
Is Couchbase the same thing as CouchDB? Alexa will say "no".
If these Alexa skills turn out to be helpful, I can expand the skills later to answer more complex questions.
If you want to follow along with this post and create your own Alexa skills, the full source code is available on Github.
Design
Alexa skills are registered with Amazon. For the most part, they make simple HTTP requests to the endpoint that you designate and expect a certain JSON response. Azure Functions can process HTTP requests. The Azure Functions can make queries out to a database full of responses, and can also keep track of how many times each response has been given.
Below is a high-level architectural diagram of my minimum viable Alexa skills project:

Data storage and design
The skill is going to ultimately query some data from Couchbase Server. I’ll start with 2 different kinds of documents. (If these Alexa skills turn out to be useful, I’ll add more complex stuff later).
Document design
Each document represents a possible response. Each will have 3 fields:
-
type- This will be either "mongodbcomparison" or "whatiscouchbase". -
number- The number of times this response has been used (starting at 0). -
text- The text that I want the Alexa skills to say.
The document key design of these documents is not important (at least not yet), since I’ll be using only N1QL (SQL for JSON) queries to retrieve them. However, I’ve decided to create keys like "mongo::2" and "couchbase::5".
To start, I will store this data in a single Couchbase node on a low cost Azure VM. A single node with a small amount of data should be able to handle even heavy booth traffic no problem. But if, for instance, I were to install these as kiosks in airports around the world I will definitely need to scale up my Couchbase cluster. Couchbase and Azure makes this easy.
Query design
To get a random document, I need to run a N1QL query:
SELECT m.*, META(m).id
FROM boothduty m
WHERE m.type = 'mongodbcomparison'
ORDER BY UUID()
LIMIT 1;
UUID is functioning as a random number generator. That’s not really what it’s for, but it’s "good enough". If I really needed true randomness, I could make a curl request in N1QL to random.org’s API.
To run that query, I need to create an index for the 'type' field:
CREATE INDEX ix_type ON boothduty(type);Azure Functions
To create an Azure Function, I used an existing .NET library called AlexaSkills.NET, which makes it very easy to write the code you need to create Alexa skills.
After creating my Azure Functions solution, I added it with NuGet.
Using AlexaSkills.NET
Next, I created a "speechlet" class. I chose to make my speechlet asynchronous, but a synchronous option exists as well. There are four methods that need to be created. I only really need two of them for the skill at this point.
    public class BoothDutySpeechlet : SpeechletBase, ISpeechletWithContextAsync
    {
        public async Task<SpeechletResponse> OnIntentAsync(IntentRequest intentRequest, Session session, Context context)
        {
            try
            {
                var intentName = intentRequest.Intent.Name;
                var intentProcessor = IntentProcessor.Create(intentName);
                return await intentProcessor.Execute(intentRequest);
            }
            catch (Exception ex)
            {
                var resp = new SpeechletResponse();
                resp.ShouldEndSession = false;
                resp.OutputSpeech = new PlainTextOutputSpeech() { Text = ex.Message };
                return await Task.FromResult(resp);
            }
        }

        public Task<SpeechletResponse> OnLaunchAsync(LaunchRequest launchRequest, Session session, Context context)
        {
            var resp = new SpeechletResponse();
            resp.ShouldEndSession = false;
            resp.OutputSpeech = new PlainTextOutputSpeech() { Text = "Welcome to the Couchbase booth. Ask me about Couchbase." };
            return Task.FromResult(resp);
        }

        public Task OnSessionStartedAsync(SessionStartedRequest sessionStartedRequest, Session session, Context context)
        {
            return Task.Delay(0); // nothing to do (yet)
        }

        public Task OnSessionEndedAsync(SessionEndedRequest sessionEndedRequest, Session session, Context context)
        {
            return Task.Delay(0); // nothing to do (yet)
        }

        // I only need to use this when I'm testing locally
//        public override bool OnRequestValidation(SpeechletRequestValidationResult result, DateTime referenceTimeUtc,
//            SpeechletRequestEnvelope requestEnvelope)
//        {
//            return true;
//        }
    }
The OnLaunchAsync is the first thing that an Echo user will reach. The user will say something like "Alexa, open Matt’s booth helper", and this code will respond with some basic instructions.
The OnIntentAsync is where most of the Alexa skills request will be processed. I’m using a factory/strategy code pattern here to instantiate a different object depending on which intent is being invoked (more on "intents" later).
public static IIntentProcessor Create(string intentName = "FallbackIntent")
{
    switch (intentName)
    {
        case "MongodbComparisonIntent":
            return new MongoDbComparisonIntentProcessor(CouchbaseBucket.GetBucket());
        case "WhatIsCouchbaseIntent":
            return new WhatIsCouchbaseIntentProcessor(CouchbaseBucket.GetBucket());
        case "CouchDbIntent":
            return new CouchDbIntentProcessor();
        case "FallbackIntent":
            return new FallbackIntentProcessor();
        default:
            return new FallbackIntentProcessor();
    }
}
Connecting to Couchbase
CouchbaseBucket.GetBucket() is using Lazy behind the scenes as outlined in my earlier blog post on Azure Functions.
So, whenever a 'What is Couchbase' intent comes in, a WhatIsCouchbaseIntentProcessor is instantiated and executed.
public class WhatIsCouchbaseIntentProcessor : BaseIntentProcessor
{
    private readonly IBucket _bucket;

    public WhatIsCouchbaseIntentProcessor(IBucket bucket)
    {
        _bucket = bucket;
    }

    public override async Task<SpeechletResponse> Execute(IntentRequest intentRequest)
    {
        // get random fact from bucket
        var n1ql = @"select m.*, meta(m).id
                        from boothduty m
                        where m.type = 'whatiscouchbase'
                        order by `number`, uuid()
                        limit 1;";
        var query = QueryRequest.Create(n1ql);
        var result = await _bucket.QueryAsync<BoothFact>(query);
        if (result == null || !result.Rows.Any())
            return await CreateErrorResponseAsync();
        var fact = result.First();

        // increment fact count
        await _bucket.MutateIn<dynamic>(fact.Id)
            .Counter("number", 1)
            .ExecuteAsync();

        // return text of fact
        return await CreatePlainTextSpeechletReponseAsync(fact.Text);
    }
}
Note the use of the N1QL query that was mentioned earlier (slightly tweaked so that facts with lower numbers will be given priority). This code is also using the Couchbase subdocument API to increment the "number" field by 1.
You can view the full code of the other intent processors on Github, but they are very similar (just with slightly different N1QL).
Connecting to Azure Functions
Finally, once my speechlet is ready, it’s easy to wire up to an Azure Function.
public static class BoothDuty
{
    [FunctionName("BoothDuty")]
    public static async Task<HttpResponseMessage> Run([HttpTrigger(AuthorizationLevel.Anonymous, "get", "post", Route = null)]HttpRequestMessage req, TraceWriter log)
    {
        var speechlet = new BoothDutySpeechlet();
        return await speechlet.GetResponseAsync(req);
    }
}
You can now test this locally with Postman, or with the Alexa interface once you deploy to azure.
Creating the Alexa skills
I won’t go through the whole process, since there’s plenty of documentation on how to setup Alexa skills. I think I have more work to do before my skill is officially certified, but it’s good enough for beta testing.
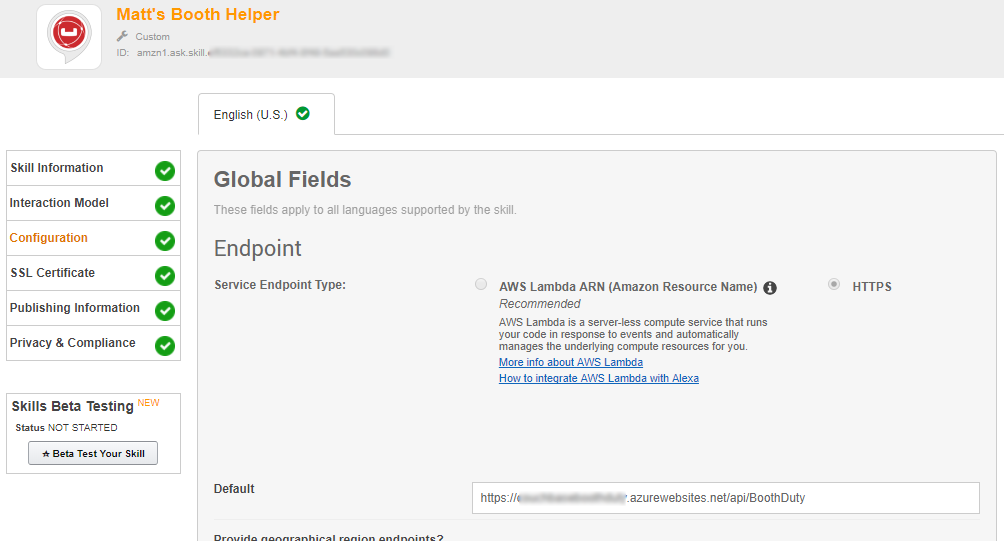
Once you have the Azure Functions URL, you’ll use that with Alexa. Alexa requires skills to use HTTPS, but fortunately Azure Functions come with HTTPS on a azurewebsites.net subdomain. Here’s a screenshot:
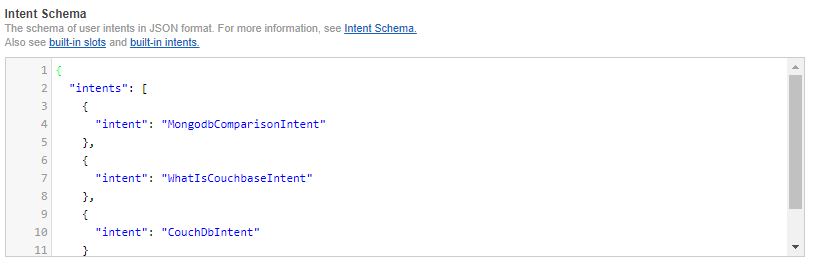
I mentioned "intents" earlier. These are various types of actions that Alexa skills can process, along with their inputs. Think of these like function signatures. Currently, I have designed 3 intents, and I have no parameters on these (yet). So my intent schema is a very simple piece of JSON:
For each intent, you can create "utterances" that map to the intents. These are the phrases that an Echo user will speak, and which intent they correspond to.
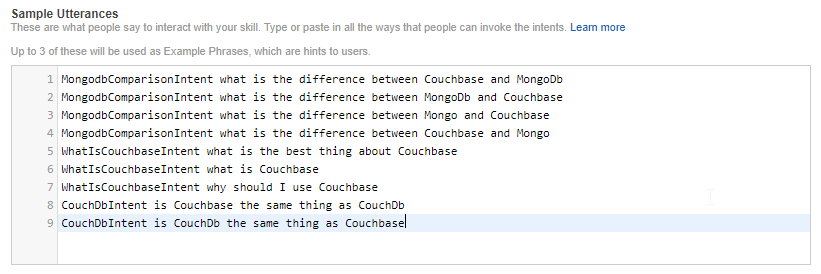
I’ve tried to think of all the different variations. But if I really wanted this to work more generally, I would setup parameters so that a user could ask the question "What is the difference between Couchbase and {x}".
Echo Dot in action
I did not publish this on the Alexa store. I did deploy it as a "beta test", so if you want to try it out, I’d be happy to send you an invitation to get it.
Here’s a video of my trying it out on my Echo Dot (which was a speaker gift last year from the fine people at DevNexus):
Will this actually work at a noisy booth? Well, let’s just say I’m not ready to bring an easy chair and pillow to the booth just yet. But it’s a fun way to demonstrate the power of Couchbase as an engagement database.
Summary
Alexa skills are a great place to use serverless architecture like Azure Functions. The skills will be used intermittently, and Azure Functions will only bill you for the time they are executed.
Couchbase Server again makes a great database for such an app. It can start out small to handle a single booth, but it can scale easily to accommodate larger demand.
Have a question about Couchbase? Visit the Couchbase forums.
Have a question for me? Find me on Twitter @mgroves.
Be sure to check out all the great documentation from Microsoft on Azure Functions, and the documentation on the Alexa Skills .NET library.
