key - invoice::1
{ "BillTo": "Lynn Hess", "InvoiceDate": "2018-01-15 00:00:00.000", "InvoiceNum": "ABC123", "ShipTo": "Herman Trisler, 4189 Oak Drive" }

key - invoiceitem::1811cfcc-05b6-4ace-a52a-be3aad24dc52
{ "InvoiceId": "1", "Price": "1000.00", "Product": "Brake Pad", "Quantity": "24" }

key - invoiceitem::29109f4a-761f-49a6-9b0d-f448627d7148
{ "InvoiceId": "1", "Price": "10.00", "Product": "Steering Wheel", "Quantity": "5" }

key - invoiceitem::bf9d3256-9c8a-4378-877d-2a563b163d45
{ "InvoiceId": "1", "Price": "20.00", "Product": "Tire", "Quantity": "2" }Posts tagged with 'Couchbase'
This is a repost that originally appeared on the Couchbase Blog: Proof of Concept: Making a case to move from relational.
Proof of concept may be just what you need to start when you’re evaluating Couchbase.
We’ve been blogging a lot about the technical side of moving from a relational database like Oracle or SQL Server to Couchbase. Here are some of the resources and posts we’ve published:
But for this post, we’re going to talk more about the overall process instead of the technical details. You’ll see five steps to creating a successful proof of concept. And if you ever need help getting started, you can talk to a Couchbase Solutions Engineer.
Proof of Concept steps
These steps are not just for migrating an existing application to Couchbase, they also work just as well for creating a brand new "greenfield" application with Couchbase, or even augmenting an existing database (as opposed to replacing it completely).
When creating a Proof of Concept, it’s a good idea to keep the scope as small and simple as possible. Some questions to ask:
-
Will it prove/disprove what you need it to, and help you move to the next step?
-
Can this be accomplished fairly quickly? If it takes too long or isn’t a priority, it might fizzle out.
-
Ask a Couchbase technical team member: is this a good fit for Couchbase? You can draw on their experience to save yourself some heartburn.
Select a use case and application
When I talk to people about Couchbase and NoSQL, I tell them the only thing worse than not using Couchbase is using Couchbase for the wrong thing and becoming soured on document databases.
"Different isn't always better, but better is always different." - Author Unknown
— Programming Wisdom (@CodeWisdom) May 16, 2017
The benefits of a distributed database like Couchbase are:
-
Better performance
-
Better scalability
-
Higher availability
-
Greater data agility/flexibility
-
Improved operational management
If your application can benefit from one of those characteristics, it’s worth checking out Couchbase. Couchbase may not be the best fit if you need multi-document transactions. But as I showed in my post on data modeling, if you can nest data instead of scattering it in pieces, you may not need multi-document transactions as much as you think.
Further, conversations with Couchbase customers have lead us to identify the need beyond a traditional database to power interactions. Marriott calls this the "look-to-book" ratio.

If you’re in a situation where you need to record transactions in your traditional database, but you want a low-latency, flexible, scalable database to power all the interactions leading up to it, Couchbase might be the right fit for you.
Some use cases that Couchbase has been a great fit for include:
-
Product Catalog (Customer spotlight: Tesco)
-
Asset Tracking
-
Content Management (Customer spotlight: replacing SQL Server with Couchbase for content management)
-
Application Configuration
-
Customer Management (Customer spotlight: DirecTV)
-
File or Streaming Metadata Service
-
And many more: check out our whitepaper on top 10 enterprise use cases for NoSQL
Define the success criteria
Once you’ve decided that you have a use case that would be good for Couchbase, you need to define what it means for a proof of concept to be successful.
Examples of criteria:
-
Performance/latency improvements - This might boil down to a number, like "5ms latency in the 95th percentile".
-
Ease of scaling - How easy is it to scale now? How much time does it take a person? How many 2am Saturdays do you need to work to do upgrades?
-
Faster development cycles - Does schema management eat up a lot of time in your sprints? A proof of concept with Couchbase can help to demonstrate if a flexible model is going to save you time.
-
Maintenence and costs
"The most important single aspect of software development is to be clear about what you are trying to build." - Bjarne Stroustrup
— Programming Wisdom (@CodeWisdom) May 6, 2016
Whatever the criteria, it’s good to define it at the beginning, so you can work towards trying to achieve that. A vague goal like "I just want to play around with NoSQL" is fine for an individual developer, but a well-defined success criteria is going to be critical for convincing decision makers.
Understand your data
As I covered in the JSON data modeling post, it’s important for you to understand your data before you even start writing any code. You need to understand what you are going to model and how your application needs to function.
Migrating from a relational to a document database is not going to be a purely mechanical exercise. If you plan to migrate data, it’s better to start by thinking about how it would look independent of how it’s currently stored. Draw out a concept of it on a whiteboard without using "tables" or "documents".
"Weeks of coding can save you hours of planning." - Unknown
— Programming Wisdom (@CodeWisdom) August 22, 2017
Identify the access patterns
I also covered this in my JSON data modeling post. Couchbase is very flexible in the way that it can store data. But, data access is also flexible. The design of your model should take that into account.
"Figure out your data structures, and the code will follow." - William Laeder
— Programming Wisdom (@CodeWisdom) January 24, 2018
In that blog post, I layed out some rules of thumb for nested/seperate documents. At a higher level, you can start with thinking about data access like this:
-
Key/value - The ability to get/change a document based on its key. This is the fastest, lowest latency method available in Couchbase.
-
N1QL query - N1QL is SQL for JSON data, available in Couchbase. It can query data just about any way you can imagine. Most importantly, you can query data based on something other than its key.
-
Full Text Search - When you need to query based on text in a language aware way. Great for user driven searches, for instance.
-
Map/Reduce - Writing a pure function to calculate query results ahead of time. N1QL is taking a lot of the workload away from M/R, but it’s still good for some specialized types of aggregation.
-
Geospatial - Querying of documents based on some geographical/location based information.
-
Analytics/reporting - Couchbase Analytics (currently in preview) can give you heavily indexed non-operational access to your data. You can run complex reports without impacting day-to-day users.
Review the architecure
At the end of your proof of concept, you can measure your results against the criteria that you created at the very beginning.
It might be a good idea to iterate on this proof on concept: you can apply what you’ve leaned in each subsequent iteration. If you keep the iterations short, you can learn what you’ve applied faster. This isn’t just true of Couchbase, by the way, but anything!
"When to use iterative development? You should use iterative development only on projects that you want to succeed." - Martin Fowler
— Programming Wisdom (@CodeWisdom) November 22, 2017
Finally, if your proof of concept is a success (and I know it will be), then it’s time to prepare for production. Take the time to review the architecture, the decisions you’ve made, what worked well, what didn’t work well, and so on. The more you document, the better off the rest of your team and organization will be on the next project.
Summary
Creating a proof of concept with these five steps will help make you successful! All that’s left to do is get started:
-
Download Couchbase Server and try it out today.
-
Post your questions into the Couchbase forum
-
Check out Couchbase’s free online training
-
Contact a Solutions Engineer for resources and help
-
Contact me on Twitter @mgroves if you have any questions or comments (or leave a comment below).
This is a repost that originally appeared on the Couchbase Blog: JSON Data Modeling for RDBMS Users.
JSON data modeling is a vital part of using a document database like Couchbase. Beyond understanding the basics of JSON, there are two key approaches to modeling relationships between data that will be covered in this blog post.
The examples in this post will build on the invoices example that I showed in CSV tooling for migrating to Couchbase from Relational.
Imported Data Refresher
In the previous example, I started with two tables from a relational database: Invoices and InvoicesItems. Each invoice item belongs to an invoice, which is done with a foreign key in a relational database.
I did a very straightforward (naive) import of this data into Couchbase. Each row became a document in a "staging" bucket.
Next, we must decide if that JSON data modeling design is appropriate or not (I don’t think it is, as if the bucket being called "staging" didn’t already give that away).
Two Approaches to JSON data modeling of relationships
With a relational database, there is really only one approach: normalize your data. This means separate tables with foreign keys linking the data together.
With a document database, there are two approaches. You can keep the data normalized or you can denormalize data by nesting it into its parent document.
Normalized (separate documents)
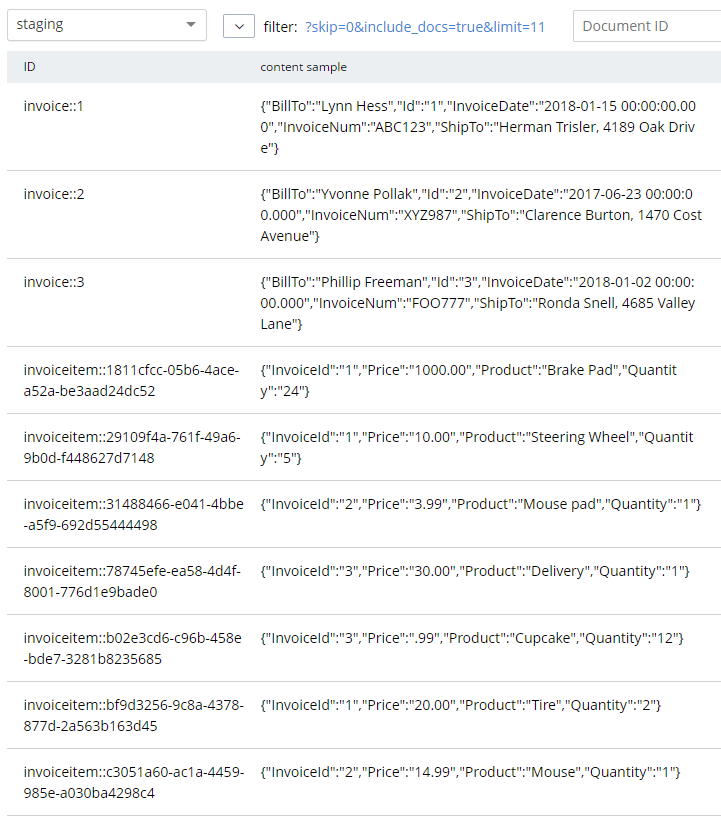
An example of the end state of the normalized approach represents a single invoice spread over multiple documents:
This lines up with the direct CSV import. The InvoiceId field in each invoiceitem document is similar to the idea of a foreign key, but note that Couchbase (and distributed document databases in general) do not enforce this relationship in the same way that relational databases do. This is a trade-off made to satisfy the flexibility, scalability, and performance needs of a distributed system.
Note that in this example, the "child" documents point to the parent via InvoiceId. But it could also be the other way around: the "parent" document could contain an array of the keys of each "child" document.
Denormalized (nested)
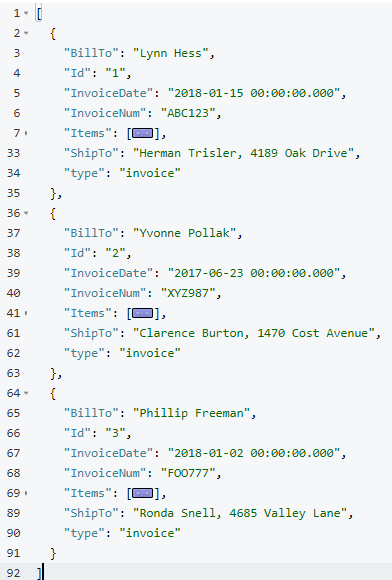
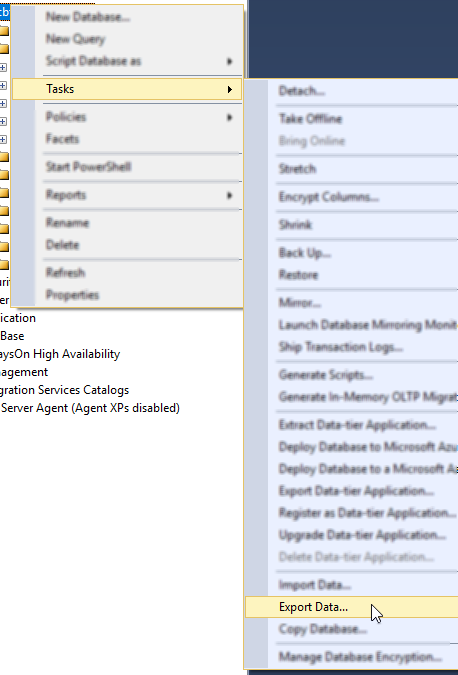
The end state of the nested approach would involve just a single document to represent an invoice.
key - invoice::1
{
  "BillTo": "Lynn Hess",
  "InvoiceDate": "2018-01-15 00:00:00.000",
  "InvoiceNum": "ABC123",
  "ShipTo": "Herman Trisler, 4189 Oak Drive",
  "Items": [
    { "Price": "1000.00", "Product": "Brake Pad", "Quantity": "24" },
    { "Price": "10.00", "Product": "Steering Wheel", "Quantity": "5" },
    { "Price": "20.00", "Product": "Tire", "Quantity": "2" }
  ]
}
Note that "InvoiceId" is no longer present in the objects in the Items array. This data is no longer foreign—it’s now domestic—so that field is not necessary anymore.
JSON Data Modeling Rules of Thumb
You may already be thinking that the second option is a natural fit in this case. An invoice in this system is a natural aggregate-root. However, it is not always straightforward and obvious when and how to choose between these two approaches in your application.
Here are some rules of thumb for when to choose each model:
| If … | Then consider… |
|---|---|
|
Relationship is 1-to-1 or 1-to-many |
Nested objects |
|
Relationship is many-to-1 or many-to-many |
Separate documents |
|
Data reads are mostly parent fields |
Separate document |
|
Data reads are mostly parent + child fields |
Nested objects |
|
Data reads are mostly parent or child (not both) |
Separate documents |
|
Data writes are mostly parent and child (both) |
Nested objects |
Modeling example
To explore this deeper, let’s make some assumptions about the invoice system we’re building.
-
A user usually views the entire invoice (including the invoice items)
-
When a user creates an invoice (or makes changes), they are updating both the "root" fields and the "items" together
-
There are some queries (but not many) in the system that only care about the invoice root data and ignore the "items" fields
Then, based on that knowledge, we know that:
-
The relationship is 1-to-many (a single invoice has many items)
-
Data reads are mostly parent + child fields together
Therefore, "nested objects" seems like the right design.
Please remember that these are not hard and fast rules that will always apply. They are simply guidelines to help you get started. The only "best practice" is to use your own knowledge and experience.
Transforming staging data with N1QL
Now that we’ve done some JSON Data Modeling exercises, it’s time to transform the data in the staging bucket from separate documents that came directly from the relational database to the nested object design.
There are many approaches to this, but I’m going to keep it very simple and use Couchbase’s powerful N1QL language to run SQL queries on JSON data.
Preparing the data
First, create a "operation" bucket. I’m going to transform data and move it to from the "staging" bucket (containing the direct CSV import) to the "operation" bucket.
Next, I’m going to mark the 'root' documents with a "type" field. This is a way to mark documents as being of a certain type, and will come in handy later.
UPDATE staging
SET type = 'invoice'
WHERE InvoiceNum IS NOT MISSING;
I know that the root documents have a field called "InvoiceNum" and that the items do not have this field. So this is a safe way to differentiate.
Next, I need to modify the items. They previously had a foreign key that was just a number. Now those values should be updated to point to the new document key.
UPDATE staging s
SET s.InvoiceId = 'invoice::' || s.InvoiceId;
This is just prepending "invoice::" to the value. Note that the root documents don’t have an InvoiceId field, so they will be unaffected by this query.
After this, I need to create an index on that field.
Preparing an index
CREATE INDEX ix_invoiceid ON staging(InvoiceId);This index will be necessary for the transformational join coming up next.
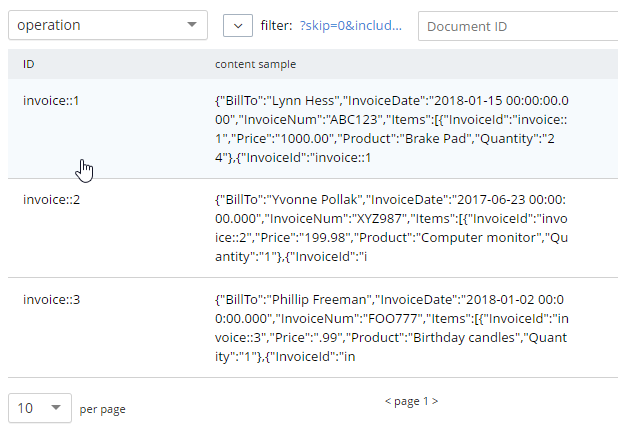
Now, before making this data operational, let’s run a SELECT to get a preview and make sure the data is going to join together how we expect. Use N1QL’s NEST operation:
SELECT i.*, t AS Items
FROM staging AS i
NEST staging AS t ON KEY t.InvoiceId FOR i
WHERE i.type = 'invoice';
The result of this query should be three total root invoice documents.
The invoice items should now be nested into an "Items" array within their parent invoice (I collapsed them in the above screenshot for the sake of brevity).
Moving the data out of staging
Once you’ve verified this looks correct, the data can be moved over to the "operation" bucket using an INSERT command, which will just be a slight variation on the above SELECT command.
INSERT INTO operation (KEY k, VALUE v)
SELECT META(i).id AS k, { i.BillTo, i.InvoiceDate, i.InvoiceNum, "Items": t } AS v
FROM staging i
NEST staging t ON KEY t.InvoiceId FOR i
where i.type = 'invoice';
If you’re new to N1QL, there’s a couple things to point out here:
-
INSERTwill always useKEYandVALUE. You don’t list all the fields in this clause, like you would in a relational database. -
META(i).idis a way of accessing a document’s key -
The literal JSON syntax being SELECTed AS v is a way to specify which fields you want to move over. Wildcards could be used here.
-
NESTis a type of join that will nest the data into an array instead of at the root level. -
FOR ispecifies the left hand side of theON KEYjoin. This syntax is probably the most non-standard portion of N1QL, but the next major release of Couchbase Server will include "ANSI JOIN" functionality that will be a lot more natural to read and write.
After running this query, you should have 3 total documents in your 'operation' bucket representing 3 invoices.
You can delete/flush the staging bucket since it now contains stale data. Or you can keep it around for more experimentation.
Summary
Migrating data straight over to Couchbase Server can be as easy as importing via CSV and transforming with a few lines of N1QL. Doing the actual modeling and making decisions requires the most time and thought. Once you decide how to model, N1QL gives you the flexibility to transform from flat, scattered relational data into an aggregate-oriented document model.
More resources:
-
Using Hackolade to collaborate on JSON data modeling.
-
Part of the SQL Server series discusses the same type of JSON data modeling decisions
-
How Couchbase Beats Oracle, if you’re considering moving some of your data away from Oracle
-
Moving from Relational to NoSQL: How to Get Started white paper.
Feel free to contact me if you have any questions or need help. I’m @mgroves on Twitter. You can also ask questions on the Couchbase Forums. There are N1QL experts there who are very responsive and can help you write the N1QL to accommodate your JSON data modeling.
This is a repost that originally appeared on the Couchbase Blog: CSV tooling for migrating to Couchbase from Relational.
CSV (Comma-seperated values) is a file format that can be exported from a relational database (like Oracle or SQL Server). It can then be imported into Couchbase Server with the cbimport utility.
Note: cbimport comes with Couchbase Enterprise Edition. For Couchbase Community Edition, you can use the more limited cbtransfer tool or go with cbdocloader if JSON is an option.
A straight relational→CSV→Couchbase ETL probably isn’t going to be the complete solution for data migration. In a later post, I’ll write about data modeling decisions that you’ll have to consider. But it’s a starting point: consider this data as "staged".
Note: for this post, I’m using SQL Server and a Couchbase Server cluster, both installed locally. The steps will be similar for SQL Server, Oracle, MySQL, PostgreSQL, etc.
Export to CSV
The first thing you need to do is export to CSV. I have a relational database with two tables: Invoices and InvoiceItems.
I’m going to export the data from these two tables into two CSV files. With SQL Server Management Studio, this can be done a number of different ways. You can use sqlcmd or bcp at the command line. Or you can use Powershell’s Invoke-Sqlcmd and pipe it through Export-Csv. You can also use the SQL Server Management Studio UI.
Other relational databases will have command line utilities, UI tools, etc to export CSV.
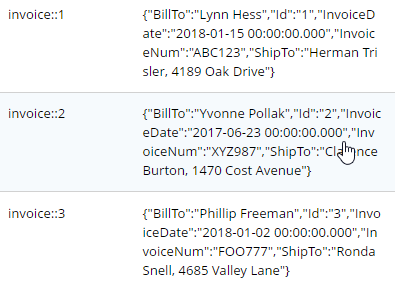
Here is an example of a CSV export from a table called "Invoices":
Id,InvoiceNum,InvoiceDate,BillTo,ShipTo
1,ABC123,2018-01-15 00:00:00.000,Lynn Hess,"Herman Trisler, 4189 Oak Drive"
2,XYZ987,2017-06-23 00:00:00.000,Yvonne Pollak,"Clarence Burton, 1470 Cost Avenue"
3,FOO777,2018-01-02 00:00:00.000,Phillip Freeman,"Ronda Snell, 4685 Valley Lane"
Here’s an export from a related table called "InvoiceItems":
InvoiceId,Product,Quantity,Price
1,Tire,2,20.00
1,Steering Wheel,5,10.00
1,Engine Oil,10,15.00
1,Brake Pad,24,1000.00
2,Mouse pad,1,3.99
2,Mouse,1,14.99
2,Computer monitor,1,199.98
3,Cupcake,12,.99
3,Birthday candles,1,.99
3,Delivery,1,30.00
Load CSV into Couchbase
Let’s import these into a Couchbase bucket. I’ll assume you’ve already created an empty bucket named "staging".
First, let’s import invoices.csv.
Loading invoices
C:\Program Files\Couchbase\Server\bin\cbimport csv -c localhost -u Administrator -p password -b staging -d file://invoices.csv --generate-key invoice::%Id%Note: with Linux/Mac, instead of C:\Program Files\Couchbase\Server\bin, the path will be different.
Let’s break this down:
-
cbimport: This is the command line utility you’re using
-
csv: We’re importing from a CSV file. You can also import from JSON files.
-
-c localhost: The location of your Couchbase Server cluster.
-
-u Administrator -p password: Credentials for your cluster. Hopefully you have more secure credentials than this example!
-
-b staging: The name of the Couchbase bucket you want the data to end up in
-
--generate-key invoice::%Id% The template that will be used to create unique keys in Couchbase. Each line of the CSV will correspond to a single document. Each document needs a unique key. I decided to use the primary key (integer) with a prefix indicating that it’s an invoice document.
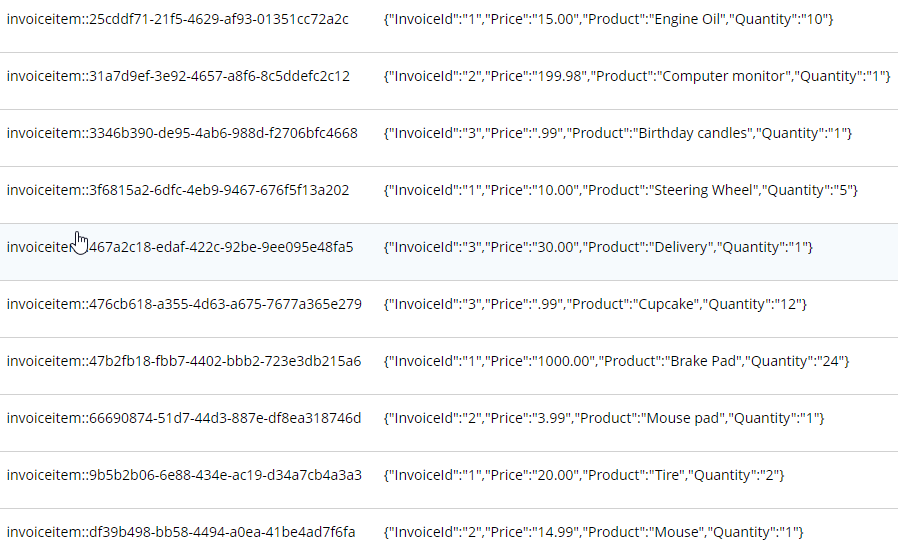
The end result of importing a 3 line file is 3 documents:
At this point, the staging bucket only contains invoice documents, so you may want to perform transformations now. I may do this in later modeling examples, but for now let’s move on to the next file.
Loading invoice items
C:\Program Files\Couchbase\Server\bin\cbimport csv -c localhost -u Administrator -p password -b staging -d file://invoice_items.csv --generate-key invoiceitem::#UUID#This is nearly identical to the last import. One difference is that it’s a new file (invoice_items.csv). But the most important difference is --generate—key. These records only contain foreign keys, but each document in Couchbase must have a unique key. Ultimately, we may decide to embed these records into their parent Invoice documents. But for now I decided to use UUID to generate unique keys for the records.
The end result of importing this 10 line file is 10 more documents:
What’s next?
Once you have a CSV file, it’s very easy to get data into Couchbase. However, this sort of direct translation is often not going to be enough on its own. I’ve explored some aspects of data modeling in a previous blog post on migrating from SQL Server, but I will revisit this Invoices example in a refresher blog post soon.
In the meantime, be sure to check out How Couchbase Beats Oracle for more information on why companies are replacing Oracle for certain use cases. And also take a look at the Moving from Relational to NoSQL: How to Get Started white paper.
If you have any questions or comments, please feel free to leave them here, contact me on Twitter @mgroves, or ask your question in the Couchbase Forums.
This is a repost that originally appeared on the Couchbase Blog: Test Drive: Trying Couchbase on Azure for Free.
Test Drive is an Azure feature that allows you to try out software in the cloud for free.
Previously, I wrote about how Getting started with Couchbase on Azure is easy and free. That post told you how to get started with $200 in Azure credit. With Test Drive, however, it’s even easier to get started, and you don’t have to use any of that $200 credit.
Test Drive on Azure Marketplace
The only thing you need before you start is a Microsoft account, which is free.
Start by going to the Couchbase Enterprise product page on Azure.
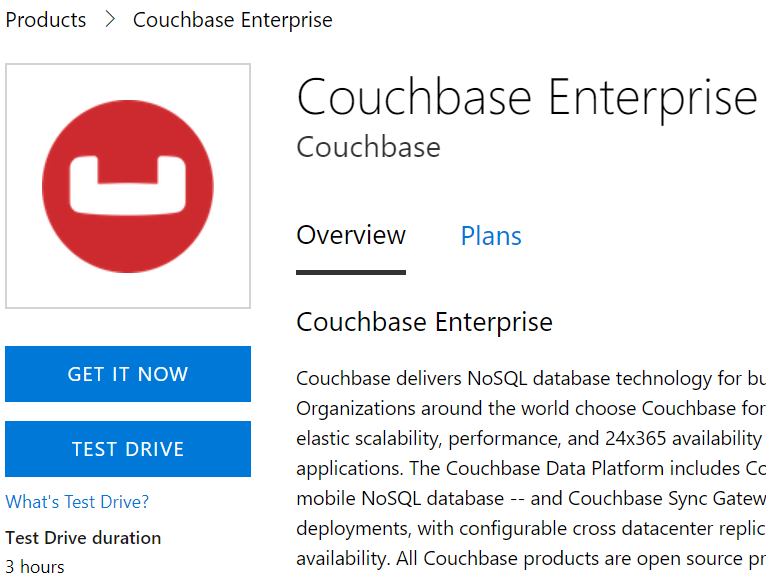
There’s a big "Test Drive" button. Simply click to get started.
Before you click to get started, notice that the Test Drive has a limited duration. You will get 3 hours to evaluate Couchbase Server.
Step by Step Evaluation Labs
We’ve prepared 4 step-by-step labs that you can follow to start evaluating Couchbase Server.
The test drive deployment is a fully functional Couchbase Server Enterprise cluster with all features enabled. The only limit you have is time.
Summary
Couchbase is proud to partner with Microsoft to make this test drive available to you.
If you are interested in learning more about Couchbase on Azure, please check out these other blog posts:
If you have any questions, comments, or suggestions, please leave a comment, email me [email protected], or tweet me @mgroves on Twitter.
This has been a good year for Cross Cutting Concerns. I had some amazing guests on the podcast. The C# Advent was also way more successful than I anticipated. And I also made some important technical improvements to the site.
Google Analytics
I pulled the top 50 most viewed page from Google Analytics. The top 10 pages that were viewed the most this year are listed below. The C# Advent page got over double the views of the second place page. (The second place page is a post from 2014 on ASP Classic that baffles me with the amount of traffic it gets).
| Page | Pageviews |
|---|---|
| The First C# Advent Calendar (2017) | 5503 |
| Using HTTP/Json endpoints in ASP Classic (2014) | 2413 |
| Command/Query Object pattern (2014) | 2229 |
| How I use Fluent Migrator (2014) | 2010 |
| ActionFilter in ASP.NET MVC - OnActionExecuting (2012) | 1386 |
| Parsing XML in ASP classic (2014) | 974 |
| Visual Studio Live Unit Testing: New to Visual Studio 2017 (2017, Couchbase Blog repost) | 964 |
| AOP vs decorator (2012) | 954 |
| SQL to JSON Data Modeling with Hackolade (2017, Couchbase Blog repost) | 895 |
That's right, some of the most viewed pages on my site have to do with ASP Classic and XML. These are posts I did on a lark during a consulting gig back in 2014.
It always seems like the posts I do on a lark are the ones that take off. For instance, over at the Couchbase Blog, I believe I have the most viewed blog post of 2017 with Hyper-V: How to run Ubuntu (or any Linux) on Windows. This is a quick post I wrote as I was learning it myself, and it keeps raking in the views. It's #2 on Bing and Google when you search for "hyper-v ubuntu", so that helps.
I'm not just looking to raw views, though. I would like to have some measure of the quality of posts. If you know of any metrics that might help track that, please let me know. Google Analytics has a "Bounce Rate" which might be useful to look at. The 10 pages with the lowest bounce rate (out of the 50 most viewed pages) are all podcast posts!
I'm going to speculate and say that podcast pages have the lowest bounce rate because they a prominent and immediately useful call-to-action link (i.e. "listen to this podcast"). Excluding the podcasts, the top 10 links with the lowest bounce rate are:
| Page | Bounce Rate |
|---|---|
| A Coryat scorekeeper for Jeopardy (2014) | 82.35% |
| The First C# Advent Calendar (2017) | 83.30% |
| Autocomplete multi-select of Geographical Places (2014) | 85.39% |
| Lessons learned about Fluent Migrator (2014) | 85.92% |
| AOP in JavaScript with jQuery (2012) | 86.46% |
| Terminology: cross cutting concern (2012) | 86.58% |
| Adventures in Yak Shaving: AsciiDoc with Visual Studio Code, Ruby, and Gem (2017) | 87.42% |
| An Audit ActionFilter for ASP.NET MVC (2012) | 88.13% |
| Using HTTP/Json endpoints in ASP Classic (2012) | 88.95% |
Once again, ASP Classic appears, but it's interesting to see a mostly different set of posts here. The average bounce rate for the top 50 most viewed pages is 90.80%. So these all beat the average (if that has any meaning).
Podcast Analytics
I've done a poor job of tracking podcast analytics since I started the podcast. I assumed I could grab download numbers from Azure (where I host my podcast files), but that turns out to be incredibly painful. I mainly do the podcast for fun and because I want to talk to enthusiatic tech people. But in my attempts to get sponsorship, I quickly realized that I needed a better solution for analytics. I signed up for PodTrac, but only after season 2 was finished. So these numbers aren't going to be very impressive. Season 3 onwards should provide more useful analytics. The top 10 are the 10 latest podcasts that I published (which makes sense).
The #1 most downloaded episode based solely on my better late than never PodTrac analytics is #061 - Eric Elliott on TDD.
Tech improvements
I've made some changes to Cross Cutting Concerns to hopefully improve SEO and your experience as a reader/listener.
- HTTPS. I host this site on a shared website on Azure, so it's not exactly straightforward. But I used CloudFlare and followed this blog post from Troy Hunt.
- HTML Meta. I added Twitter cards, tagging, description, and so forth. This makes my posts look a little nicer on Twitter and search engines, and hopefully will improve my search rankings. If you want to see what I did, hit CTRL+U/View Source right now and check out all the <meta />
- If you clicked on some of the top 10 posts earlier, you might have noticed a new green box with a call to action. I've put this on some of my most popular posts to try and drive some additional engagement, page views, and podcast subscribers.
- Image optimization. pngcrush, gifsicle, and jpegtran losslessly optimize images so they are smaller downloads. This will help with my Azure bill a little bit, and also improve page speed. It's currently a manual process, so sometimes I will forget.
What's next?
Based on the analytics I'm seeing so far, I'm going to:
Continue:
- Reposting my Couchbase blog posts. These help drive traffic back to my employer's site and increase awareness of Couchbase. Which is my job!
- Podcasting. I'm enjoying it, some people are listening to it.
- Keep podcast episodes short. I get comments in person about how the length of the shows (10-15 minutes) is just right. I'm going to expand by a few minutes (see below), but episodes will not increase in length by much more than that (unless I feel like making a longer special episode).
- C# Advent. I've heard that this helps people get traffic to their blogs. I'm definitely happy with it, and it helps the C# / Microsoft MVP community. I'll start recruiting writers a little earlier in November 2018.
Start:
- Adding some more fun to podcast episodes. I've got an idea to add a little humor to each podcast. Stay tuned!
- Podcast sponsorship. I've lined up a sponsor for 6 months of episodes. Let's see how it goes. I'd like to use this money to buy better equipment, pay for hosting, and maybe even purchase tokens of appreciation for guests.
Stop:
- Tracking podcast downloads with Azure and FeedBurner.
- People from using ASP Classic. Somehow.
