services.AddCouchbase(client =>
{
    client.Servers = new List<Uri> { new Uri("http://localhost:8091")};
    client.UseSsl = false;
});Posts tagged with '.NET'
This is a repost that originally appeared on the Couchbase Blog: Dependency Injection with ASP.NET Core and Couchbase.
Dependency Injection is a design pattern that makes coding easier. It saves you the hassle of instantiating objects with complex dependencies, and it makes it easier for you to write tests. With the Couchbase.Extensions.DependencyInjection library (GitHub), you can use Couchbase clusters and buckets within the ASP.NET Core dependency injection framework.
In my last blog post on distributed caching with ASP.NET, I mentioned the DependencyInjection library. Dependency injection will be explored in-depth in this post. Feel free to follow along with the code samples I’ve created, available on GitHub.
Basic setup of Couchbase
First, you’ll need a Couchbase Server cluster running. You can:
-
Install it on-premise
-
Run in a container with Docker
-
Use a cloud service like Azure
Next, you’ll need to create a bucket in Couchbase. This can be the "travel-sample" bucket that comes with Couchbase, or a bucket that you create yourself.
If you are using Couchbase Server 5.0, you’ll also need to create a user. Give that user Cluster Admin permission, and give it the same name as the bucket, just to keep things simple if you are following along.
Dependency Injection with Couchbase.Extensions
The Couchbase.Extensions (GitHub) project aims to make working with Couchbase Server and ASP.NET Core simpler. Dependency Injection is just one of these extensions.
You can add it to your ASP.NET Core project with NuGet:
-
By using Package Manager:
Install-Package Couchbase.Extensions.DependencyInjection -Version 1.0.2 -
With the NuGet UI
-
Use the .NET command line:
dotnet add package Couchbase.Extensions.DependencyInjection --version 1.0.2
(Version 1.0.2 is the latest version at the time of writing).

Next, you’ll need to make changes to your Startup class in Startup.cs.
In the blog post on caching, I hard-coded the configuration:
This is fine for demos and blog posts, but you’ll likely want to use a configuration file for a production project.
services.AddCouchbase(Configuration.GetSection("Couchbase"));Assuming you’re using the default appsettings.json, update that file to add a Couchbase section:
"Couchbase" : {
  "Servers": [
    "http://localhost:8091"
  ],
  "UseSsl": false
}
By making a "Couchbase" section, the dependency injection module will read right from the appsettings.json text file.
Constructor Injection
After dependency injection is setup, you can start injecting useful objects into your classes. You might inject them into Controllers, services, or repositories.
Here’s an example of injecting into HomeController:
public class HomeController : Controller
{
    private readonly IBucket _bucket;

    public HomeController(IBucketProvider bucketProvider)
    {
        _bucket = bucketProvider.GetBucket("travel-sample", "password");
    }

    // ... snip ...
}
Next, let’s do a simple Get operation on a well-known document in "travel-sample". This token usage of the Couchbase .NET SDK will show dependency injection in action. I’ll make a change to the generated About action method. In that method, it will retrieve a route document and write out the equipment number.
public IActionResult About()
{
    // get the route document for Columbus to Chicago (United)
    var route = _bucket.Get<dynamic>("route_56027").Value;

    // display the equipment number of the route
    ViewData["Message"] = "CMH to ORD - " + route.equipment;

    return View();
}
And the result is:
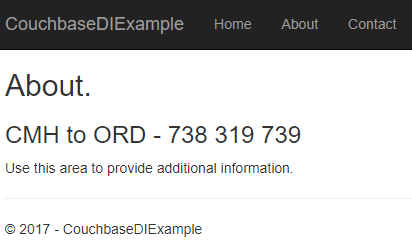
Success! Dependency injection worked, and we’re ready to use a Couchbase bucket.
If you aren’t using "travel-sample", use a key from your own bucket.
Named buckets
You can use dependency injection for a single bucket instead of having to specify the name each time.
Start by creating an interface that implements INamedBucketProvider. Leave it empty. Here’s an example:
public interface ITravelSampleBucketProvider : INamedBucketProvider
{
    // nothing goes in here!
}
Then, back in Startup.cs, map this interface to a bucket using AddCouchbaseBucket:
services
    .AddCouchbase(Configuration.GetSection("Couchbase"))
    .AddCouchbaseBucket<ITravelSampleBucketProvider>("travel-sample", "password");
Now, the ITravelSampleBucketProvider gets injected instead of the more general provider.
public HomeController(ITravelSampleBucketProvider travelBucketProvider)
{
    _bucket = travelBucketProvider.GetBucket();
}
More complex dependency injection
Until this point, we’ve only used dependency injection on Controllers. Dependency injection starts to pay dividends with more complex, deeper object graphs.
As an example, imagine a service class that uses a Couchbase bucket, but also uses an email service.
public class ComplexService : IComplexService
{
private readonly IBucket _bucket;
private readonly IEmailService _email;
public ComplexService(ITravelSampleBucketProvider bucketProvider, IEmailService emailService)
{
_bucket = bucketProvider.GetBucket();
_email = emailService;
}
public void ApproveApplication(string emailAddress)
{
_bucket.Upsert(emailAddress, new {emailAddress, approved = true});
_email.SendEmail(emailAddress, "Approved", "Your application has been approved!");
}
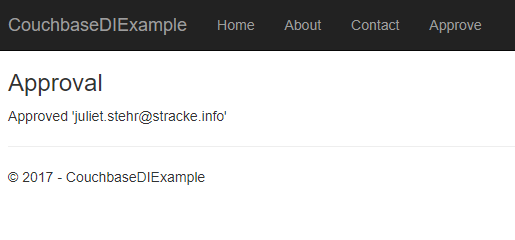
}Next, let’s use this service in a controller (aka making it a dependency). But notice that the controller is not directly using either the bucket or the email service.
public class ApproveController : Controller
{
    private readonly IComplexService _svc;

    public ApproveController(IComplexService svc)
    {
        _svc = svc;
    }

    public IActionResult Index()
    {
        var fakeEmailAddress = Faker.Internet.Email();
        _svc.ApproveApplication(fakeEmailAddress);
        ViewData["Message"] = "Approved '" + fakeEmailAddress + "'";
        return View();
    }
}
If I were to instantiate ComplexService manually, I would have to instantiate at least two other objects. It would look something like: new ComplexService(new BucketProvider(), new MyEmailService(). That’s a lot that I have to keep track of, and if any dependencies change, it’s a lot of manual maintenance.
Instead, I can have ASP.NET Core use dependency injection to do all this for me. Back in Startup:
services.AddTransient<IEmailService, MyEmailService>();
services.AddTransient<IComplexService, ComplexService>();
Now, ASP.NET Core knows how to instantiate:
-
ITravelSampleBucketProvider, thanks to Couchbase.Extensions.DependencyInjection -
IEmailService- I told it to useMyEmailService -
IComplexService- I told it to useComplexService
Finally, when ApproveController is instantiated, ASP.NET Core will know how to do it. It will create ComplexService by instantiating MyEmailService and ComplexService. It will inject ComplexService automatically into `ApproveController’s constructor. The end result:
For the complete example, be sure to check out the source code that accompanies this blog post on GitHub.
Cleaning up
Don’t forget to clean up after yourself. When the ASP.NET Core application is stops, release any resources that the Couchbase .NET SDK is using. In the Configure method in Startup, add a parameter of type IApplicationLifetime:
public void Configure(IApplicationBuilder app, IHostingEnvironment env, ILoggerFactory loggerFactory, IApplicationLifetime applicationLifetime)Within that Configure method, setup an ApplicationStopped event:
applicationLifetime.ApplicationStopped.Register(() =>
{
    app.ApplicationServices.GetRequiredService<ICouchbaseLifetimeService>().Close();
});
Summary
Dependency injection is a rich subject. Entire books have been written about it and its benefits to your application. This blog post just scratched the surface and didn’t even cover the testability benefits.
Couchbase.Extensions.DependencyInjection makes it easier to inject Couchbase into ASP.NET Core.
If you have questions or comments, make sure to check out the GitHub repository or the Couchbase .NET SDK forums.
And please reach out to me with questions by leaving a comment below or finding me on Twitter @mgroves.
This is a repost that originally appeared on the Couchbase Blog: Distributed caching with ASP.NET Core and Couchbase.
Distributed caching can help to improve performance of an ASP.NET Core application. This is especially true for an ASP.NET application that’s deployed to a server farm or scalable cloud environment. Using Couchbase Server for caching is one of the many features that make it an ideal choice for your engagement database needs.
In this blog post, I’ll show you how to use the Couchbase.Extensions.Caching middleware plugin to easily add distributed caching capabilities to your application.
You can follow along with the sample code I wrote for this post on GitHub.
Please note that Couchbase.Extensions.Caching is currently in a beta2 release (as I’m writing this blog post), so some things may change.
Basic setup of Couchbase
First, you’ll need a Couchbase Server cluster running (you can install it on-premise, or with Docker, or even in Azure if you’d like).
Next, you’ll need to create a bucket in Couchbase where cached data will be stored. I called mine "cachebucket". You may want to take advantage of the new ephemeral bucket feature in Couchbase Server 5.0 for caching, but it is not required.
If you are using Couchbase Server 5.0, you’ll also need to create a user with permissions (Data Writer and Data Reader) on that bucket. To keep things simple, create a user that has the same name as the bucket (e.g. "cachebucket").
Distributed Caching with Couchbase.Extensions
The Couchbase.Extensions (GitHub) project aims to make working with Couchbase Server and .NET Core simpler. Caching is just one of these extensions.
You can add it to your ASP.NET Core project with NuGet, via Package Manager: Install-Package Couchbase.Extensions.Caching -Version 1.0.0-beta2, or with the NuGet UI, or you can use the .NET command line: dotnet add package Couchbase.Extensions.Caching --version 1.0.0-beta2.
Once you’ve added this to your project, you’ll need to make a couple minor changes to your Startup class in Startup.cs.
First, in ConfigureServices, add a couple namespaces:
using Couchbase.Extensions.Caching;
using Couchbase.Extensions.DependencyInjection;
This will make the Caching namespace available, and specifically the AddDistributedCouchbaseCache extension method for IServiceCollection. Next, call that extension method from within the ConfigureServices method.
The other namespace in there, DependencyInjection, is necessary to inject Couchbase functionality. In this case, it’s going to be used only by the Caching extension. But you can use it for other purposes too, which I will cover in a future blog post.
But for now, it’s just needed for the AddCouchbase extension method on IServiceCollection.
Finally, put them both together, and your ConfigureServices method should look like this:
public void ConfigureServices(IServiceCollection services)
{
    services.AddMvc();

    services.AddCouchbase(opt =>
    {
        opt.Servers = new List<Uri>
        {
            new Uri("http://localhost:8091")
        };
    });

    services.AddDistributedCouchbaseCache("cachebucket", "password", opt => { });
}
Using distributed caching
Now that you have distributed caching setup with Couchbase in your ASP.NET Core project, you can use IDistributedCache elsewhere in your project.
Injecting IDistributedCache
A simple example would be to use it directly in a controller. It can be injected into constructors as you need it:
public class HomeController : Controller
{
    private readonly IDistributedCache _cache;

    public HomeController(IDistributedCache cache)
    {
        _cache = cache;
    }

    // ... snip ...

}
Caching strings
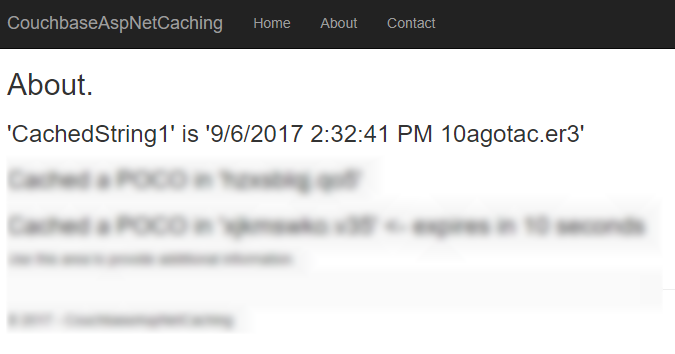
You can use the GetString and SetString methods to retrieve/set a string value in the cache.
// cache/retrieve from cache
// a string, stored under key "CachedString1"
var message = _cache.GetString("CachedString1");
if (message == null)
{
    message = DateTime.Now + " " + Path.GetRandomFileName();
    _cache.SetString("CachedString1", message);
}
ViewData["Message"] = "'CachedString1' is '" + message + "'";
This would appear in the "cachebucket" bucket as an encoded binary value (not JSON).

In the sample code, I simply print out the ViewData["Message"] in the Razor view. It should look something like this:
Caching objects
You can also use Set<> and Get<> methods to save and retrieve objects in the cache. I created a very simple POCO (Plain Old CLR Object) to demonstrate:
public class MyPoco
{
    public string Name { get; set; }
    public int ShoeSize { get; set; }
    public decimal Price { get; set; }
}
Next, in the sample, I generate a random string to use as a cache key, and a random generated instance of MyPoco. First, I store them in the cache using the Set<> method:
var pocoKey = Path.GetRandomFileName();
_cache.Set(pocoKey, MyPoco.Generate(), null);
ViewData["Message2"] = "Cached a POCO in '" + pocoKey + "'";
Then, I print out the key to the Razor view:
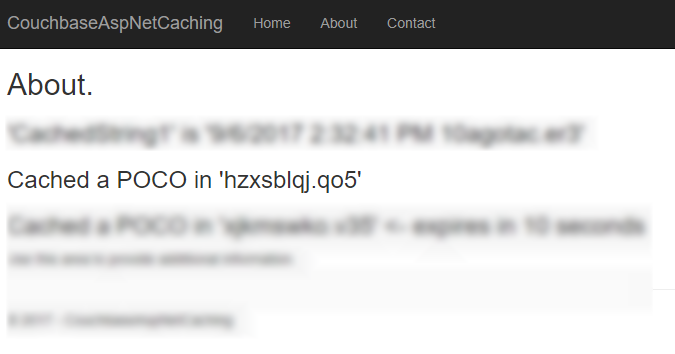
Next, I can use this key to look up the value in Couchbase:

Also, notice that it’s been serialized to JSON. This not only means that you can read it, but you can also query it with N1QL (if you need to).
Distributed caching with expiration
If you want the values in the cache to expire after a certain period of time, you can specify that with DistributedCacheEntryOptions (only SlidingExpiration is supported at this time).
var anotherPocoKey = Path.GetRandomFileName();
_cache.Set(anotherPocoKey, MyPoco.Generate(), new DistributedCacheEntryOptions
{
    SlidingExpiration = new TimeSpan(0, 0, 10) // 10 seconds
});
ViewData["Message3"] = "Cached a POCO in '" + anotherPocoKey + "'";
In the sample project, I’ve also set this to print out to Razor.
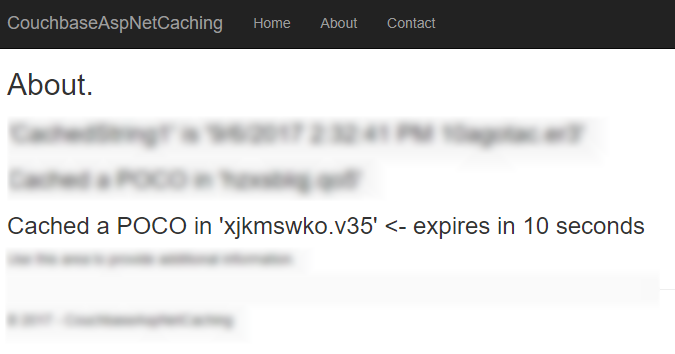
If you view that document (before the 10 seconds runs out) in Couchbase Console, you’ll see that it has an expiration value in its metadata. Here’s an example:
{
  "id": "xjkmswko.v35",
  "rev": "1-14e1d9998125000059b0404502000001",
  "expiration": 1504723013,
  "flags": 33554433
}
After 10 seconds, that document will be gone from the bucket, and you’ll see an error "not found (Document does not exist)".
Tearing down distributed caching
Finally, don’t forget to cleanup the resources used by the Couchbase .NET SDK for distributed caching. One easy way to do this is with the ApplicationStopped event. You can wire this up in Startup:
appLifetime.ApplicationStopped.Register(() =>
{
    app.ApplicationServices.GetRequiredService<ICouchbaseLifetimeService>().Close();
});
Note that you will have to add IApplicationLifetime appLifetime as a parameter to the Configure method in Startup if you haven’t already.
Summary
Using Couchbase Server for distributed caching in your ASP.NET Core application is a great way to improve performance and scalability in your application. These kind of "engagement" use cases are what Couchbase Server excels at. To see customers that are using Couchbase Server for caching, check out the Couchbase Customers page.
If you have questions or comments about the Couchbase.Extensions.Caching project, make sure to check out the GitHub repository or the Couchbase .NET SDK forums.
As always, you can reach me by leaving a comment below or finding me on Twitter @mgroves.
This is a repost that originally appeared on the Couchbase Blog: Azure Functions with Couchbase Server.
Azure Functions are Microsoft’s answer to Amazon’s Lambdas or Google’s Cloud Functions (aka "serverless" architecture). They give you a way to deploy small pieces of code, and let Azure handle the underlying server. I’ve never used them before, so I thought I would give them a try beyond "Hello, World", by getting them to work with Couchbase Server.
There are more options in Azure Functions beyond simple HTTP events (e.g. Blob triggers, GitHub webhooks, Azure Storage queue triggers, etc). But, for this blog post, I’m going to focus on just HTTP events. I’ll create simple "Get" and "Set" endpoints that interact with Couchbase Server.
Before beginning, you can follow along by getting the source code for this blog post on GitHub.
Also, please read the Azure Functions and Lazy Initialization with Couchbase Server post. It contains an important update about using Couchbase Server and Azure Functions.
Getting setup to develop Azure Functions
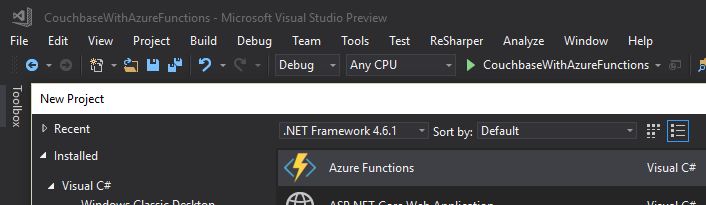
For this blog post, I decided to try Visual Studio Preview.
I did this because there is a handy tool for creating Azure Function projects in Visual Studio.
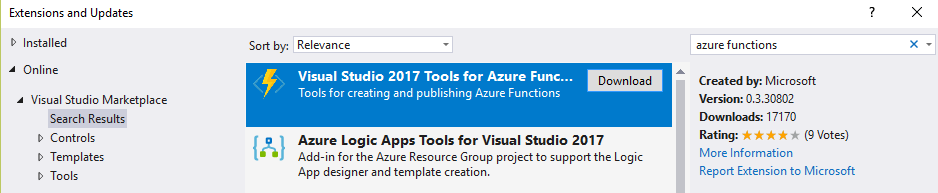
But it only works for the preview version at this time. You don’t have to use these tools to develop Azure Functions, but it made the process simpler for me.
Once I had this tooling in place, all I had to was to File→New→Project. Then under "Cloud", select "Azure Functions".
Once you do this, you’ll have an empty looking project with a couple of JSON files. Right click on the project, add item, and select "Azure Function".
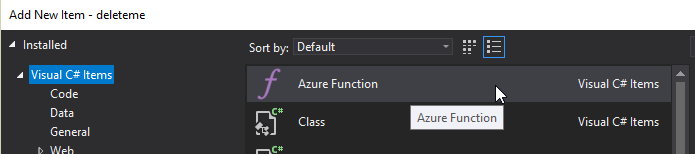
Next, you’ll need to select what kind of Azure Function you want to create. I chose "HttpTrigger". I also chose "Anonymous" to keep this post simple, but depending on your use case, you may want to require an authentication token. After you do this, a very simple shell of a function will be generated (as a C# class). You can execute this function locally (indeed, that is what the local.settings.json file is for) so you can test it out without deploying to Azure yet.
Writing a "Get" function
First, I decided that I wanted two Azure Functions: one to "get" a piece of data by ID, and one to "set" a new piece of given data. I started by defining the shape of my data with a simple C# POCO:
public class MyDocument
{
    public string Name { get; set; }
    public int ShoeSize { get; set; }
    public decimal Balance { get; set; }
}
Here is the Azure function that I wrote to "get" that document from Couchbase Server:
public static async Task<HttpResponseMessage> Get([HttpTrigger(AuthorizationLevel.Anonymous, "get", Route = null)]HttpRequestMessage req, TraceWriter log)
{
    // parse query parameter
    var id = req.GetQueryNameValuePairs()
        .FirstOrDefault(q => string.Compare(q.Key, "id", true) == 0)
        .Value;

    using (var cluster = GetCluster())
    {
        using (var bucket = GetBucket(cluster))
        {
            var doc = await bucket.GetAsync<MyDocument>(id);
            return req.CreateResponse(HttpStatusCode.OK, doc.Value, new JsonMediaTypeFormatter());
        }
    }
}
Some things to note:
-
I remove the
"post"that was generated by the tooling, since I want this to only be a"get"function. -
Parsing the query parameter seems like a lot of extra code for this simple case. You can alternatively create a "function with parameters"
-
GetClusterandGetBucketwill be discussed later in this post. But the short story is that I want this code to work both locally and deployed to Azure
Next, run this function locally, and you’ll get a console screen that looks similar to this:
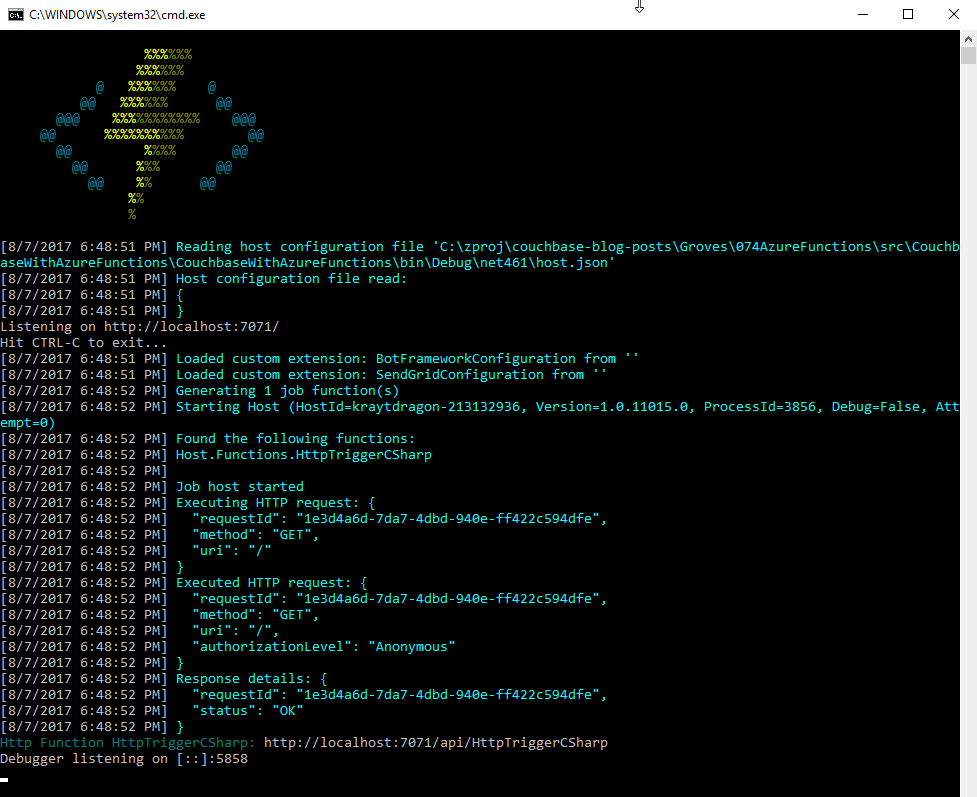
At the bottom, you’ll notice that it tells you the Azure Function URL(s). Assuming I had a document in Couchbase (I don’t yet), I could create an HTTP request with a tool like Postman to: http://localhost:7071/api/HttpTriggerCsharpGet?id=123456
Currently, if I do that, I’ll get "null" as a response (since I don’t have any validation or error checking code). So let’s move on and create a "Set" function.
Writing a "Set" function
The "Set" function will be slightly different. I want document information POSTed to it, and I want it to return a message like "New document inserted with ID 123456".
public static async Task<HttpResponseMessage> Set([HttpTrigger(AuthorizationLevel.Anonymous, "post", Route = null)] MyDocument req, TraceWriter log)
{

    var id = Guid.NewGuid().ToString();

    using (var cluster = GetCluster())
    {
        using (var bucket = GetBucket(cluster))
        {
            await bucket.InsertAsync(id, req);
        }
    }

    return new HttpResponseMessage
    {
        Content = new StringContent($"New document inserted with ID {id}"),
        StatusCode = HttpStatusCode.OK
    };
}
This function has a similar shape to the Get, but some important things to note:
-
There is only
"post"in the HttpTrigger attribute. -
Instead of
HttpRequestMessageas the first parameter, I’ve decided to useMyDocument, and let Azure Functions do the binding for me. -
Since I don’t have
HttpRequestMessage, I can’t call itsCreateResponsemethod, so instead I instantiate a newHttpResponseMessagedirectly to return the success message at the end.
To create a request in Postman, I’ll use a URL of http://localhost:7071/api/HttpTriggerCsharpSet. In the headers, I’ll set Content-Type to "application/json". Finally, the body will be JSON:
{
    "Name": "matthew",
    "Balance": 107.18,
    "ShoeSize": 14
}
Now, when I POST that to the endpoint, I’ll get a response message of "New document inserted with ID f05ea97e-7c2f-4f88-b72d-19756f6a6f35".
Connecting to Couchbase Server
I have glossed over how these functions connect to Couchbase Server.
Previously, I mentioned two methods, GetCluster and GetBucket that will connect to the cluster and bucket, respectively.
private static Cluster GetCluster()
{
    var uri = ConfigurationManager.AppSettings["couchbaseUri"];
    return new Cluster(new ClientConfiguration
    {
        Servers = new List<Uri> { new Uri(uri) }
    });
}

private static IBucket GetBucket(Cluster cluster)
{
    var bucketName = ConfigurationManager.AppSettings["couchbaseBucketName"];
    var bucketPassword = ConfigurationManager.AppSettings["couchbaseBucketPassword"];

    return cluster.OpenBucket(bucketName, bucketPassword);
}
At this point, most of this code should be familiar if you’ve used Couchbase Server and the Couchbase .NET SDK before. I’m connecting to a single node cluster, and then connecting a bucket that has a password set (I’m using Couchbase Server 4.6).
But, the important thing to point out here is the use of Configuration.AppSettings. In the local.settings.json file, I’ve added these Couchbase settings to the Value section:
{
  "IsEncrypted": false,
  "Values": {
    "AzureWebJobsStorage": "",
    "AzureWebJobsDashboard": "",
    "couchbaseUri": "http://localhost:8091",
    "couchbaseBucketName": "azurefunctions",
    "couchbaseBucketPassword": "Password88!"
  }
}
When running Azure Functions locally, this file is used for configuration. I have Couchbase Server running locally with a bucket called "azurefunctions". Anything in "Values" can be accessed via Configuration.AppSettings.
Deploying to Azure
Before deploying the Azure Functions, I’ll need to create a Couchbase Cluster on Azure. This is very easy to do, thanks to Ben Lackey’s great work on the Azure Marketplace. Once that’s deployed, deploying the Azure Functions are also easy, thanks to Visual Studio.
Deploying Couchbase Server to Azure
Here is a short video walking you through the process of creating a Couchbase Server cluster on Azure.
For my example, I followed that video closely. Here is step 1, where I configure the username, password, and resource group.
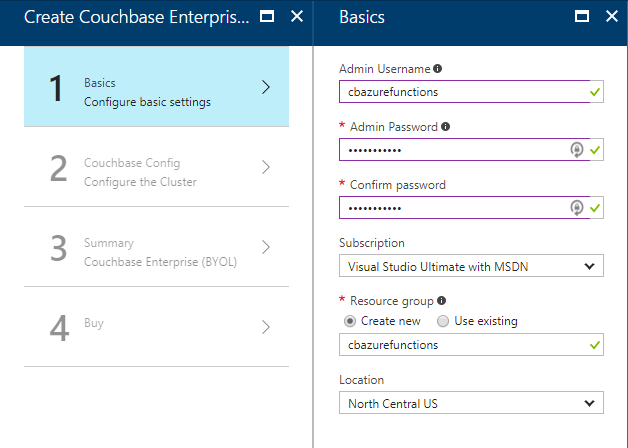
For the second step, I only created a single node cluster on the smallest, cheapest VM (DS1 v2). I created 0 Sync Gateway nodes, since I’m not using Sync Gateway for this example.
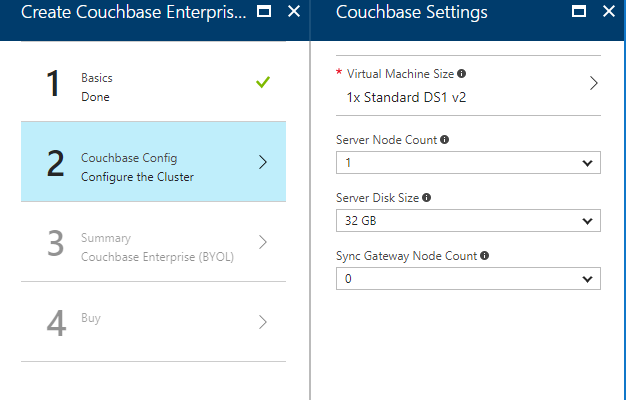
Step 3 is just a summary, and step 4 is a confirmation. It will take 3-5 minutes for the Couchbase Cluster to start up in Azure.
Once the cluster is created, find the URL for the first node in the cluster (just as demonstrated in the above video). My URL looked something like: http://vm0.server-hsmkrefstzg2t.northcentralus.cloudapp.azure.com:8091. Go to this URL, login, and create a bucket (I called mine "azurefunctions", just like I did locally).
Deploying Azure Functions to Azure
Now, Couchbase Server is running. So let’s deploy the Azure Functions that will interact with it.
To begin, right-click the project in Visual Studio and select "publish". You’ll need to create a new publish profile the first time you do this, but that’s easy.
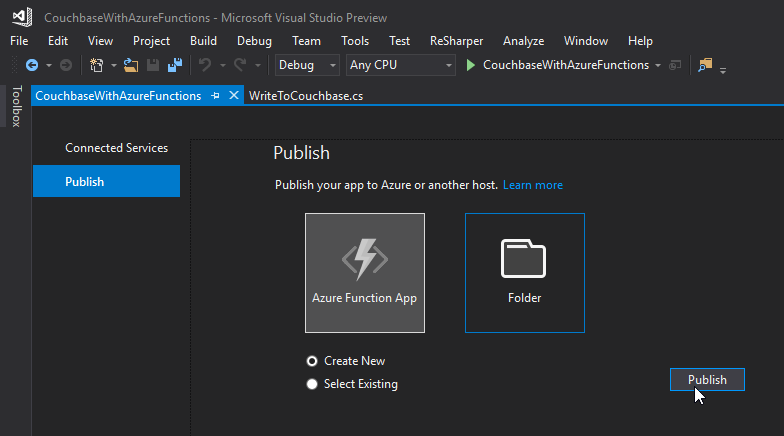
Give your functions an app name, select a subscription, select a resource group (you can create a new one, or use the same group that you created above for Couchbase), select a service plan, and finally a storage account. You can create new ones when necessary.
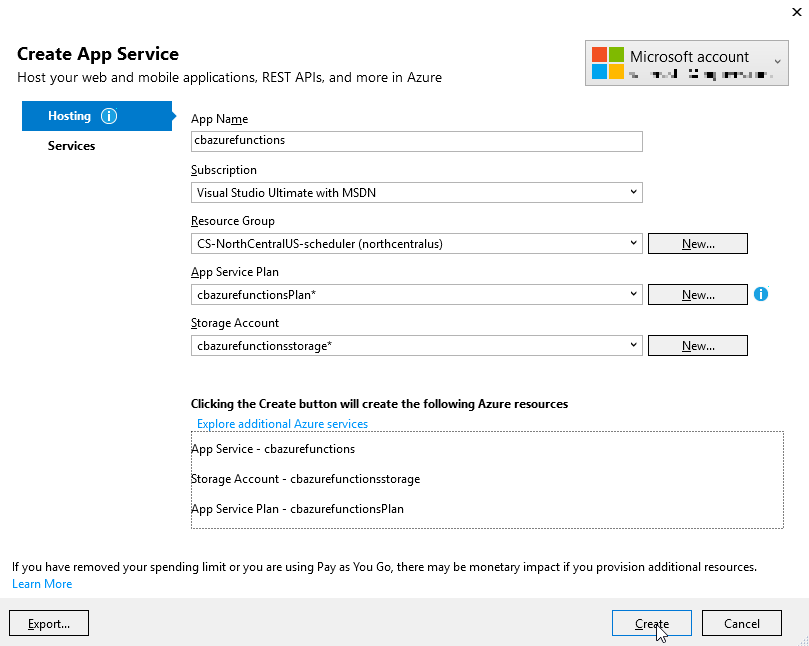
Click "create" and these items will start to be created in Azure (it may take a minute or two).
Trying out the Azure Functions
Finally, remember that the Azure Functions need to know the URI, bucket name, and password in order to connect to Couchbase Server. That information is in local.settings.json, but that file is not used for actual Azure deployments.
In the Azure portal, navigate to the Azure function (I called mine cbazurefunctions), and then select "Application Settings". Under "App settings", enter those three settings: couchbaseUri, couchbaseBucketName, and couchbaseBucketPassword.
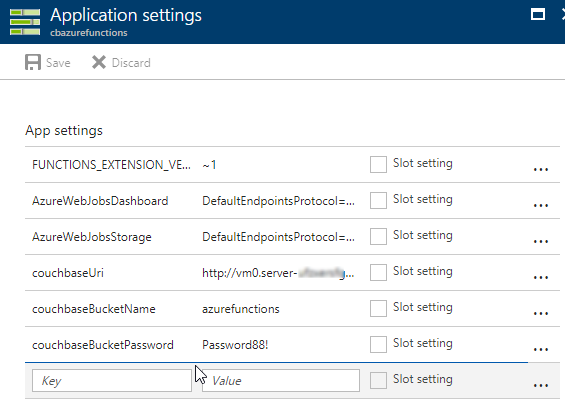
Now, repeat the Postman process mentioned above to try out the Azure functions and make sure they work. Your URL will vary, but mine was http://cbazurefunctions.azurewebsites.net/.
Summary
This is my first time trying out Azure Functions. This blog post shows a simple demo, but there are other factors to consider before you start using this in production:
-
Authentication - I used anonymous Azure Functions to keep it simple. Azure Functions can also provide authentication tokens to use that prevent access except to authorized users.
-
App settings - Setting them manually in the portal may not be the best solution. There is probably a way to automate that portion, and that’s something I’ll look into in the future.
-
HTTPS/TLS - You will likely want to have some level of encryption as you are getting and posting data to your Azure Functions. The above example transmits everything in clear text.
Anything I missed? Any more tips or suggestions to share to make this process easier or better? Please leave a comment below or ping me on Twitter @mgroves.

Wolfgang Goerlich is using encryption frameworks.
Show Notes:
- Wolfgang's blog at jwgoerllich.com
- Some terms discussed in the podcast just in case you aren't familiar:
- SQL injection
- Password cracker (programs that can assist in figuring out a password by enumerating / guessing)
- OAuth
- TLS / HTTPS
- SFTP
- SecureString in the .NET framework
- Companies mentioned:
- Database level encryption, discussed for SQL Server docs
- Disk encryption article
- The Scrypt.NET library I kept going on about
- RSA 1024 article
- Dear listeners, to keep your passwords safe and secure, please consider using one or more of:
- Azure Key Vault
- Bruce Schneier on security
- Wolfgang's employer: CBI
Wolfgang Goerlich is on Twitter.
Want to be on the next episode? You can! All you need is the willingness to talk about something technical.
Theme music is "Crosscutting Concerns" by The Dirty Truckers, check out their music on Amazon or iTunes.
This is a repost that originally appeared on the Couchbase Blog: SQL Server and Couchbase side-by-side (video).
SQL Server is compared (and contrasted) with Couchbase Server in this video.
If you are averse to video, you can check out the corresponding blog post series I wrote a few months ago that covers the same material:
The source code demonstrated in this video is available on GitHub.
If you have questions or feedback, please contact me at [email protected], or on @mgroves at Twitter, or just leave a comment below.
