SELECT r.destinationairport, r.sourceairport, r.distance, r.airlineid, a.name
FROM `travel-sample` r
JOIN `travel-sample` a ON KEYS r.airlineid
WHERE r.type = 'route'
AND r.sourceairport = 'CMH'
ORDER BY r.distance DESC
LIMIT 10;Posts tagged with 'N1QL'
This is a repost that originally appeared on the Couchbase Blog: New Querying Features in Couchbase Server 5.5.
New querying features figure prominently in the latest release of Couchbase Server 5.5. Check out the announcement and download the developer build for free right now.
In this post, I want to highlight a few of the new features and show you how to get started using them:
-
ANSI JOINs - N1QL in Couchbase already has JOIN, but now JOIN is more standards compliant and more flexible.
-
HASH joins - Performance on certain types of joins can be improved with a HASH join (in Enterprise Edition only)
-
Aggregate pushdowns - GROUP BY can be pushed down to the indexer, improving aggregation performance (in Enterprise Edition only)
All the examples in this post use the "travel-sample" bucket that comes with Couchbase.
ANSI JOINs
Until Couchbase Server 5.5, JOINs were possible, with two caveats:
-
One side of the JOIN has to be document key(s)
-
You must use the
ON KEYSsyntax
In Couchbase Server 5.5, it is no longer necessary to use ON KEYS, and so writing joins becomes much more natural and more in line with other SQL dialects.
Previous JOIN syntax
For example, here’s the old syntax:
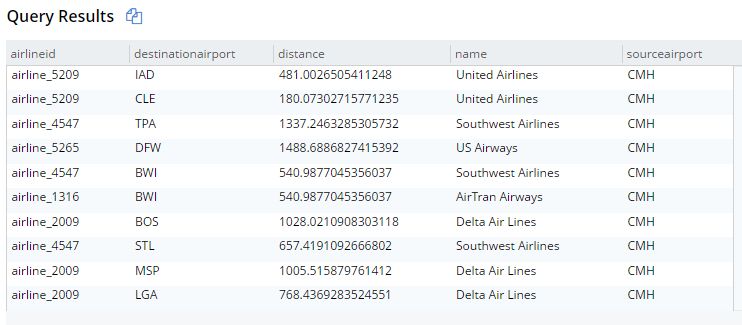
This will get 10 routes that start at CMH airport, joined with their corresponding airline documents. The result are below (I’m showing them in table view, but it’s still JSON):
New JOIN syntax
And here’s the new syntax doing the same thing:
SELECT r.destinationairport, r.sourceairport, r.distance, r.airlineid, a.name
FROM `travel-sample` r
JOIN `travel-sample` a ON META(a).id = r.airlineid
WHERE r.type = 'route'
AND r.sourceairport = 'CMH'
ORDER BY r.distance DESC
LIMIT 10;
The only difference is the ON. Instead of ON KEYS, it’s now ON <field1> = <field2>. It’s more natural for those coming from a relational background (like myself).
But that’s not all. Now you are no longer limited to joining just on document keys. Here’s an example of a JOIN on a city field.
SELECT a.airportname, a.city AS airportCity, h.name AS hotelName, h.city AS hotelCity, h.address AS hotelAddress
FROM `travel-sample` a
INNER JOIN `travel-sample` h ON h.city = a.city
WHERE a.type = 'airport'
AND h.type = 'hotel'
LIMIT 10;
This query will show hotels that match airports based on their city.

Note that for this to work, you must have an index created on the field that’s on the inner side of the JOIN. The "travel-sample" bucket already contains a predefined index on the city field. If I were to attempt it with other fields, I’d get an error message like "No index available for ANSI join term…".
For more information on ANSI JOIN, check out the full N1QL JOIN documentation.
Note: The old JOIN, ON KEYS syntax will still work, so don’t worry about having to update your old code.
Hash Joins
Under the covers, there are different ways that joins can be carried out. If you run the query above, Couchbase will use a Nested Loop (NL) approach to execute the join. However, you can also instruct Couchbase to use a hash join instead. A hash join can sometimes be more performant than a nested loop. Additionally, a hash join isn’t dependent on an index. It is, however, dependent on the join being an equality join only.
For instance, in "travel-sample", I could join landmarks to hotels on their email fields. This may not be the best find to find out if a hotel is a landmark, but since email is not indexed by default, it illustrates the point.
SELECT l.name AS landmarkName, h.name AS hotelName, l.email AS landmarkEmail, h.email AS hotelEmail
FROM `travel-sample` l
INNER JOIN `travel-sample` h ON h.email = l.email
WHERE l.type = 'landmark'
AND h.type = 'hotel';
The above query will take a very long time to run, and probably time out.
Syntax
Next I’ll try a hash join, which must be explicitly invoked with a USE HASH hint.
SELECT l.name AS landmarkName, h.name AS hotelName, l.email AS landmarkEmail, h.email AS hotelEmail
FROM `travel-sample` l
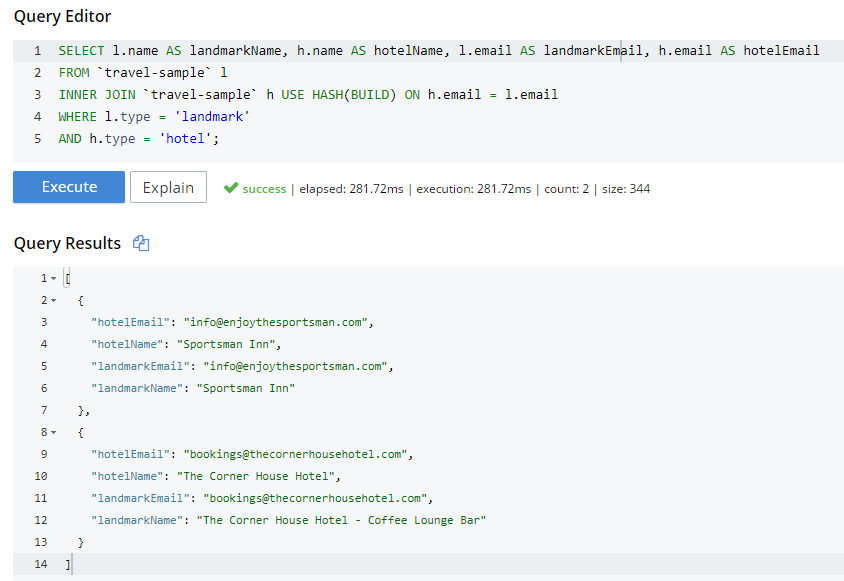
INNER JOIN `travel-sample` h USE HASH(BUILD) ON h.email = l.email
WHERE l.type = 'landmark'
AND h.type = 'hotel';
A hash join has two sides: a BUILD and a PROBE. The BUILD side of the join will be used to create an in-memory hash table. The PROBE side will use that table to find matches and perform the join. Typically, this means you want the BUILD side to be used on the smaller of the two sets. However, you can only supply one hash hint, and only to the right side of the join. So if you specify BUILD on the right side, then you are implicitly using PROBE on the left side (and vice versa).
BUILD and PROBE
So why did I use HASH(BUILD)?
I know from using INFER and/or Bucket Insights that landmarks make up roughly 10% of the data, and hotels make up about 3%. Also, I know from just trying it out that HASH(BUILD) was slightly slower. But in either case, the query execution time was milliseconds. Turns out there are two hotel-landmark pairs with the same email address.
USE HASH will tell Couchbase to attempt a hash join. If it cannot do so (or if you are using Couchbase Server Community Edition), it will fall back to a nested-loop. (By the way, you can explicitly specify nested-loop with the USE NL syntax, but currently there is no reason to do so).
For more information, check out the HASH join areas of the documentation.
Aggregate pushdowns
Aggregations in the past have been tricky when it comes to performance. With Couchbase Server 5.5, aggregate pushdowns are now supported for SUM, COUNT, MIN, MAX, and AVG.
In earlier versions of Couchbase, indexing was not used for statements involving GROUP BY. This could severely impact performance, because there is an extra "grouping" step that has to take place. In Couchbase Server 5.5, the index service can do the grouping/aggregation.
Example
Here’s an example query that finds the total number of hotels, and groups them by country, state, and city.
SELECT country, state, city, COUNT(1) AS total
FROM `travel-sample`
WHERE type = 'hotel' and country is not null
GROUP BY country, state, city
ORDER BY COUNT(1) DESC;
The query will execute, and it will return as a result:

Let’s take a look at the visual query plan (only available in Enterprise Edition, but you can view the raw Plan Text in Community Edition).

Note that the only index being used is for the type field. The grouping step is doing the aggregation work. With the relatively small travel-sample data set, this query is taking around ~90ms on my single node desktop. But let’s see what happens if I add an index on the fields that I’m grouping by:
Indexing
CREATE INDEX ix_hotelregions ON `travel-sample` (country, state, city) WHERE type='hotel';Now, execute the above SELECT query again. It should return the same results. But:
-
It’s now taking ~7ms on my single node desktop. We’re taking ms, but with a large, more realistic data set, that is a huge difference in magnitude.
-
The query plan is different.

Note that this time, there is no 'group' step. All the work is being pushed down to the index service, which can use the ix_hotelregions index. It can use this index because my query is exactly matching the fields in the index.
Index push down does not always happen: your query has to meet specific conditions. For more information, check out the GROUP BY and Aggregate Performance areas of the documentation.
Summary
With Couchbase Server 5.5, N1QL includes even more standards-compliant syntax and becomes more performant than ever.
Try out N1QL today. You can install Enterprise Edition or try out N1QL right in your browser.
Have a question for me? I’m on Twitter @mgroves. You can also check out @N1QL on Twitter. The N1QL Forum is a good place to go if you have in-depth questions about N1QL.
This is a repost that originally appeared on the Couchbase Blog: Aggregate grouping with N1QL or with MapReduce.
Aggregate grouping is what I’m titling this blog post, but I don’t know if it’s the best name. Have you ever used MySQL’s GROUP_CONCAT function or the FOR XML PATH('') workaround in SQL Server? That’s basically what I’m writing about today. With Couchbase Server, the easiest way to do it is with N1QL’s ARRAY_AGG function, but you can also do it with an old school MapReduce View.
I’m writing this post because one of our solution engineers was working on this problem for a customer (who will go unnamed). Neither of us could find a blog post like this with the answer, so after we worked together to come up with a solution, I decided I would blog about it for my future self (which is pretty much the main reason I blog anything, really. The other reason is to find out if anyone else knows a better way).
Before we get started, I’ve made some material available if you want to follow along. The source code I used to generate the "patient" data used in this post is available on GitHub. If you aren’t .NET savvy, you can just use cbimport on sample data that I’ve created. (Or, you can use the N1QL sandbox, more information on that later). The rest of this blog post assumes you have a "patients" bucket with that sample data in it.
Requirements
I have a bucket of patient documents. Each patient has a single doctor. The patient document refers to a doctor by a field called doctorId. There may be other data in the patient document, but we’re mainly focused on the patient document’s key and the doctorId value. Some examples:
key 01257721
{
    "doctorId": 58,
    "patientName": "Robyn Kirby",
    "patientDob": "1986-05-16T19:01:52.4075881-04:00"
}

key 116wmq8i
{
    "doctorId": 8,
    "patientName": "Helen Clark",
    "patientDob": "2016-02-01T04:54:30.3505879-05:00"
}
Next, we can assume that each doctor can have multiple patients. We can also assume that a doctor document exists, but we don’t actually need that for this tutorial, so let’s just focus on the patients for now.
Finally, what we want for our application (or report or whatever), is an aggregate grouping of the patients with their doctor. Each record would identify a doctor and a list/array/collection of patients. Something like:
| doctor | patients |
|---|---|
|
58 |
01257721, 450mkkri, 8g2mrze2 … |
|
8 |
05woknfk, 116wmq8i, 2t5yttqi … |
|
… etc … |
… etc … |
This might be useful for a dashboard showing all the patients assigned to doctors, for instance. How can we get the data in this form, with N1QL or with MapReduce?
N1QL Aggregate grouping
N1QL gives us the ARRAY_AGG function to make this possible.
Start by selecting the doctorId from each patient document, and the key to the patient document. Then, apply ARRAY_AGG to the patient document ID. Finally, group the results by the doctorId.
SELECT p.doctorId AS doctor, ARRAY_AGG(META(p).id) AS patients
FROM patients p
GROUP BY p.doctorId;
Note: don’t forget to run CREATE PRIMARY INDEX ON patients for this tutorial to enable a primary index scan.
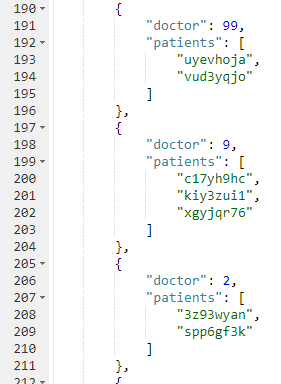
Imagine this query without the ARRAY_AGG. It would return one record for each patient. By adding the ARRAY_AGG and the GROUP BY, it now returns one record for each doctor.
Here’s a snippet of the results on the sample data set I created:
If you don’t want to go through the trouble of creating a bucket and importing sample data, you can also try this in the N1QL tutorial sandbox. There aren’t patient documents in there, so the query will be a little different.
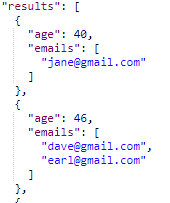
I’m going to group up emails by age. Start by selecting the age from each document, and the email from each document. Then, apply ARRAY_AGG to the email. Finally, group the results by the age.
SELECT t.age AS age, ARRAY_AGG(t.email) AS emails
FROM tutorial t
group by t.age;
Here’s a screenshot of some of the results from the sandbox:
Aggregate group with MapReduce
Similar aggregate grouping can also be achieved with a MapReduce View.
Start by creating a new View. From Couchbase Console, go to Indexes, then Views. Select the "patients" bucket. Click "Create Development View". Name a design document (I called mine "_design/dev_patient". Create a view, I called mine "doctorPatientGroup".
We’ll need both a Map and a custom Reduce function.
First, for the map, we just want the doctorId (in an array, since we’ll be using grouping) and the patient’s document ID.
function (doc, meta) {
    emit([doc.doctorId], meta.id);
}
Next, for the reduce function, we’ll take the values and concatenate them into an array. Below is one way that you can do it. I do not claim to be a JavaScript expert or a MapReduce expert, so there might be a more efficient way to tackle this:
function reduce(key, values, rereduce) {
    var merged = [].concat.apply([], values);
    return merged;
}
After you’ve created both map and reduce functions, save the index.
Finally, when actually calling this Index, set group_level to 1. You can do this in the UI:
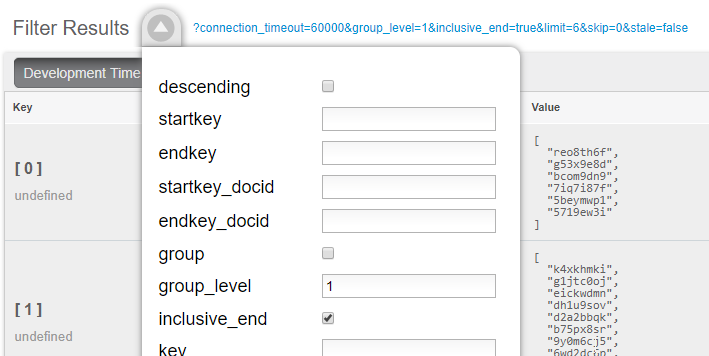
Or you can do it from the Index URL. Here’s an example from a cluster running on my local machine:
http://127.0.0.1:8092/patients/_design/dev_patients/_view/doctorPatientGroup?connection_timeout=60000&full_set=true&group_level=1&inclusive_end=true&skip=0&stale=falseThe result of that view should look like this (truncated to look nicer in a blog post):
{"rows":[
{"key":[0],"value":["reo8th6f","g53x9e8d", ... ]},
{"key":[1],"value":["k4xkhmki","g1jtc0oj", ... ]},
{"key":[2],"value":["spp6gf3k","3z93wyan"]},
{"key":[3],"value":["qnx93fh3","gssusiun", ...]},
{"key":[4],"value":["qvqgb0ve","jm0g69zz", ...]},
{"key":[5],"value":["ywjfvad6","so4uznxx", ...]}
...
]}
Summary
I think the N1QL method is easier, but there may be performance benefits to using MapReduce in some cases. In either case, you can accomplish aggregate grouping just as easily (if not more easily) as in a relational database.
Interested in learning more about N1QL? Be sure to check out the complete N1QL tutorial/sandbox. Interested in MapReduce Views? Check out the MapReduce Views documentation to get started.
Did you find this post useful? Have suggestions for improvement? Please leave a comment below, or contact me on Twitter @mgroves.
This is a repost that originally appeared on the Couchbase Blog: Tooling Improvements in Couchbase 5.0 Beta.
Tooling improvements have come to Couchbase Server 5.0 Beta. In this blog post, I’m going to show you some of the tooling improvements in:
-
Query plan visualization - to better understand how a query is going to execute
-
Query monitoring - to see how a query is actually executing
-
Improved UX - highlighting the new Couchbase Web Console
-
Import/export - the new cbimport and cbexport tooling
Some of these topics have been covered in earlier blog posts for the developer builds (but not the Beta). For your reference:
Query Plan Visualization tooling
In order to help you write efficient queries, the tooling in Couchbase Server 5.0 has been enhanced to give you a Visual Query Plan when writing N1QL queries. If you’ve ever used the Execution Plan feature in SQL Server Management Studio, this should feel familiar to you.
As a quick example, I’ll write a UNION query against Couchbase’s travel-sample bucket (optional sample data that ships with Couchbase Server). First, I’ll click "Query" to bring up the Couchbase Query Workbench. Then, I’ll enter a query into the Query Editor.

This is a relatively complex query that involves the following steps (and more):
-
Identify and scan the correct index(es)
-
Fetch the corresponding data
-
Project the fields named in the
SELECTclause -
Find distinct results
-
UNIONthe results together -
Stream the results back to the web console
In Couchbase Server 4.x, you could use the EXPLAIN N1QL command to get an idea of the query plan. Now, in Couchbase Server 5.0 beta, you can view the plan visually.
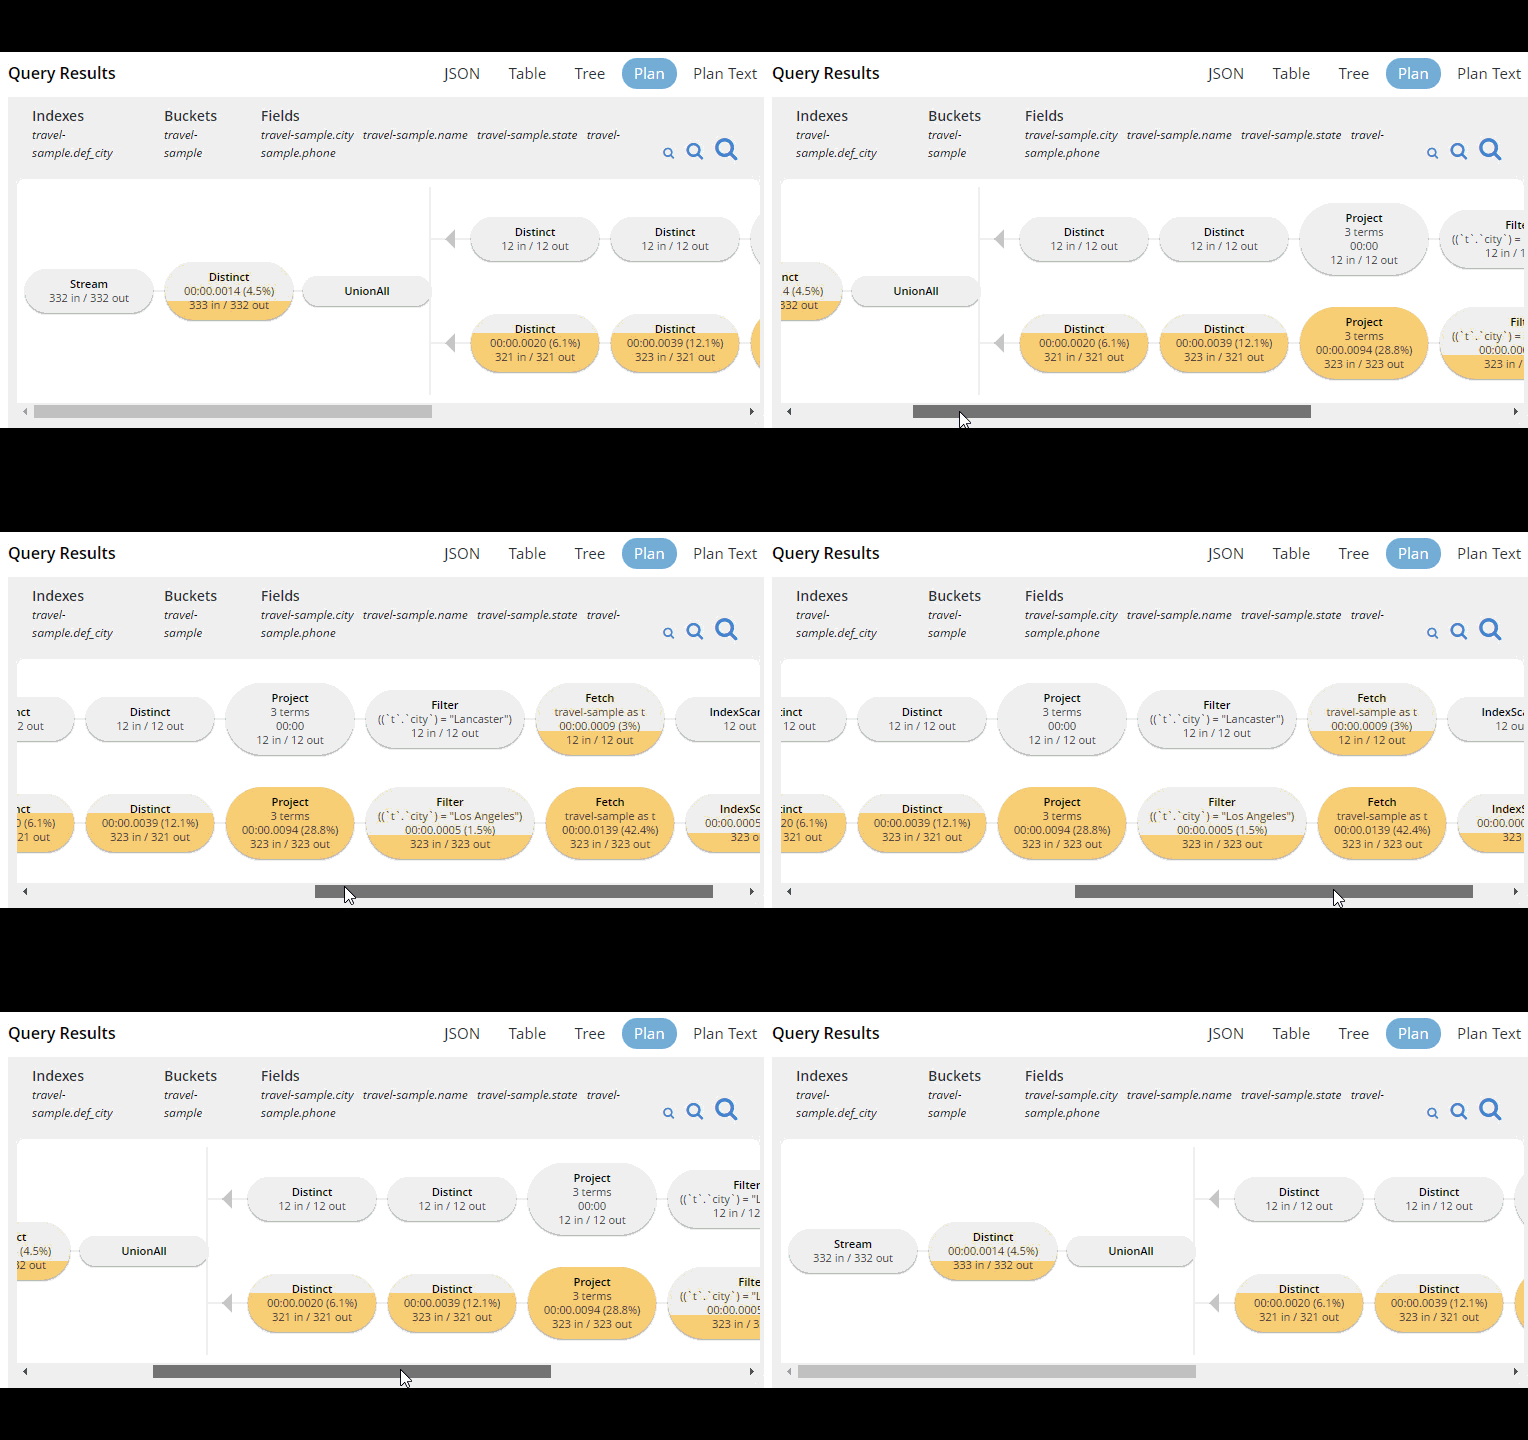
This tooling shows you, at a glance, the costliest parts of the query, which can help you to identify improvements.
Query monitoring
It’s important to have tooling to monitor your queries in action. Couchbase Server 5.0 beta has tooling to monitor active, completed, and prepared queries. In addition, you have the ability to cancel queries that are in progress.
Start by clicking "Query" on the Web Console menu, and then click "Query Monitor". You’ll see the "Active", "Completed", and "Prepared" options at the top of the page.
Let’s look at the "Completed" queries page. The query text and other information about the query is displayed in a table.

Next, you can sort the table to see which query took the longest to run (duration), return the most results (result count), and so on. Finally, if you click "edit", you’ll be taken to the Query Workbench with the text of that query.
New Couchbase Web Console
If you’ve been following along, you’ve probably already noticed the new Couchbase Web Console. The UI has been given an overhaul in Couchbase Server 5.0. The goal is to improve navigation and optimize the UI.
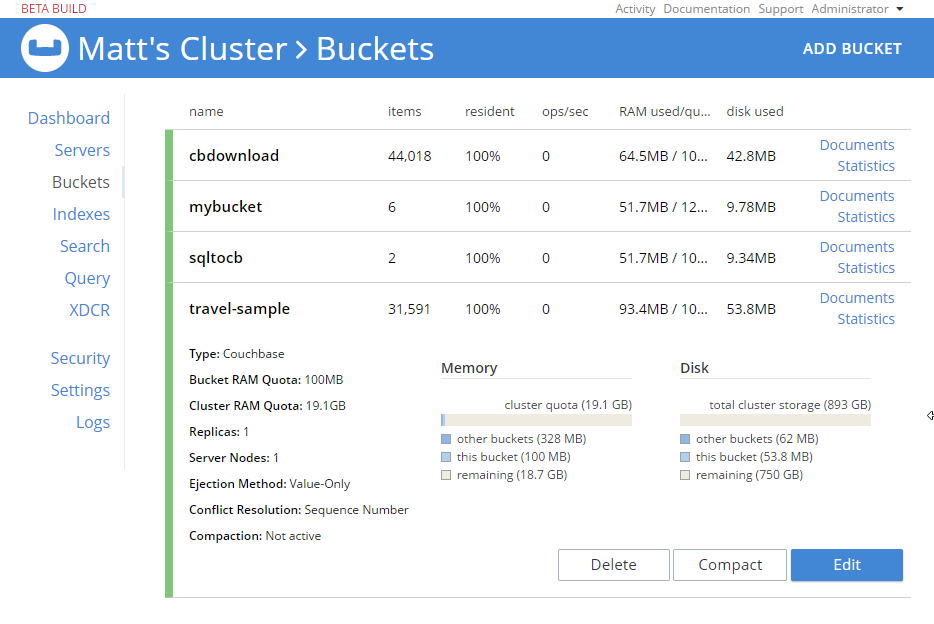
This new design maximizes usability of existing features from Server 4.x, while leaving room to expand the feature set of 5.0 and beyond.
cbimport and cbexport
New command line tooling includes cbimport and cbexport for moving data around.
cbimport supports importing both CSV and JSON data. The documentation on cbimport should tell you all you want to know, but I want to highlight a couple things:
-
Load data from a URI by using the
-d,--dataset <uri>flags -
Generate keys according to a template by using the
-g,--generate-key <key_expr>flags. This gives you a powerful templating system to generate unique keys that fit your data model and access patterns -
Specify a variety of JSON formats when importing: JSON per line (
lines), JSON list/array (list), JSON ZIP file/folder containing multiple files (sample). So no matter what format you receive JSON in, cbimport can handle it.
For more about cbimport in action, check out Using cbimport to import Wikibase data to JSON documents.
cbexport exports data from Couchbase to file(s). Currently, only the JSON format is supported. Again, the documentation on cbexport will tell you what you want to know. A couple things to point out:
-
Include the document key in your export by using the
--include-key <key>flag. -
Export to either "lines" or "list" format (see above).
Here’s an example of cbexport in action (I’m using Powershell on Windows, but it will be very similar on Mac/Linux):
PS C:\Program Files\Couchbase\Server\bin> .\cbexport.exe json -c localhost -u Administrator -p password -b mybucketname -f list -o c:\exportdirectory\cbexporttest.json --include-key _id

Json exported to `c:\exportdirectory\cbexporttest.json` successfully

PS C:\Program Files\Couchbase\Server\bin> type C:\exportdirectory\cbexporttest.json

[
{"_id":"463f8111-2000-48cc-bb69-e2ba07defa37","body":"Eveniet sed unde officiis dignissimos.","type":"Update"},
{"_id":"e39375ab-2cdf-4dc4-9659-6c19b39e377d","name":"Jack Johnston","type":"User"}
]
Notice that the key was included in an "_id" field.
Summary
Tooling for Couchbase Server 5.0 beta is designed to make your life easier. These tools will help you whether you’re writing queries, integrating with data, monitoring, or performing administrative tasks.
We’re always looking for feedback. Inside of the Web Console, there is a feedback icon at the bottom right of the screen. You can click that to send us feedback about the tooling directly. Or, feel free to leave a comment below, or reach out to me on Twitter @mgroves.
This is a repost that originally appeared on the Couchbase Blog: New Profiling and Monitoring in Couchbase Server 5.0 Preview.
N1QL query monitoring and profiling updates are just some of goodness you can find in February’s developer preview release of Couchbase Server 5.0.0.
Go download the February 5.0.0 developer release of Couchbase Server today, click the "Developer" tab, and check it out. You still have time to give us some feedback before the official release.
As always, keep in mind that I’m writing this blog post on early builds, and some things may change in minor ways by the time you get the release.
What is profiling and monitoring for?
When I’m writing N1QL queries, I need to be able to understand how well (or how badly) my query (and my cluster) is performing in order to make improvements and diagnose issues.
With this latest developer version of Couchbase Server 5.0, some new tools have been added to your N1QL-writing toolbox.
N1QL Writing Review
First, some review.
There are multiple ways for a developer to execute N1QL queries.
-
Use the SDK of your choice.
-
Use the cbq command line tool.
-
Use the Query Workbench in Couchbase Web Console
-
Use the REST API N1QL endpoints
In this post, I’ll be mainly using Query Workbench.
There are two system catalogs that are already available to you in Couchbase Server 4.5 that I’ll be talking about today.
-
system:active_request - This catalog lists all the currently executing active requests or queries. You can execute the N1QL query
SELECT * FROM system:active_requests;and it will list all those results. -
system:completed_requests - This catalog lists all the recent completed requests (that have run longer than some threshold of time, default of 1 second). You can execute
SELECT * FROM system:completed_requests;and it will list these queries.
New to N1QL: META().plan
Both active_requests and completed_requests return not only the original N1QL query text, but also related information: request time, request id, execution time, scan consistency, and so on. This can be useful information. Here’s an example that looks at a simple query (select * from `travel-sample`) while it’s running by executing select * from system:active_requests;
{
	"active_requests": {
	  "clientContextID": "805f519d-0ffb-4adf-bd19-15238c95900a",
	  "elapsedTime": "645.4333ms",
	  "executionTime": "645.4333ms",
	  "node": "10.0.75.1",
	  "phaseCounts": {
		"fetch": 6672,
		"primaryScan": 7171
	  },
	  "phaseOperators": {
		"fetch": 1,
		"primaryScan": 1
	  },
	  "phaseTimes": {
		"authorize": "500.3µs",
		"fetch": "365.7758ms",
		"parse": "500µs",
		"primaryScan": "107.3891ms"
	  },
	  "requestId": "80787238-f4cb-4d2d-999f-7faff9b081e4",
	  "requestTime": "2017-02-10 09:06:18.3526802 -0500 EST",
	  "scanConsistency": "unbounded",
	  "state": "running",
	  "statement": "select * from `travel-sample`;"
	}
}
First, I want to point out that phaseTimes is a new addition to the results. It’s a quick and dirty way to get a sense of the query cost without looking at the whole profile. It gives you the overall cost of each request phase without going into detail of each operator. In the above example, for instance, you can see that parse took 500µs and primaryScan took 107.3891ms. This might be enough information for you to go on without diving into META().plan.
However, with the new META().plan, you can get very detailed information about the query plan. This time, I’ll execute SELECT *, META().plan FROM system:active_requests;
[
  {
    "active_requests": {
      "clientContextID": "75f0f401-6e87-48ae-bca8-d7f39a6d029f",
      "elapsedTime": "1.4232754s",
      "executionTime": "1.4232754s",
      "node": "10.0.75.1",
      "phaseCounts": {
        "fetch": 12816,
        "primaryScan": 13231
      },
      "phaseOperators": {
        "fetch": 1,
        "primaryScan": 1
      },
      "phaseTimes": {
        "authorize": "998.7µs",
        "fetch": "620.704ms",
        "primaryScan": "48.0042ms"
      },
      "requestId": "42f50724-6893-479a-bac0-98ebb1595380",
      "requestTime": "2017-02-15 14:44:23.8560282 -0500 EST",
      "scanConsistency": "unbounded",
      "state": "running",
      "statement": "select * from `travel-sample`;"
    },
    "plan": {
      "#operator": "Sequence",
      "#stats": {
        "#phaseSwitches": 1,
        "kernTime": "1.4232754s",
        "state": "kernel"
      },
      "~children": [
        {
          "#operator": "Authorize",
          "#stats": {
            "#phaseSwitches": 3,
            "kernTime": "1.4222767s",
            "servTime": "998.7µs",
            "state": "kernel"
          },
          "privileges": {
            "default:travel-sample": 1
          },
          "~child": {
            "#operator": "Sequence",
            "#stats": {
              "#phaseSwitches": 1,
              "kernTime": "1.4222767s",
              "state": "kernel"
            },
            "~children": [
              {
                "#operator": "PrimaryScan",
                "#stats": {
                  "#itemsOut": 13329,
                  "#phaseSwitches": 53319,
                  "execTime": "26.0024ms",
                  "kernTime": "1.3742725s",
                  "servTime": "22.0018ms",
                  "state": "kernel"
                },
                "index": "def_primary",
                "keyspace": "travel-sample",
                "namespace": "default",
                "using": "gsi"
              },
              {
                "#operator": "Fetch",
                "#stats": {
                  "#itemsIn": 12817,
                  "#itemsOut": 12304,
                  "#phaseSwitches": 50293,
                  "execTime": "18.5117ms",
                  "kernTime": "787.9722ms",
                  "servTime": "615.7928ms",
                  "state": "services"
                },
                "keyspace": "travel-sample",
                "namespace": "default"
              },
              {
                "#operator": "Sequence",
                "#stats": {
                  "#phaseSwitches": 1,
                  "kernTime": "1.4222767s",
                  "state": "kernel"
                },
                "~children": [
                  {
                    "#operator": "InitialProject",
                    "#stats": {
                      "#itemsIn": 11849,
                      "#itemsOut": 11848,
                      "#phaseSwitches": 47395,
                      "execTime": "5.4964ms",
                      "kernTime": "1.4167803s",
                      "state": "kernel"
                    },
                    "result_terms": [
                      {
                        "expr": "self",
                        "star": true
                      }
                    ]
                  },
                  {
                    "#operator": "FinalProject",
                    "#stats": {
                      "#itemsIn": 11336,
                      "#itemsOut": 11335,
                      "#phaseSwitches": 45343,
                      "execTime": "6.5002ms",
                      "kernTime": "1.4157765s",
                      "state": "kernel"
                    }
                  }
                ]
              }
            ]
          }
        },
        {
          "#operator": "Stream",
          "#stats": {
            "#itemsIn": 10824,
            "#itemsOut": 10823,
            "#phaseSwitches": 21649,
            "kernTime": "1.4232754s",
            "state": "kernel"
          }
        }
      ]
    }
  }, ...
]
The above output comes from the Query Workbench.
Note the new "plan" part. It contains a tree of operators that combine to execute the N1QL query. The root operator is a Sequence, which itself has a collection of child operators like Authorize, PrimaryScan, Fetch, and possibly even more Sequences.
Enabling the profile feature
To get this information when using cbq or the REST API, you’ll need to turn on the "profile" feature.
You can do this in cbq by entering set -profile timings; and then running your query.
You can also do this with the REST API on a per request basis (using the /query/service endpoint and passing a querystring parameter of profile=timings, for instance).
You can turn on the setting for the entire node by making a POST request to http://localhost:8093/admin/settings, using Basic authentication, and a JSON body like:
{
  "completed-limit": 4000,
  "completed-threshold": 1000,
  "controls": false,
  "cpuprofile": "",
  "debug": false,
  "keep-alive-length": 16384,
  "loglevel": "INFO",
  "max-parallelism": 1,
  "memprofile": "",
  "pipeline-batch": 16,
  "pipeline-cap": 512,
  "pretty": true,
  "profile": "timings",
  "request-size-cap": 67108864,
  "scan-cap": 0,
  "servicers": 32,
  "timeout": 0
}
Notice the profile setting. It was previously set to off, but I set it to "timings".
You may not want to do that, especially on nodes being used by other people and programs, because it will affect other queries running on the node. It’s better to do this on a per-request basis.
It’s also what Query Workbench does by default.
Using the Query Workbench
There’s a lot of information in META().plan about how the plan is executed. Personally, I prefer to look at a simplified graphical version of it in Query Workbench by clicking the "Plan" icon (which I briefly mentioned in a previous post about the new Couchbase Web Console UI).

Let’s look at a slightly more complex example. For this exercise, I’m using the travel-sample bucket, but I have removed one of the indexes (DROP INDEX `travel-sample.def_sourceairport;`).
I then execute a N1QL query to find flights between San Francisco and Miami:
SELECT r.id, a.name, s.flight, s.utc, r.sourceairport, r.destinationairport, r.equipment
FROM `travel-sample` r
UNNEST r.schedule s
JOIN `travel-sample` a ON KEYS r.airlineid
WHERE r.sourceairport = 'SFO'
AND r.destinationairport = 'MIA'
AND s.day = 0
ORDER BY a.name;
Executing this query (on my single-node local machine) takes about 10 seconds. That’s definitely not an acceptible amount of time, so let’s look at the plan to see what the problem might be (I broke it into two lines so the screenshots will fit in the blog post).


Looking at that plan, it seems like the costliest parts of the query are the Filter and the Join. JOIN operations work on keys, so they should normally be very quick. But it looks like there are a lot of documents being joined.
The Filter (the WHERE part of the query) is also taking a lot of time. It’s looking at the sourceairport and destinationairport fields. Looking elsewhere in the plan, I see that there is a PrimaryScan. This should be a red flag when you are trying to write performant queries. PrimaryScan means that the query couldn’t find an index other than the primary index. This is roughly the equivalent of a "table scan" in relational database terms. (You may want to drop the primary index so that these issues get bubbled-up faster, but that’s a topic for another time).
Let’s add an index on the sourceairport field and see if that helps.
CREATE INDEX `def_sourceairport` ON `travel-sample`(`sourceairport`);Now, running the same query as above, I get the following plan:


This query took ~100ms (on my single-node local machine) which is much more acceptible. The Filter and the Join still take up a large percentage of the time, but thanks to the IndexScan replacing the PrimaryScan, there are many fewer documents that those operators have to deal with. Perhaps the query could be improved even more with an additional index on the destinationairport field.
Beyond Tweaking Queries
The answer to performance problems is not always in tweaking queries. Sometimes you might need to add more nodes to your cluster to address the underlying problem.
Look at the PrimaryScan information in META().plan. Here’s a snippet:
"~children": [
  {
    "#operator": "PrimaryScan",
    "#stats": {
      "#itemsOut": 13329,
      "#phaseSwitches": 53319,
      "execTime": "26.0024ms",
      "kernTime": "1.3742725s",
      "servTime": "22.0018ms",
      "state": "kernel"
    },
    "index": "def_primary",
    "keyspace": "travel-sample",
    "namespace": "default",
    "using": "gsi"
  }, ... ]
The servTime value indicates how much time is spent by the Query service to wait on the Key/Value data storage. If the servTime is very high, but there is a small number of documents being processed, that indicates that the indexer (or the key/value service) can’t keep up. Perhaps they have too much load coming from somewhere else. So this means that something weird is running someplace else or that your cluster is trying to handle too much load. Might be time to add some more nodes.
Similarly, the kernTime is how much time is spent waiting on other N1QL routines. This might mean that something else downstream in the query plan has a problem, or that the query node is overrun with requests and are having to wait a lot.
We want your feedback!
The new META().plan functionality and the new Plan UI combine in Couchbase Server 5.0 to improve the N1QL writing and profiling process.
Stay tuned to the Couchbase Blog for information about what’s coming in the next developer build.
Interested in trying out some of these new features? Download Couchbase Server 5.0 today!
We want feedback! Developer releases are coming every month, so you have a chance to make a difference in what we are building.
Bugs: If you find a bug (something that is broken or doesn’t work how you’d expect), please file an issue in our JIRA system at issues.couchbase.com or submit a question on the Couchbase Forums. Or, contact me with a description of the issue. I would be happy to help you or submit the bug for you (my Couchbase handlers high-five me every time I submit a good bug).
Feedback: Let me know what you think. Something you don’t like? Something you really like? Something missing? Now you can give feedback directly from within the Couchbase Web Console. Look for the ![]() icon at the bottom right of the screen.
icon at the bottom right of the screen.
In some cases, it may be tricky to decide if your feedback is a bug or a suggestion. Use your best judgement, or again, feel free to contact me for help. I want to hear from you. The best way to contact me is either Twitter @mgroves or email me [email protected].
- Data modeling
- The data itself (this blog post)
- Applications using the data
Data Types in JSON vs SQL
| SQL Server | JSON |
|---|---|
|
nvarchar, varchar, text |
string |
|
int, float, decimal, double |
number |
|
bit |
boolean |
|
null |
null |
|
XML/hierarchyid fields |
array / object |
Migrating and translating data
- Give yourself plenty of time in planning. While migrating, you may discover that you need to rethink your model. You will need to test and make adjustments, and it’s better to have extra time than make mistakes while hurrying. Migrating data is an iterative cycle: migrate a table, see if that works, adjust, and keep iterating. You may have to go through this cycle many times.
- Test your migration using real data. Data can be full of surprises. You may think that NVARCHAR field only ever contains string representations of numbers, but maybe there are some abnormal rows that contain words. Use a copy of the real data to test and verify your migration.
- Be prepared to run the migration multiple times. Have a plan to cleanup a failed migration and start over. This might be a simple
DELETE FROM bucketin N1QL, or it could be a more nuanaced and targeted series of cleanups. If you plan from the start, this will be easier. Automate your migration, so this is less painful. - ETL or ELT? Extract-Transform-Load, or Extract-Load-Transform. When are you going to do a transform? When putting data into Couchbase, the flexibility of JSON allows you to transfer-in-place after loading if you choose.
An example ETL migration
ShoppingCartMigrator class and a SocialMediaMigrator class. I’m only going to cover the shopping cart in this post. I pass it a Couchbase bucket and the Entity Framework context that I used in the last blog post. (You could instead pass an NHibernate session or a plain DbConnection here, depending on your preference).public class ShoppingCartMigrator
{
readonly IBucket _bucket;
readonly SqlToCbContext _context;
public ShoppingCartMigrator(IBucket bucket, SqlToCbContext context)
{
_bucket = bucket;
_context = context;
}
}Go method to perform the migration, and a Cleanup method to delete any documents created in the migration, should I choose to.Go method, I let Entity Framework do the hard work of the joins, and loop through every shopping cart.public bool Go()
{
var carts = _context.ShoppingCarts
.Include(x => x.Items)
.ToList();
foreach (var cart in carts)
{
var cartDocument = new Document<dynamic>
{
Id = cart.Id.ToString(),
Content = MapCart(cart)
};
var result = _bucket.Insert(cartDocument);
if (!result.Success)
{
Console.WriteLine($"There was an error migrating Shopping Cart {cart.Id}");
return false;
}
Console.WriteLine($"Successfully migrated Shopping Cart {cart.Id}");
}
return true;
}public void Cleanup()
{
Console.WriteLine("Delete all shopping carts...");
var result = _bucket.Query<dynamic>("DELETE FROM `sqltocb` WHERE type='ShoppingCart';");
if (!result.Success)
{
Console.WriteLine($"{result.Exception?.Message}");
Console.WriteLine($"{result.Message}");
}
}DELETE FROM sqltocb WHERE fingerprint = '999cfbc3-186e-4219-ab5d-18ad130a9dc6'). Or vice versa: fingerprint the problematic data for later analysis and delete the rest. Just make sure to cleanup these temporary fields when the migration is completed successfully.What about the other features of SQL Server?
- SQL/N1QL
- Stored Procedures
- Service tiers
- Triggers
- Views
- Serialization
- Security
- Concurrency
- Autonumber
- OR/Ms and ODMs
- Transactions
