[
  {
    "code": 13014,
    "msg": "User does not have credentials to access privilege cluster.bucket[mynewbucket].data.docs!read. Add role Data Reader[mynewbucket] to allow the query to run."
  }
]Posts tagged with 'Couchbase'
This is a repost that originally appeared on the Couchbase Blog: Authorization and Authentication with RBAC (Part 2).
Authorization and authentication are important to Couchbase. In March, I blogged about some of the new Role Based Access Control (RBAC) that we are showing in the Couchbase Server 5.0 Developer Builds. This month, I’d like to go into a little more detail now that the April Couchbase Server 5.0 Developer Build is available (make sure to click the "Developer" tab).
Authentication and authorization
In past version of Couchbase, buckets were secured by a password. In 5.0, bucket passwords for authorization are gone. You can no longer create a "bucket password" for authorization. Instead, you must create one (or more) users that have varying levels of authorization for that bucket. Notice that there is no "password" field anymore (not even in the "Advance bucket settings":
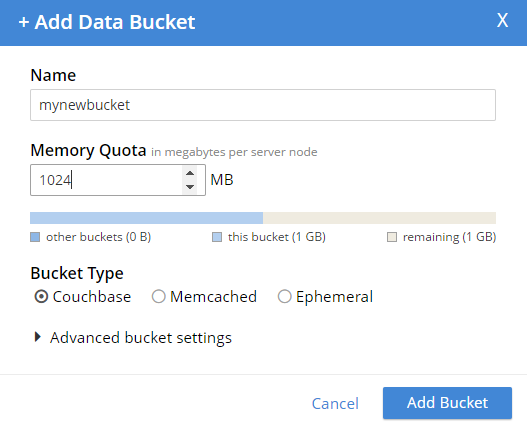
So now, you no longer have to hand out a password that gives complete access to a bucket. You can fine-tune bucket authorization, and give out multiple sets of credentials with varying levels of access. This will help you tighten up security, and reduce your exposure.
Note: The administrator user still exists, and has permission to do everything. So I can still run N1QL queries (for instance) on that bucket while logged in as an administrator account. However, this is not the account you should be using from your clients.
Creating an authorized user
To create a new user, you must be logged in as an administrator (or as a user that has an Admin role). Go to the "Security" tab, and you’ll be able to see a list of users, and be able to add new ones.
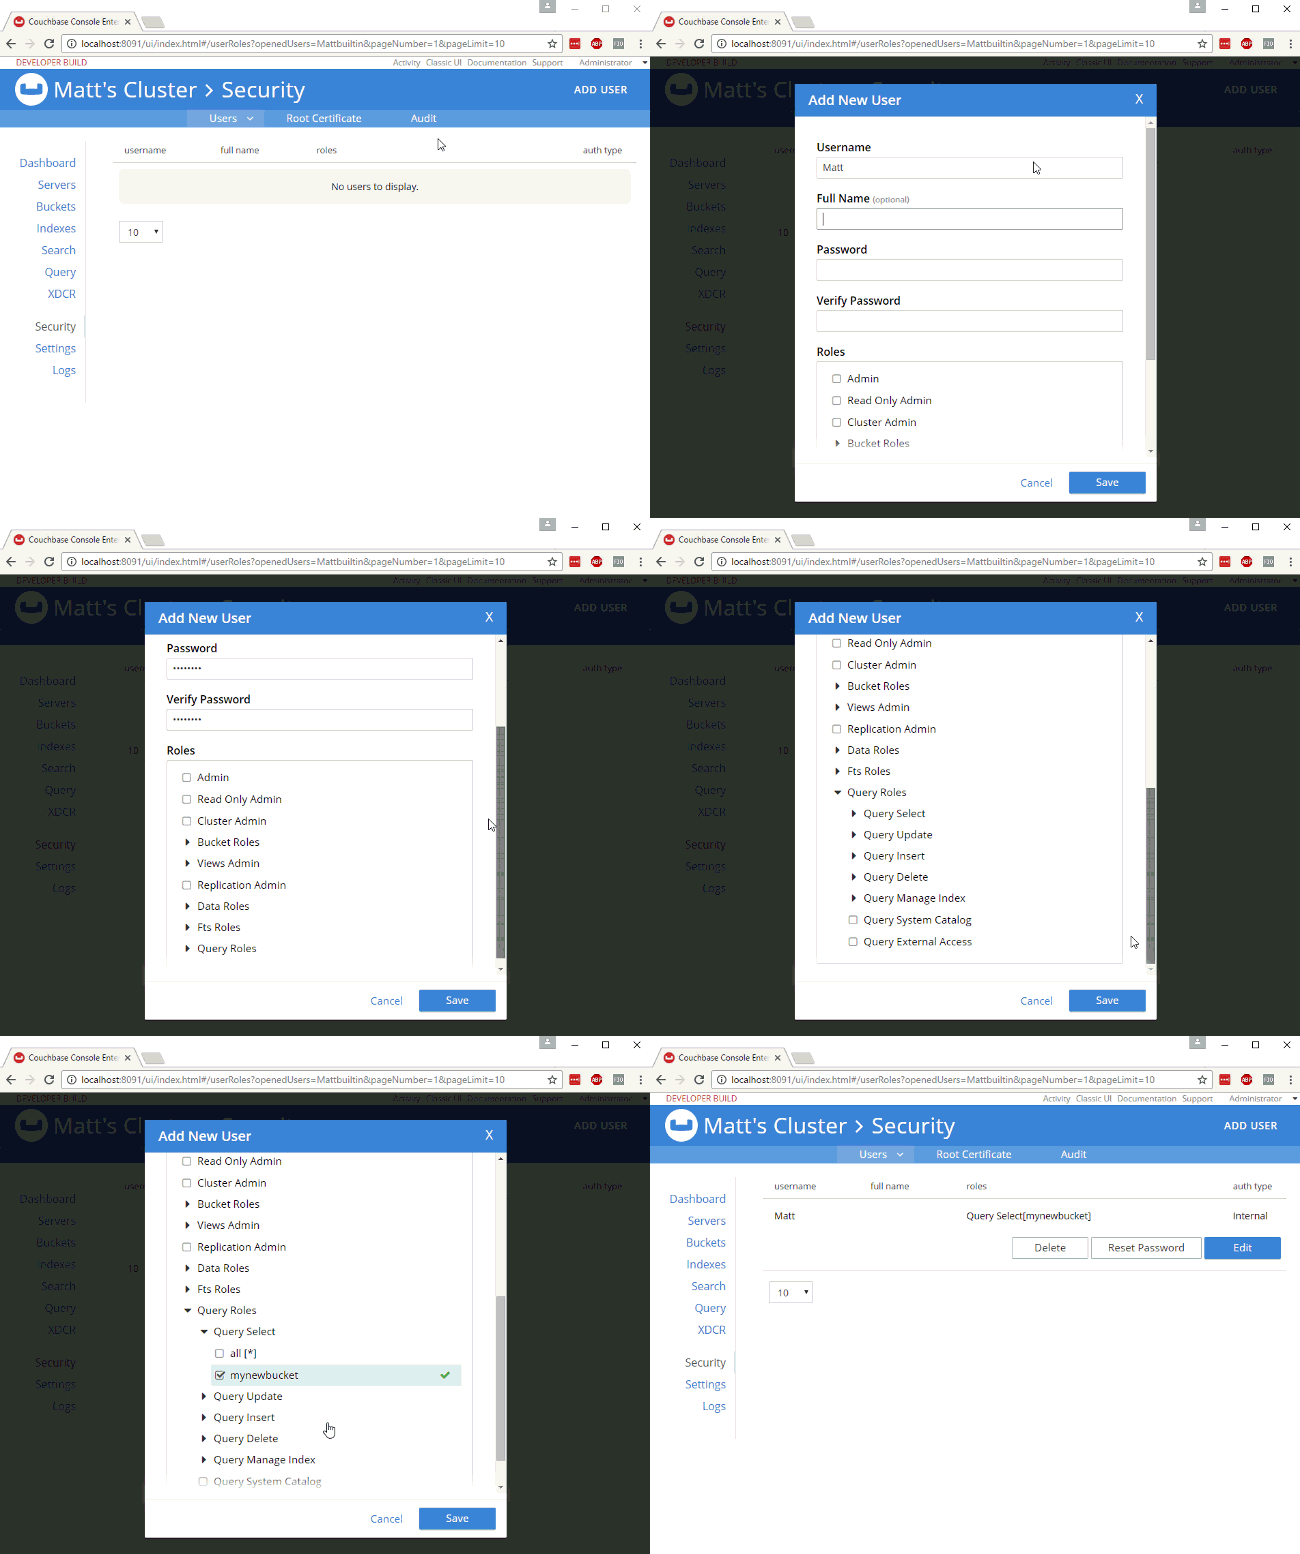
Create a new user by clicking "ADD USER". Enter the information for the user. You may want to create a user for a person (e.g. "Matt"), or you may want to create a user for a service (e.g. "MyAspNetApplication"). Make sure to enter a strong password, and then select the appropriate roles for the user you want to create.
For example, let’s create a user "Matt" that only has access to run SELECT queries on the bucket I just created. In "Roles", I expand "Query Roles", then "Query Select", and check the box for "mynewbucket", and then "Save" to finalize the user.
Authorization in action
When I log out of the administrator account, and log back in as "Matt", I can see that the authorization level I have is severely restricted. Only "Dashboard", "Servers", "Settings", and "Query" are visible. If I go to "Query" I can execute SELECT 1;
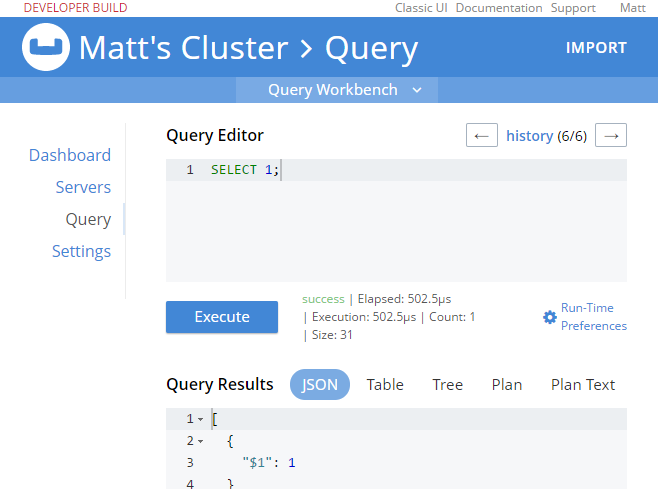
If I try something more complex, like SELECT COUNT(1) FROM mynewbucket, I’ll get an error message like:
So, it looks like I have the correct authentication to log in, and I have the correct authorization to execute a SELECT, but I don’t have the correct authorization to actually read the data. I’ll go back in as admin, and add Data Reader authorization.

At this point, when I login with "Matt", SELECT COUNT(1) FROM mynewbucket; will work. If you are following along, try SELECT * FROM mynewbucket;. You’ll get an error message that no index is available. But, if you try to CREATE INDEX you’ll need another permission to do that. You get the idea.
New N1QL functionality
There’s some new N1QL functionality to go along with the new authentication and authorization features.
GRANT and REVOKE ROLE
You can grant and revoke roles with N1QL commands. You need Admin access to do this.
Here’s a quick example of granting SELECT query authorization to a user named "Matt" on a bucket called "mynewbucket":
GRANT ROLE query_select(`mynewbucket) TO Matt;`
And likewise, you can REVOKE a role doing something similar:
REVOKE ROLE query_select(`mynewbucket) FROM Matt;`
Creating users with REST
There is no way (currently) to create users with N1QL, but you can use the REST API to do this. Full documentation is coming later, but here’s how you can create a user with the REST API:
-
PUT to the
/settings/rbac/users/builtin/<username>endpoint. -
Use admin credentials for this endpoint (e.g. Administrator:password with basic auth)
-
The body should contain:
-
roles=<role1,role2,…,roleN>
-
password=<password>
-
Below is an example. You can use cURL, Postman, Fiddler, or whatever your favorite tool is to make the request.
Headers: Content-Type: application/x-www-form-urlencoded Authorization: Basic QWRtaW5pc3RyYXRvcjpwYXNzd29yZA==
Body: roles=query_select[mynewbucket],query_update[mynewbucket]&password=password
The above assumes that you have an admin user/password of Administrator/password (hence the basic auth token of QWRtaW5pc3RyYXRvcjpwYXNzd29yZA==).
After executing that, you’ll see a new user named "restman" with the two specified permissions.

Wait, there’s more!
The RBAC system is far too rich to cover in a single blog post, and full documentation is on its way. In the meantime, here are some details that might help you get started with the preview:
-
You may have noticed the
alloption in the screenshots above. You can give a user roles on a bucket-by-bucket basis, or you can give permission to all buckets (even buckets that haven’t been created yet. -
I covered FTS permissions in the previous blog post, but there are permissions that cover just about everything: views, bucket administration, backup, monitoring, DCP, indexes, etc.
-
You can’t create buckets with a password anymore. The equivalent is to instead create a user with the name as the bucket, and give it authorization to a role called "Bucket Full Access". This will be useful for upgrading and transitioning purposes.
We still want your feedback!
Stay tuned to the Couchbase Blog for information about what’s coming in the next developer build.
Interested in trying out some of these new features? Download Couchbase Server 5.0 April 2017 Developer Build today!
The 5.0 release is fast approaching, but we still want your feedback!
Bugs: If you find a bug (something that is broken or doesn’t work how you’d expect), please file an issue in our JIRA system at issues.couchbase.com or submit a question on the Couchbase Forums. Or, contact me with a description of the issue. I would be happy to help you or submit the bug for you (my Couchbase handlers let me take selfies on our cartoonishly big couch when I submit good bugs).
Feedback: Let me know what you think. Something you don’t like? Something you really like? Something missing? Now you can give feedback directly from within the Couchbase Web Console. Look for the ![]() icon at the bottom right of the screen.
icon at the bottom right of the screen.
In some cases, it may be tricky to decide if your feedback is a bug or a suggestion. Use your best judgement, or again, feel free to contact me for help. I want to hear from you. The best way to contact me is either Twitter @mgroves or email me [email protected].
This is a repost that originally appeared on the Couchbase Blog: SQL to JSON Data Modeling with Hackolade.
SQL to JSON data modeling is something I touched on in the first part of my "Moving from SQL Server to Couchbase" series. Since that blog post, some new tooling has come to my attention from Hackolade, who have recently added first-class Couchbase support to their tool.
In this post, I’m going to review the very simple modeling exercise I did by hand, and show how IntegrIT’s Hackolade can help.
I’m using the same SQL schema that I used in the previous blog post series; you can find it on GitHub (in the SQLServerDataAccess/Scripts folder).
Review: SQL to JSON data modeling
First, let’s review, the main way to represent relations in a relational database is via a key/foreign key relationship between tables.
When looking at modeling in JSON, there are two main ways to represent relationships:
-
Referential - Concepts are given their own documents, but reference other document(s) using document keys.
-
Denormalization - Instead of splitting data between documents using keys, group the concepts into a single document.
I started with a relational model of shopping carts and social media users.
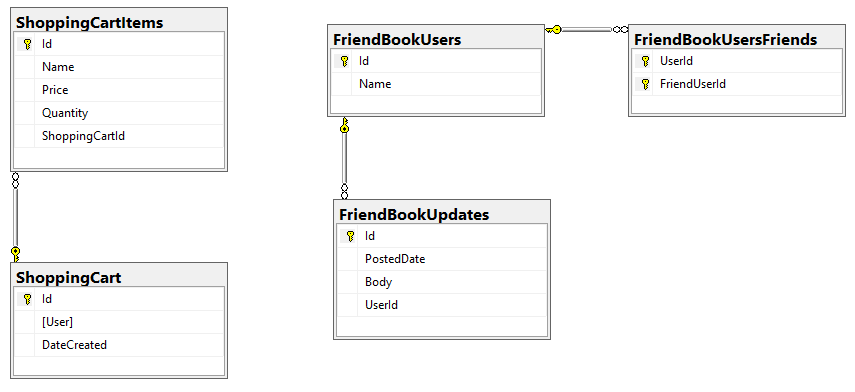
In my example, I said that a Shopping Cart - to - Shopping Cart Items relationship in a relational database would probably be better represented in JSON by a single Shopping Cart document (which contains Items). This is the "denormalization" path. Then, I suggested that a Social Media User - to - Social Media User Update relationship would be best represented in JSON with a referential relationship: updates live in their own documents, separate from the user.
This was an entirely manual process. For that simple example, it was not difficult. But with larger models, it would be helpful to have some tooling to assist in the SQL to JSON data modeling. It won’t be completely automatic: there’s still some art to it, but the tooling can do a lot of the work for us.
Starting with a SQL Server DDL
This next part assumes you’ve already run the SQL scripts to create the 5 tables: ShoppingCartItems, ShoppingCart, FriendBookUsers, FriendBookUpdates, and FriendBookUsersFriends. (Feel free to try this on your own databases, of course).
The first step is to create a DDL script of your schema. You can do this with SQL Server Management Studio.
First, right click on the database you want. Then, go to "Tasks" then "Generate Scripts". Next, you will see a wizard. You can pretty much just click "Next" on each step, but if you’ve never done this before you may want to read the instructions of each step so you understand what’s going on.
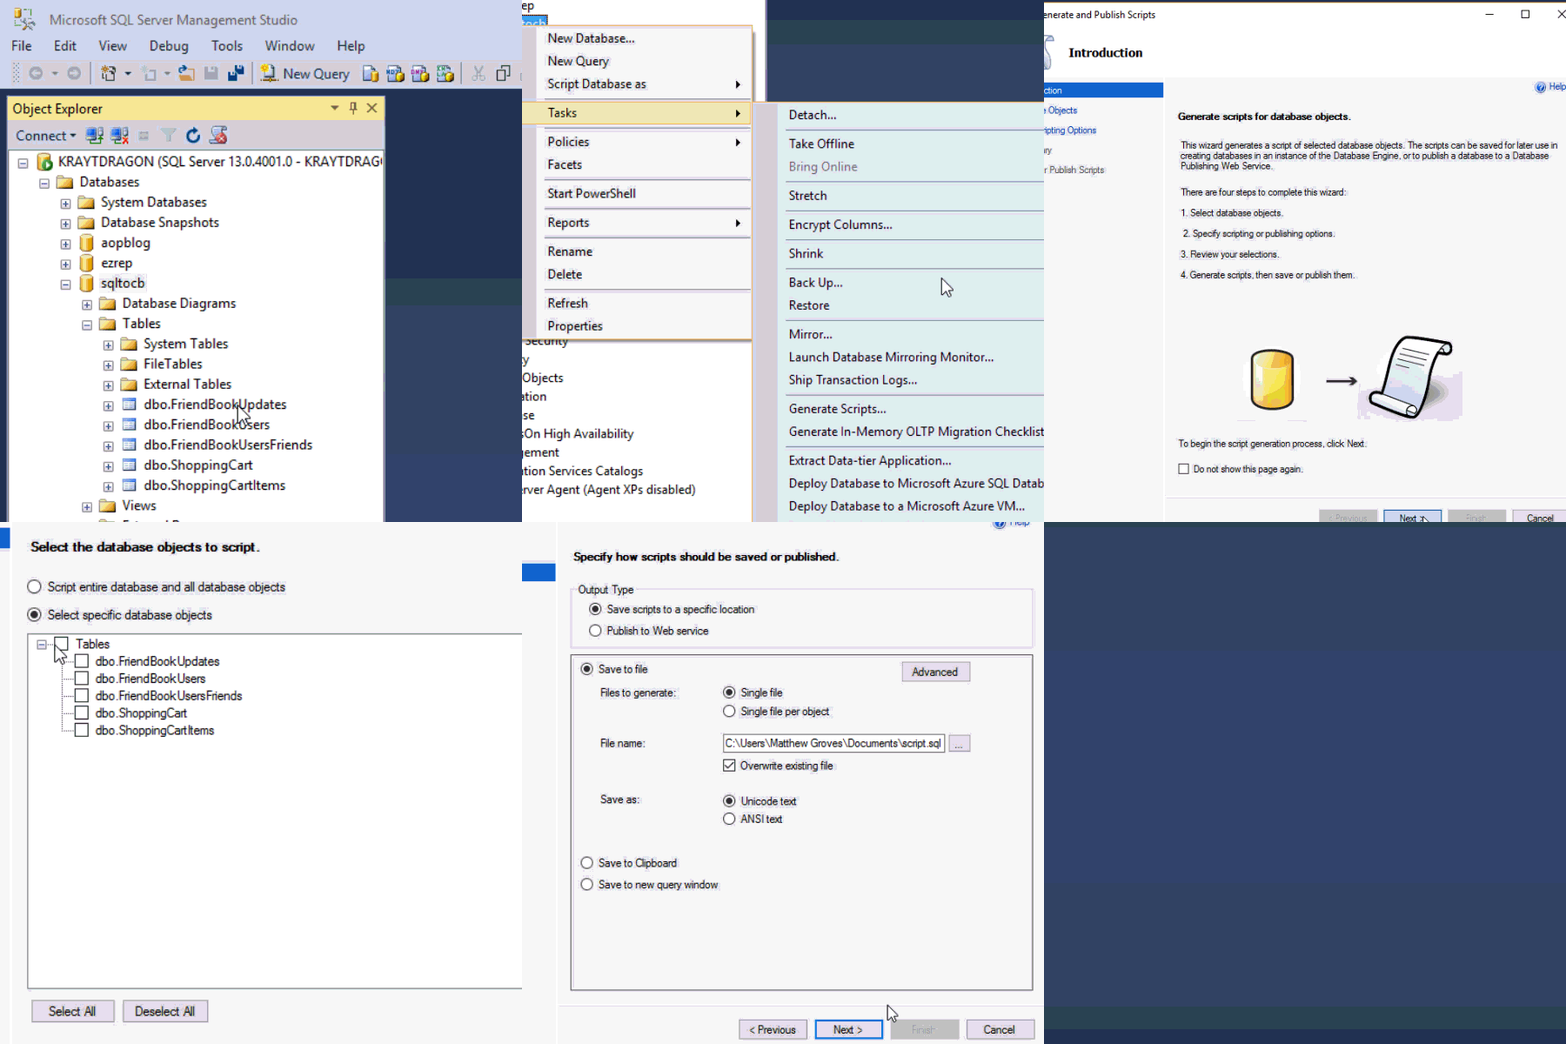
Finally, you will have a SQL file generated at the path you specified.
This will be a text file with a series of CREATE and ALTER statements in it (at least). Here’s a brief excerpt of what I created (you can find the full version on Github).
CREATE TABLE [dbo].[FriendBookUpdates](
	[Id] [uniqueidentifier] NOT NULL,
	[PostedDate] [datetime] NOT NULL,
	[Body] [nvarchar](256) NOT NULL,
	[UserId] [uniqueidentifier] NOT NULL,
 CONSTRAINT [PK_FriendBookUpdates] PRIMARY KEY CLUSTERED
(
	[Id] ASC
)WITH (PAD_INDEX = OFF, STATISTICS_NORECOMPUTE = OFF, IGNORE_DUP_KEY = OFF, ALLOW_ROW_LOCKS = ON, ALLOW_PAGE_LOCKS = ON) ON [PRIMARY]
) ON [PRIMARY]

GO

-- etc...
By the way, this should also work with SQL Azure databases.
Note: Hackolade works with other types of DDLs too, not just SQL Server, but also Oracle and MySQL.
Enter Hackolade
This next part assumes that you have downloaded and installed Hackolade. This feature is only available on the Professional edition of Hackolade, but there is a 30-day free trial available.
Once you have a DDL file created, you can open Hackolade.
In Hackolade, you will be creating/editing models that correspond to JSON models: Couchbase (of course) as well as DynamoDB and MongoDB. For this example, I’m going to create a new Couchbase model.
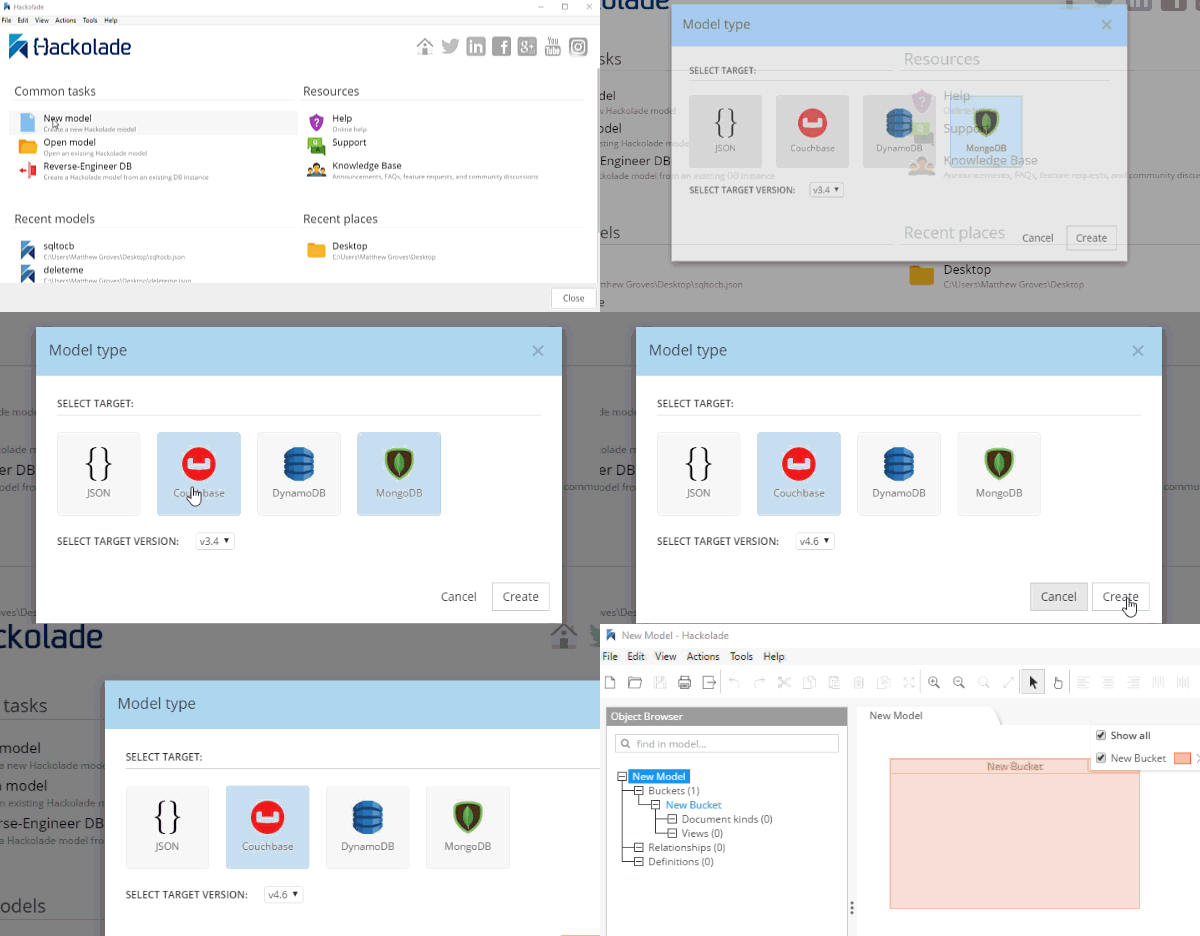
At this point, you have a brand new model that contains a "New Bucket". You can use Hackolade as a designing tool to visually represent the kinds of documents you are going to put in the bucket, the relationships to other documents, and so on.
We already have a relational model and a SQL Server DDL file, so let’s see what Hackolade can do with it.
Reverse engineer SQL to JSON data modeling
In Hackolade, go to Tools → Reverse Engineer → Data Definition Language file. You will be prompted to select a database type and a DDL file location. I’ll select "MS SQL Server" and the "script.sql" file from earlier. Finally, I’ll hit "Ok" to let Hackolade do its magic.
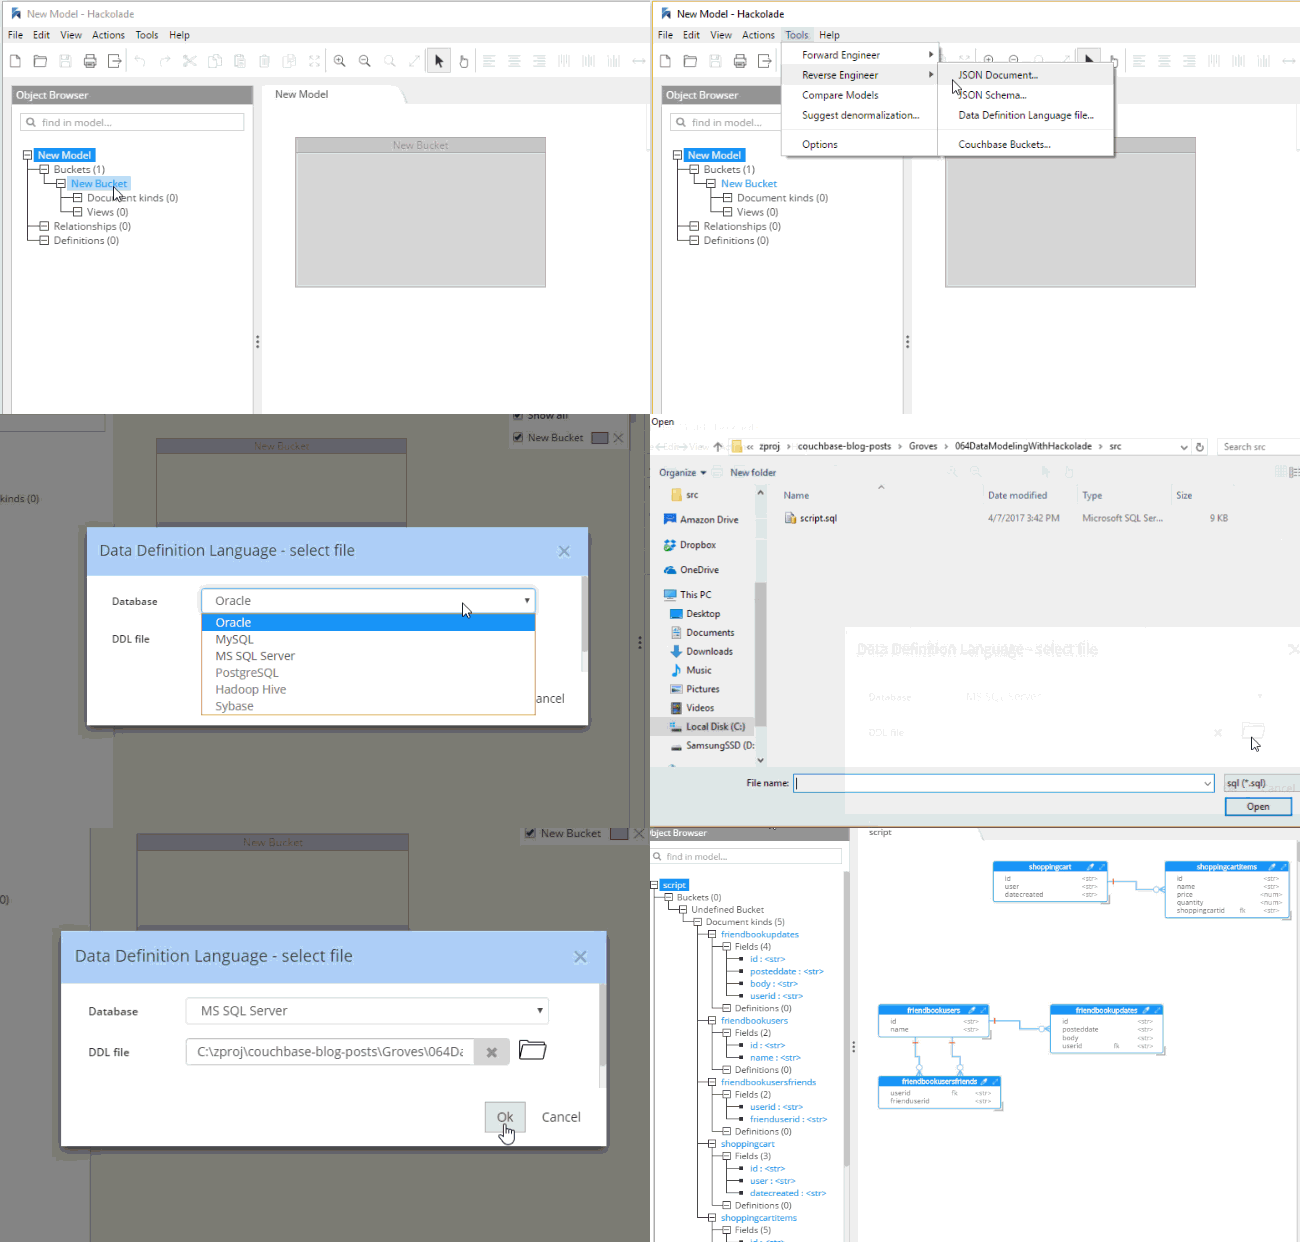
Hackolade will process the 5 tables into 5 different kinds of documents. So, what you end up with is very much like a literal translation.
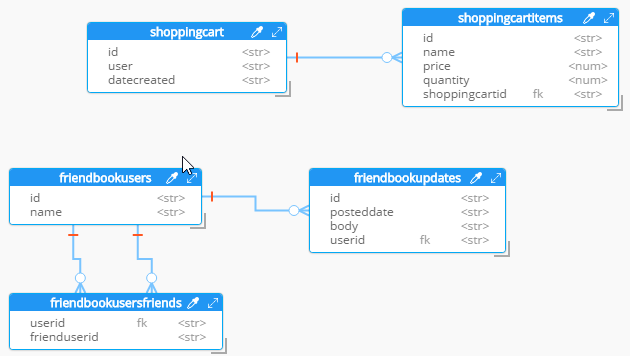
This diagram gives you a view of your model. But now you can think of it as a canvas to construct your ultimate JSON model. Hackolade gives you some tools to help.
Denormalization
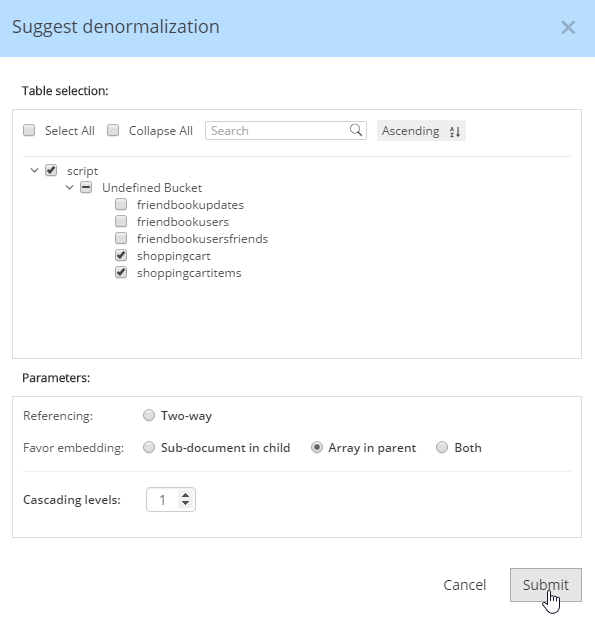
For instance, Hackolade can make suggestions about denormalization when doing SQL to JSON data modeling. Go to Tools→Suggest denormalization. You’ll see a list of document kinds in "Table selection". Try selecting "shoppingcart" and "shoppingcartitems". Then, in the "Parameters" section, choose "Array in parent".
After you do this, you will see that the diagram looks different. Now, the items are embedded into an array in shoppingcart, and there are dashed lines going to shoppingcartitems. At this point, we can remove shoppingcartitems from the model (in some cases you may want to leave it, that’s why Hackolade doesn’t remove it automatically when doing SQL to JSON data modeling).
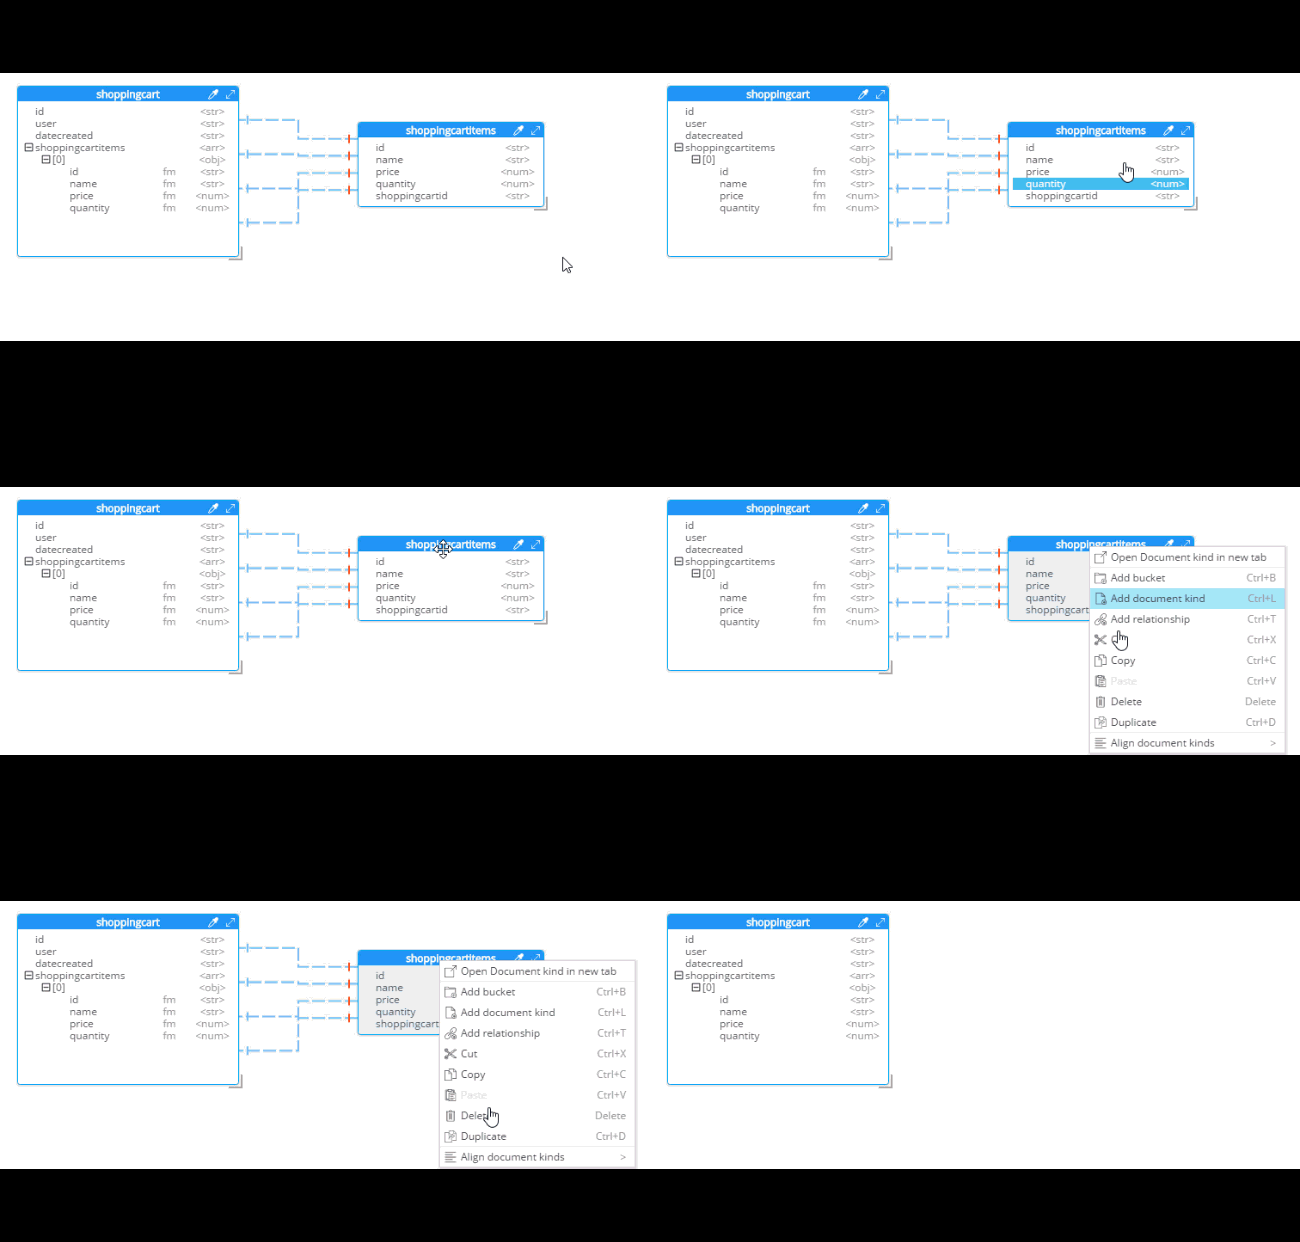
Notice that there are other options here too:
-
Embedding Array in parent - This is what was demonstrated above.
-
Embedding Sub-document in child - If you want to model the opposite way (e.g. store the shopping cart within the shopping cart item).
-
Embedding Both - Both array in parent and sub-document approach.
-
Two-way referencing - Represent a many-to-many relationship. In relational tables, this is typically done with a "junction table" or "mapping table"
Also note cascading. This is to prevent circular referencing where there can be a parent, child, grandchild, and so on. You select how far you want to cascade.
More cleanup
There are a couple of other things that I can do to clean up this model.
-
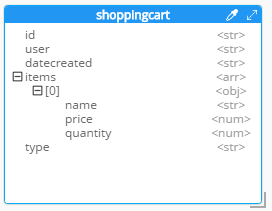
Add a 'type' field. In Couchbase, we might need to distinguish shoppingcart documents from other documents. One way to do this is to add a "discriminator" field, usually called 'type' (but you can call it whatever you like). I can give it a "default" value in Hackolade of "shoppingcart".
-
Remove the 'id' field from the embedded array. The SQL table needed this field for a foreign key relationship. Since it’s all embedded into a single document, we no longer need this field.
-
Change the array name to 'items'. Again, since a shopping cart is now consolidated into a single document, we don’t need to call it 'shoppingcartitems'. Just 'items' will do fine.
Output
A model like this can be a living document that your team works on. Hackolade models are themselves stored as JSON documents. You can share with team members, check them into source control, and so on.
You can also use Hackolade to generate static documentation about the model. This documentation can then be used to guide the development and architecture of your application.
Go to File → Generate Documentation → HTML/PDF. You can choose what components to include in your documentation.
Summary
Hackolade is a NoSQL modeling tool created by the IntegrIT company. It’s useful not only in building models from scratch, but also in reverse engineering for SQL to JSON data modeling. There are many other features about Hackolade that I didn’t cover in this post. I encourage you to download a free trial of Hackolade today. You can also find Hackolade on Twitter @hackolade.
If you have questions about Couchbase Server, please ask away in the Couchbase Forums. Also check out the Couchbase Developer Portal for more information on Couchbase for developers. Always feel free to contact me on Twitter @mgroves.
This is a repost that originally appeared on the Couchbase Blog: C# Tuples: New C# 7 language feature.
C# tuples are a new feature of C# 7. I’m going to show you the basics of how C# tuples work. I’m also going to mix in a little Couchbase to show tuples in action. However, if you don’t want to install Couchbase just to play around with tuples, don’t worry, you will still be able to follow along.
The source code that I use for this blog post is available on GitHub for you to try out if you’d like.
Note: If you’ve been using C# for a while, you might remember the Tuple Class that was introduced in .NET 4. That class still exists, but it is not the same thing as the new tuple feature of C#.
What are C# tuples?
A "tuple" is a name for a mathematical concept that is just a list of elements. In the LISP family of languages, coding is built almost entirely around the idea that everything is a list. C# once again borrows the kernel of an idea from the functional programming world and integrates it into a non-functional language. So, we get C# tuples (check out the original C# tuple proposal by Mads Torgersen for more details and background).
Remember anonymous types?
But, to make it simple, let’s consider something you may already be familiar with in C#, an anonymous type. To review, you can instantiate a new object without specifying a type:
var myObject = new { Foo = "bar", Baz = 123 };Behind the scenes, there actually is a type that inherits from the base Object type, but generally speaking, we only deal with the object, not its type.
Additionally, I can’t return an anonymous type from a method, or pass an anonymous type as a parameter without losing the type information in the process.
private object GetAnonymousObject()
{
    return new {Foo = "bar", Baz = 123};
}

private void AnotherMethod()
{
    var obj = GetAnonymousObject();
    Console.WriteLine(obj.Foo); // compiler error :(
}
They are useful, certainly, but I generally refer to these as anonymous objects as I use them, for these reasons.
What’s this got to do with C# tuples?
I think of C# tuples as richer anonymous types. They are a way to create a "class" on the fly without actually defining a class. The syntax for tuples is to simply put parenthesis around a comma separated list of types and names. A tuple literal is just a comma separated list of literals also surrounded by parenthesis. For instance:
(string FirstName, string LastName) myTuple = ("Matt", "Groves");

Console.WriteLine(myTuple.FirstName); // no compiler error :)
Console.WriteLine(myTuple.LastName);  // no compiler error :)
Note: Right now I’m preferring PascalCase for tuple properties. I don’t know if that’s the official guideline or not, but it "feels" right to me.
C# tuples in action
I put tuples to work in a simple console app that interacts with Couchbase.
I created a BucketHelper class that is a very simple facade over the normal Couchbase IBucket. This class has two methods: one to get a document by key and return a tuple, and one to insert a tuple as a document.
public class BucketHelper
{
    private readonly IBucket _bucket;

    public BucketHelper(IBucket bucket)
    {
        _bucket = bucket;
    }

    public (string Key, T obj) GetTuple<T>(string key)
    {
        var doc = _bucket.Get<T>(key);
        return (doc.Id, doc.Value);
    }

    public void InsertTuple<T>((string Key, T obj) tuple)
    {
        _bucket.Insert(new Document<T>
        {
            Id = tuple.Key,
            Content = tuple.obj
        });
    }
}
To instantiate this helper, you just need to pass an IBucket into the constructor.
Tuple as a return type
You can then use the GetTuple method to get a document out of Couchbase as a tuple.
var bucketHelper = new BucketHelper(bucket);

(string key, Film film) fightClub = bucketHelper.GetTuple<Film>("film-001");
The tuple will consist of a string (the document key) and an object of whatever type you specify. The document content is JSON and will be serialized to a C# object by the .NET SDK.
Also, notice that the name of the tuple properties don’t have to match. I used obj in BucketHelper but I used film when I called GetTuple<Film>. The types do have to match, of course.
Tuple as a parameter type
I can also go the other way and pass a tuple as a parameter to InsertTuple.
string key = Guid.NewGuid().ToString();
Film randomFilm = GenerateRandomFilm();
bucketHelper.InsertTuple((key, randomFilm));
The GenerateRandomFilm method returns a Film object with some random-ish values (check out the GitHub source for details). A tuple of (string, Film) is passed to InsertTuple. The Couchbase .NET SDK takes it from there and inserts a document with the appropriate key/value.
Running the console app, you should get an output that looks something like this:

Note that the Couchbase .NET SDK at this time doesn’t have any direct tuple support, and it may not ever need it. This code is simply to help demonstrate C# tuples. I would not recommend using the BucketHelper as-is in production.
TUH-ple or TOO-ple?
I seem to remember my professor(s) pronouncing it as "TOO-ple", so that’s what I use. Like the hard-G / soft-G debate of "GIF", I’m sure there are those who think this debate is of the utmost importance and are convinced their pronunciation is the one true way. But, both are acceptable.
If you have questions about tuples, I’d be happy to help. You can also contact me at Twitter @mgroves or email me [email protected].
If you have questions about the Couchbase .NET SDK that I used in this post, please ask away in the Couchbase .NET Forums. Also check out the Couchbase Developer Portal for more information on the .NET SDK and Couchbase in general.
This is a repost that originally appeared on the Couchbase Blog: ASP.NET with NoSQL Workshop.
I delivered an ASP.NET with NoSQL workshop at the recent Indy.Code() conference in Indianapolis. I had a lot of fun at this conference, and I recommend you go next year. If you were unable to attend, don’t worry, because I’ve got the next best thing for you: all the material that I used in my workshop.
ASP.NET Workshop in 4 parts
This workshop contained four main parts:
-
Install a NoSQL database (Couchbase Server)
-
Interact with Couchbase Server (using both the Web Console and the .NET (or .NET Core) SDK)
-
Create a RESTful API using ASP.NET (or ASP.NET Core) WebAPI
-
Consume the RESTful API with an Angular frontend
Try it yourself
If you’d like to try it yourself, the ASP.NET with NoSQL Workshop materials are available on GitHub. Each part of the workshop contains a PPT and PDF file for you to follow along. Also, the "completed" version of each workshop is available.
If you get stuck or have any questions, please ask away in the Couchbase .NET Forums. Also check out the Couchbase Developer Portal for more information on the .NET SDK and Couchbase in general.
You can also contact me at Twitter @mgroves.
This is a repost that originally appeared on the Couchbase Blog: Data structures with Couchbase and .NET (video).
In February, I wrote a blog about using data structures with .NET (and .NET Core): List, Queue, and Dictionary.
Now, I’ve created a video to show the same concepts in action.
How to use Couchbase Data Structures with .NET
The source code used in this video is available on GitHub. Note that the source code uses .NET Core, but this should work just the same in .NET.
Thanks for watching!
If you have any questions about Couchbase and .NET, please ask away in the Couchbase .NET Forums. Also check out the Couchbase Developer Portal for more information on the .NET SDK and Couchbase in general.
You can also contact me at Twitter @mgroves.
