var cluster = new Cluster(new ClientConfiguration
{
    Servers = new List<Uri> { new Uri("http://localhost:8091") }
});Posts tagged with 'authorization'
Joel Lord is using passwordless authentication. This episode is sponsored by Smartsheet.
Show Notes:
-
Joel works for Auth0
-
xkcd comic called "password strength"
-
Check out episode 71, Bill Sempf talking about security in the movie 'Sneakers'
-
Slack uses a 'magic link' passwordless system
-
What is a dongle? There are a lot of security dongles, here’s one called ChaosKey.
-
The Auth0 blog
-
Joel’s site: JavaScriptEverything.com
Want to be on the next episode? You can! All you need is the willingness to talk about something technical.
Music is by Joe Ferg, check out more music on JoeFerg.com!
This is a repost that originally appeared on the Couchbase Blog: Authentication and Authorization with RBAC in .NET.
Authentication and authorization are vastly improved in Couchbase Server 5.0. We’ve been blogging about the new RBAC features in the developer preview for a while.
-
Authentication and Authorization with RBAC - introduction / part 1
-
Authentication and Authorization with RBAC (Part 2) - managing users
-
Improved SDK Authentication Methods - Couchbase 5.0 - an introduction featuring Python, Java, PHP, and .NET
Now that Couchbase Server 5.0 is released, I’m writing a more in-depth blog post about how to use the Couchbase .NET SDK along with these new features.
The full code samples used in this blog post are available for you on Github.
Create a bucket
As I mentioned in the previous posts, the days of buckets with passwords are gone. The future belongs to users—users that have specific permission(s) to specific bucket(s).
Let’s start by creating a bucket. In the Couchbase UI, login as the Administrator that you created when you installed Couchbase. Go to "Buckets" and click "ADD BUCKET" (top right). You will see the "Add Data Bucket" dialog. Notice that there is no longer a "password" field (not even in "Advanced bucket settings").
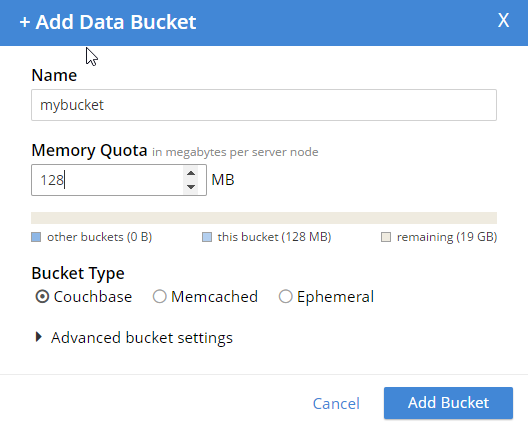
Give the bucket a name and some amount of memory, and click "Add Bucket". Now you have a bucket. But, other than an Administrator in the UI, no one can access this bucket yet.
Create a user
In order to get access to this bucket, you must create a user. In Couchbase 5.0, "users" are an entirely new feature, bringing richer authentication and authorization features to Couchbase Server.
While still logged in as an administrator, go to "Security" to see a list of users. Click "ADD USER" (top right).
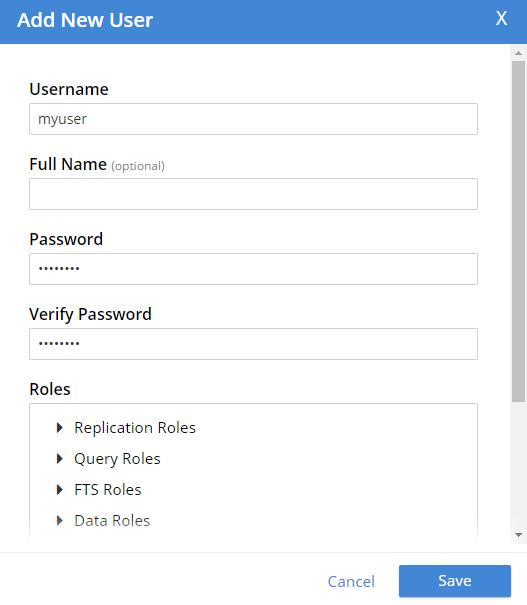
Create a user with whatever name and password you’d like. You can choose which roles the user has, and for which buckets (when applicable). Let’s give this user Data Writer and Data Reader roles, for the bucket that was just created (e.g. "mybucket"), but NOT any Query roles.
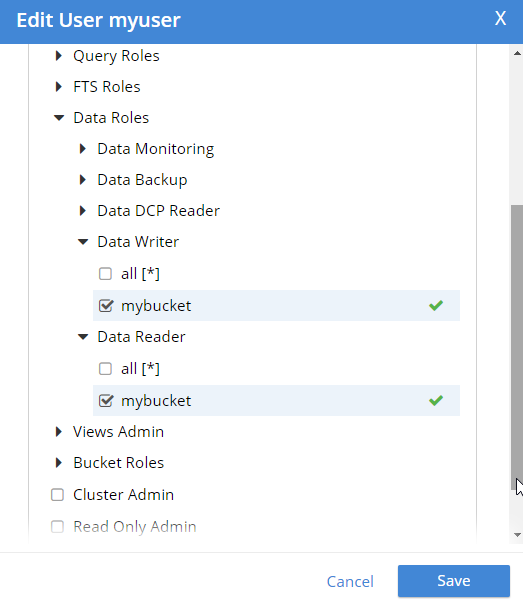
Once the user is added, you can hover over the roles to get a description of what the role means.

Authentication and authorization with the Couchbase .NET SDK
Now that we have a bucket and a user, let’s see how to use them with the .NET SDK.
Start by creating a Cluster object.
You have a cluster, but your program has not been authenticated yet. Use a PasswordAuthenticator object to specify the credentials. Then, use that object with the cluster’s Authenticate method. In this example below, I’m using incorrect credentials.
var authenticator = new PasswordAuthenticator("myuser", "wrongpassword");
cluster.Authenticate(authenticator);
Now, if I try to perform an operation like OpenBucket on the cluster, an exception is thrown.
try
{
    var bucket = cluster.OpenBucket("mybucket");
}
catch (Exception ex)
{
    Console.WriteLine("Error getting bucket.");
    Console.WriteLine(ex.Message);
}
Now, let’s try it again using the correct credentials. Authentication will work. But let’s talk about authorization next.
Remember that I only gave this user Data Writer and Data Reader roles (for mybucket). So, if I authenticate and insert a document now, it works.
var cluster = new Cluster(new ClientConfiguration
{
    Servers = new List<Uri> { new Uri("http://localhost:8091") }
});
var authenticator = new PasswordAuthenticator("myuser", "password");
cluster.Authenticate(authenticator);
var bucket = cluster.OpenBucket("mybucket");

// insert a document, this should be allowed
var result = bucket.Insert(Guid.NewGuid().ToString(), new {foo = "bar"});
Console.WriteLine("Insert was successful: " + result.Success);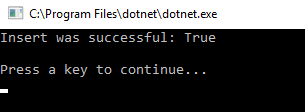
But if I tried to, for instance, execute a N1QL (SQL for JSON) query, then it would fail. This is because that user is not authorized to execute queries.
var queryResult = bucket.Query<int>("SELECT COUNT(1) FROM `" + bucket.Name + "`");
Console.WriteLine("Query was successful: " + queryResult.Success);
queryResult.Errors.ForEach(e => Console.WriteLine("Error: " + e.Message));
I’m just doing a simple COUNT(1) aggregation query. Since that user is not authorized, here’s what’s displayed:

One more thing
If you are worried about the effect this will have on upgrading from Couchbase Server 4.x to Couchbase Server 5.0, then here’s a tip. If you create a user with the same name as the bucket (e.g. a bucket called "foo" and a user named "foo"), then the older Couchbase .NET APIs that still expect a bucket password will work as before. Just give that user a "Cluster Admin" role for now. This is a good temporary fix until you can re-engineer your system to use a regimented approach to role.
Summary
Couchbase Server 5.0 is out now in beta! These role-based authentication (RBAC) features make Couchbase a leader in document database security, and I’m personally very pleased that Couchbase is going in this direction. Security is important, but too often overlooked by developers.
If you have any questions, please ask away in the Couchbase Forums, leave a comment below, or ping me on Twitter @mgroves.
This is a repost that originally appeared on the Couchbase Blog: Authorization and Authentication with RBAC (Part 2).
Authorization and authentication are important to Couchbase. In March, I blogged about some of the new Role Based Access Control (RBAC) that we are showing in the Couchbase Server 5.0 Developer Builds. This month, I’d like to go into a little more detail now that the April Couchbase Server 5.0 Developer Build is available (make sure to click the "Developer" tab).
Authentication and authorization
In past version of Couchbase, buckets were secured by a password. In 5.0, bucket passwords for authorization are gone. You can no longer create a "bucket password" for authorization. Instead, you must create one (or more) users that have varying levels of authorization for that bucket. Notice that there is no "password" field anymore (not even in the "Advance bucket settings":
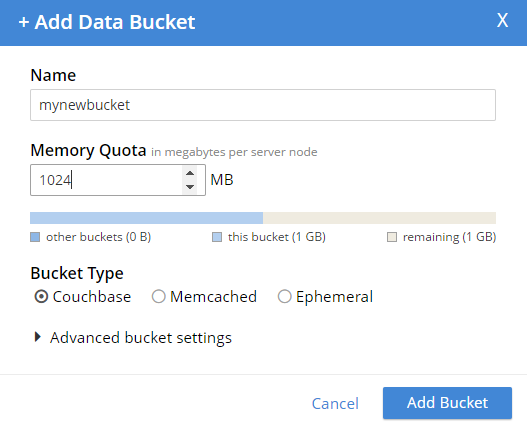
So now, you no longer have to hand out a password that gives complete access to a bucket. You can fine-tune bucket authorization, and give out multiple sets of credentials with varying levels of access. This will help you tighten up security, and reduce your exposure.
Note: The administrator user still exists, and has permission to do everything. So I can still run N1QL queries (for instance) on that bucket while logged in as an administrator account. However, this is not the account you should be using from your clients.
Creating an authorized user
To create a new user, you must be logged in as an administrator (or as a user that has an Admin role). Go to the "Security" tab, and you’ll be able to see a list of users, and be able to add new ones.
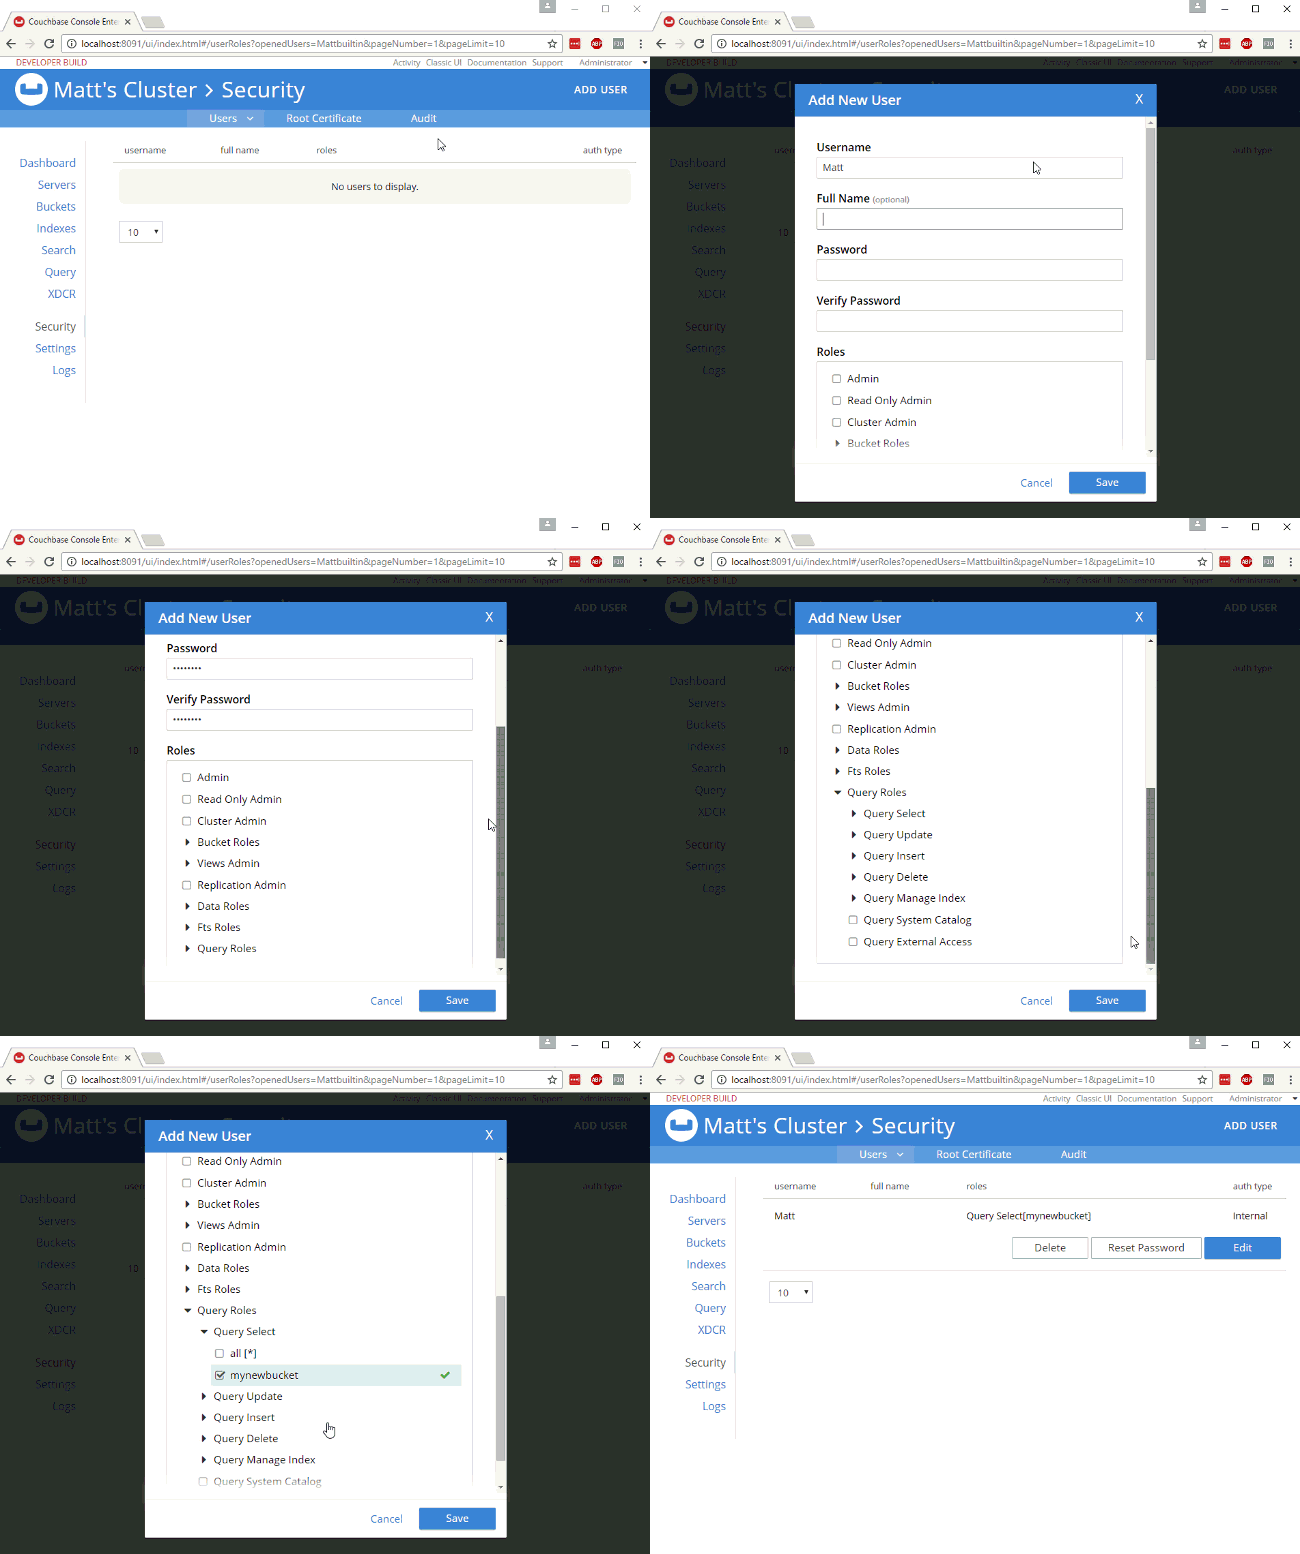
Create a new user by clicking "ADD USER". Enter the information for the user. You may want to create a user for a person (e.g. "Matt"), or you may want to create a user for a service (e.g. "MyAspNetApplication"). Make sure to enter a strong password, and then select the appropriate roles for the user you want to create.
For example, let’s create a user "Matt" that only has access to run SELECT queries on the bucket I just created. In "Roles", I expand "Query Roles", then "Query Select", and check the box for "mynewbucket", and then "Save" to finalize the user.
Authorization in action
When I log out of the administrator account, and log back in as "Matt", I can see that the authorization level I have is severely restricted. Only "Dashboard", "Servers", "Settings", and "Query" are visible. If I go to "Query" I can execute SELECT 1;
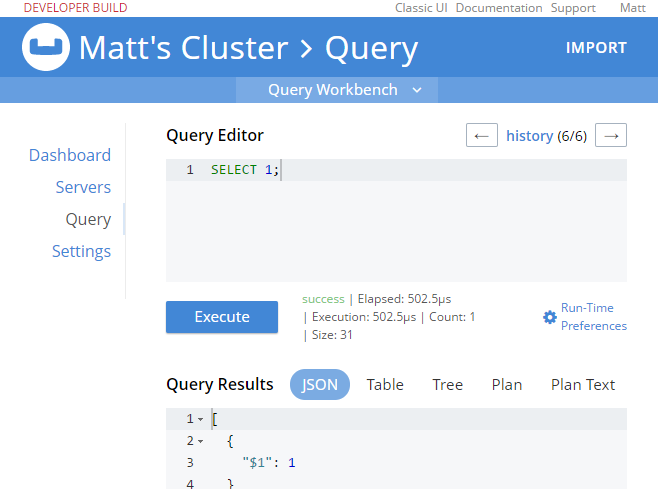
If I try something more complex, like SELECT COUNT(1) FROM mynewbucket, I’ll get an error message like:
[
  {
    "code": 13014,
    "msg": "User does not have credentials to access privilege cluster.bucket[mynewbucket].data.docs!read. Add role Data Reader[mynewbucket] to allow the query to run."
  }
]
So, it looks like I have the correct authentication to log in, and I have the correct authorization to execute a SELECT, but I don’t have the correct authorization to actually read the data. I’ll go back in as admin, and add Data Reader authorization.

At this point, when I login with "Matt", SELECT COUNT(1) FROM mynewbucket; will work. If you are following along, try SELECT * FROM mynewbucket;. You’ll get an error message that no index is available. But, if you try to CREATE INDEX you’ll need another permission to do that. You get the idea.
New N1QL functionality
There’s some new N1QL functionality to go along with the new authentication and authorization features.
GRANT and REVOKE ROLE
You can grant and revoke roles with N1QL commands. You need Admin access to do this.
Here’s a quick example of granting SELECT query authorization to a user named "Matt" on a bucket called "mynewbucket":
GRANT ROLE query_select(`mynewbucket) TO Matt;`
And likewise, you can REVOKE a role doing something similar:
REVOKE ROLE query_select(`mynewbucket) FROM Matt;`
Creating users with REST
There is no way (currently) to create users with N1QL, but you can use the REST API to do this. Full documentation is coming later, but here’s how you can create a user with the REST API:
-
PUT to the
/settings/rbac/users/builtin/<username>endpoint. -
Use admin credentials for this endpoint (e.g. Administrator:password with basic auth)
-
The body should contain:
-
roles=<role1,role2,…,roleN>
-
password=<password>
-
Below is an example. You can use cURL, Postman, Fiddler, or whatever your favorite tool is to make the request.
Headers: Content-Type: application/x-www-form-urlencoded Authorization: Basic QWRtaW5pc3RyYXRvcjpwYXNzd29yZA==
Body: roles=query_select[mynewbucket],query_update[mynewbucket]&password=password
The above assumes that you have an admin user/password of Administrator/password (hence the basic auth token of QWRtaW5pc3RyYXRvcjpwYXNzd29yZA==).
After executing that, you’ll see a new user named "restman" with the two specified permissions.

Wait, there’s more!
The RBAC system is far too rich to cover in a single blog post, and full documentation is on its way. In the meantime, here are some details that might help you get started with the preview:
-
You may have noticed the
alloption in the screenshots above. You can give a user roles on a bucket-by-bucket basis, or you can give permission to all buckets (even buckets that haven’t been created yet. -
I covered FTS permissions in the previous blog post, but there are permissions that cover just about everything: views, bucket administration, backup, monitoring, DCP, indexes, etc.
-
You can’t create buckets with a password anymore. The equivalent is to instead create a user with the name as the bucket, and give it authorization to a role called "Bucket Full Access". This will be useful for upgrading and transitioning purposes.
We still want your feedback!
Stay tuned to the Couchbase Blog for information about what’s coming in the next developer build.
Interested in trying out some of these new features? Download Couchbase Server 5.0 April 2017 Developer Build today!
The 5.0 release is fast approaching, but we still want your feedback!
Bugs: If you find a bug (something that is broken or doesn’t work how you’d expect), please file an issue in our JIRA system at issues.couchbase.com or submit a question on the Couchbase Forums. Or, contact me with a description of the issue. I would be happy to help you or submit the bug for you (my Couchbase handlers let me take selfies on our cartoonishly big couch when I submit good bugs).
Feedback: Let me know what you think. Something you don’t like? Something you really like? Something missing? Now you can give feedback directly from within the Couchbase Web Console. Look for the ![]() icon at the bottom right of the screen.
icon at the bottom right of the screen.
In some cases, it may be tricky to decide if your feedback is a bug or a suggestion. Use your best judgement, or again, feel free to contact me for help. I want to hear from you. The best way to contact me is either Twitter @mgroves or email me [email protected].
This is a repost that originally appeared on the Couchbase Blog: Authentication and Authorization with RBAC.
In March’s developer build, you can start to see some major changes to authentication and authorization within Role Based Access Control (RBAC) coming to Couchbase Server. These changes are a work in progress: the developer build is essentially a nightly build that gets released to the public. But there’s some good stuff in RBAC that’s worth getting excited about!
Go download the March 5.0.0 developer release of Couchbase Server today. Make sure to click the "Developer" tab to get the developer build (DB), and check it out. You still have time to give us some feedback before the official release.
Keep in mind that I’m writing this blog post on early builds, and some things may change in minor ways by the time you get the release, and some things may still be buggy.
Authentication and Authorization
Just a quick reminder of the difference between authentication and authorization:
-
Authentication is the process of identifying that a user is who they say they are.
-
Authorization is the process of making sure the user has permission to do what they are trying to do.
If you’ve used Couchbase before, you’re familiar with the login to what we sometimes call the "Admin Web Console".
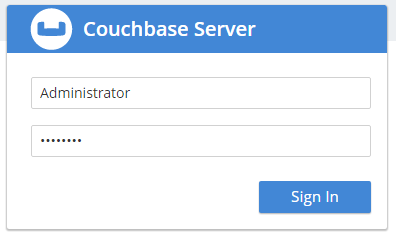
However, the Web Console is really not just for admins, it’s for developers too. But until now, you didn’t really have a lot of control built-in to Couchbase about who can log in and (more importantly) what they’re allowed to do.
So, I’d like to introduce you to Couchbase’s new first-class user feature.
Users
There’s still a full administrator user. This is the login that you create when you first install Couchbase. This is the user who is unrestricted, and can do anything, including creating new users. So, for instance, a full administrator can see the "Security" link in the navigation, while other users can’t.
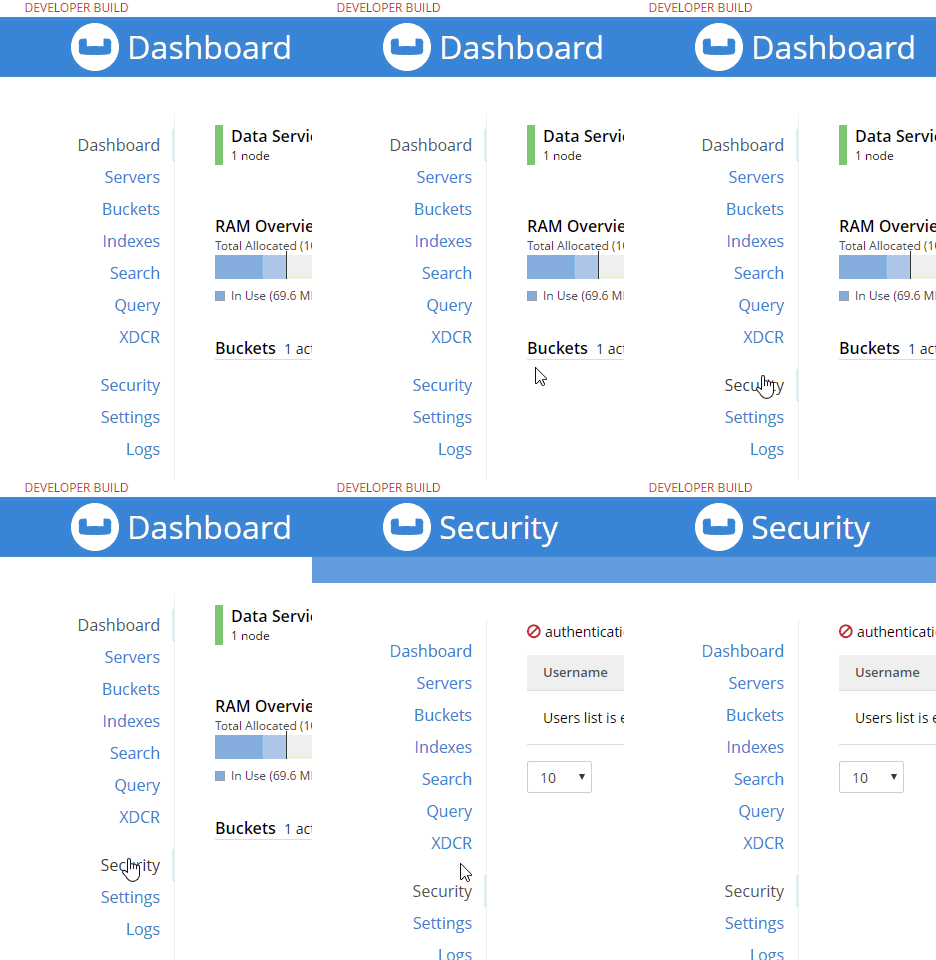
Now, once on this security page, you can add, edit, and delete users.
A user can identify a person, but it can also identify some service or process. For instance, if you’re writing an ASP.NET application, you may want to create a user with a limited set of permissions called "web-service". Therefore, the credentials for that "user" would not be for a person, but for an ASP.NET application.
Next, try adding a new Couchbase user by clicking "+ Add User". I’m going to create a user called "fts_admin", with a name of "Full Text Search Admin", a password, and a single role: FTS Admin of the travel-sample bucket (FTS = Full Text Search).
Adding a new User
Here’s an animation of adding that user:
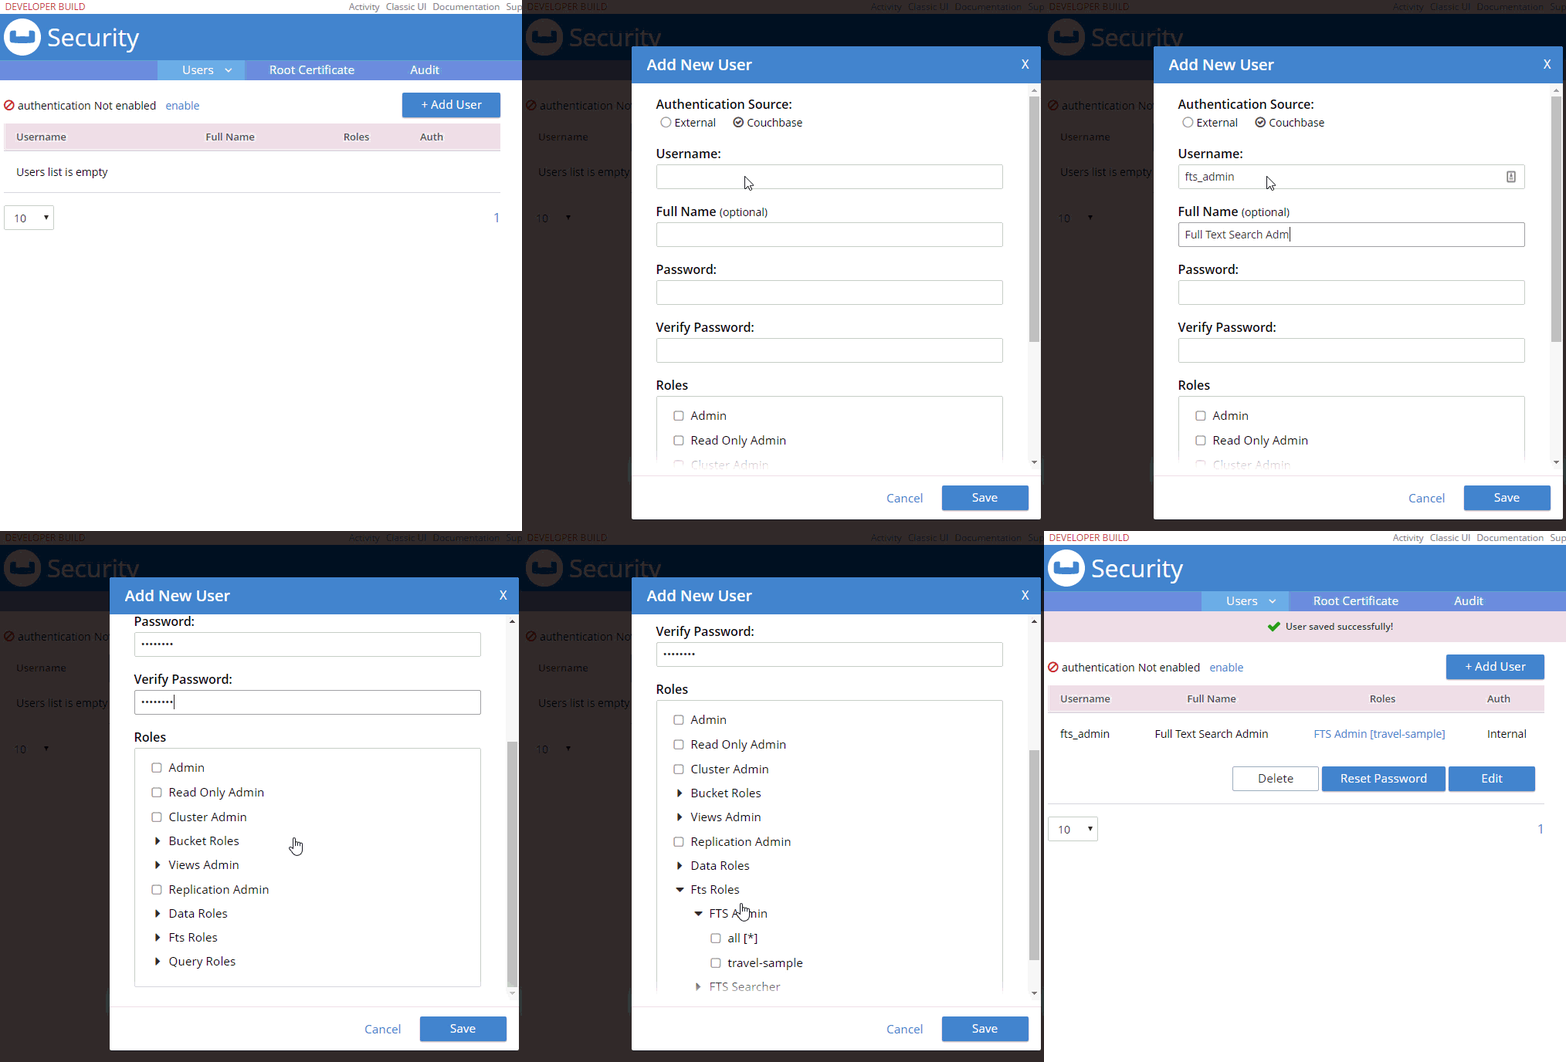
Some notes about the above animation:
-
I selected "Couchbase" instead of "External". External is meant for LDAP integration. Note that "Couchbase" (internal authentication) will likely become the default in future releases.
-
FTS Admin gives the user permission to do everything with Full Text Searches: create, modify, delete, and execute them.
-
I granted FTS Admin only for the travel-sample bucket. If I selected "all", that would grant permission to all buckets, even ones created in the future.
-
Users with the FTS Searcher role only have access to execute searches, not modify or create them.
More on the difference between FTS Admin and FTS Searcher later.
Logging in as a new user
Now that this user is created, I can login as fts_admin. This user’s authentication is handled within Couchbase.
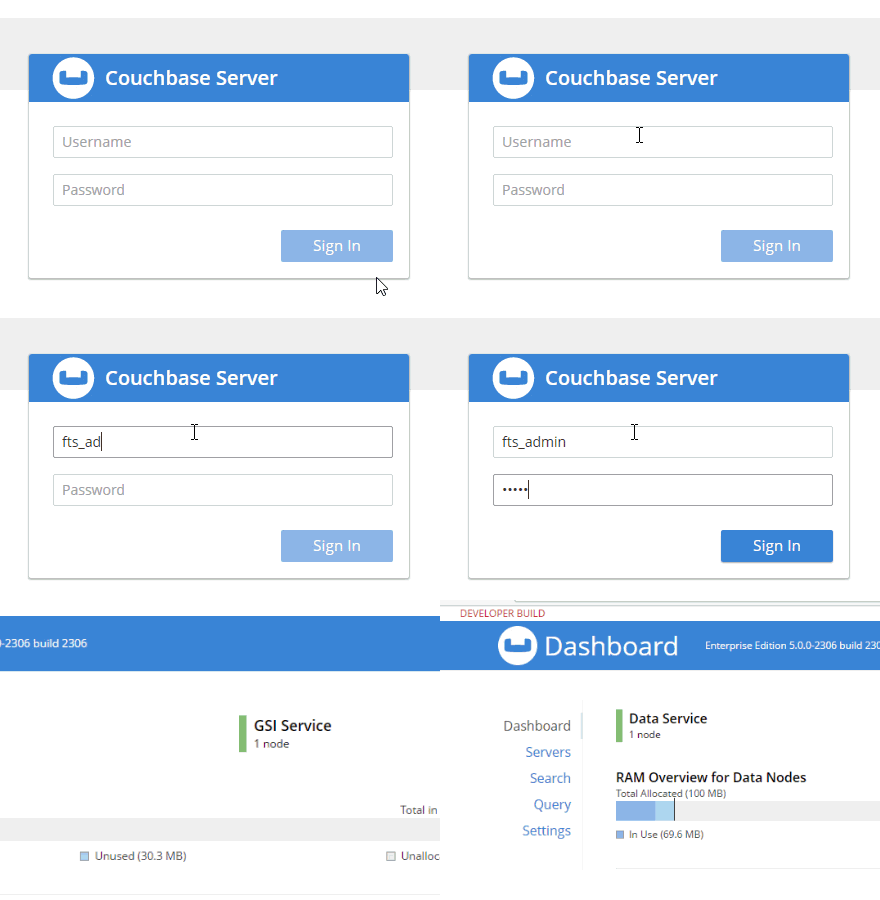
First, in the above animation, note that the fts_admin user has a much more limited set of options compared to the full admin user.
Next, it’s worth pointing out that users can reset their password:

Creating an FTS index
Since I’ve already created an fts_admin user with the FTS Admin role, I’ll create another user called fts_searcher that only has the FTS Searcher role for the travel-sample bucket.

Using the REST API for FTS
I’m going to use the REST API to demonstrate that these users are limited by the roles I’ve given them. If you need a refresher on the REST API, you can refer to the documentation of the Full Text Search API. Also note that I’m using the REST API because there are some bugs in the UI as I’m writing this.
Create an FTS index
To create an index with the REST API, I need to make a PUT request to the /api/index/<indexname> endpoint.
-
First, I’ll create an index for the 'hotel' type in the travel-sample bucket, so I’ll PUT to
/api/index/hotels -
Also, credentials can be put in the URL to use basic authentication
-
Furthermore, the REST endpoints are available on port 8094
Finally, the URL for the PUT request should look something like this:
The body of the PUT is a big JSON object. Below is part of it. You can find the full version on GitHub to try for yourself.
{
  "type": "fulltext-index",
  "name": "hotels",
  "sourceType": "couchbase",
  "sourceName": "travel-sample",

// ... snip ...

}
Normally, you can create this via the UI instead of having to create JSON by hand. I’m not going to go into FTS in much detail in this post, because my goal is to demonstrate the new authentication and authorization features, not FTS itself.
Trying to create an index without authorization
Notice that I’m using fts_searcher as the user. I know that fts_searcher shouldn’t have permission to create indexes, so I would expect a 403. And that’s just what I get.
{
  "message": "Forbidden. User needs one of the following permissions",
  "permissions": [
    "cluster.bucket[travel-sample].fts!write"
  ]
}
So, while the authentication worked, that user doesn’t have the necessary authorization.
Creating an index with authorization
I’ll try again with fts_admin:
And assuming an index named 'hotels' doesn’t already exist, you’ll get a 200, and this in the body of response:
{
  "status": "ok"
}
Using the FTS index
Next, let’s use the REST API to search the index for the word 'breakfast'.
First, make a POST to the /api/index/hotels/query endpoint, again with the proper credentials and port number.
or
Both users should be able to execute a search using that index.
Next, in the body of the POST should be a simple JSON object. Again, you don’t normally have to create this by hand — your SDK of choice or the Web Console UI can do this for you.
{
  "explain": true,
  "fields": [
    "*"
  ],
  "highlight": {},
  "query": {
    "query": "breakfast"
  }
}
Finally, the result of this search request will be a large JSON response. Look within the "hits" sub-document for "fragments" to verify that the search worked. Here’s a snippet of my search for "breakfast". Again, the full result is on Github.
// ... snip ...

        "reviews.content": [
          "… to watch TV. <mark>Breakfast</mark> was served every morning along with a copy of the Times-Picayune. I took my <mark>breakfast</mark> downstairs in the patio, the coffee was very good. The continental <mark>breakfast</mark> is nothing to…"
        ]
      },

// ... snip ...
This is a preview, expect some bugs!
There are some bugs and some incomplete features.
-
I’ve shown FTS roles here on purpose. This is because the other roles are not yet fully formed. Please try them out, let us know what you think, but remember they are not in their final form. FTS is closest to ready.
-
I’ve seen some issues when logging in as a non-admin user causes the web console to behave badly. Because of this, I showed the REST example above instead of relying on the UI.
-
Finally, there might be other bugs that we don’t know about yet. Please let us know! You can file an issue in our JIRA system at issues.couchbase.com or submit a question on the Couchbase Forums. Or, contact me with a description of the issue. I would be happy to help you or submit the bug for you (my Couchbase handlers send me a cake pop when I submit a good bug).
If you have questions, the best way to contact me is either Twitter @mgroves or email me [email protected].

