builder.Services.AddCouchbase(options =>
{
    options.ConnectionString = "couchbase://localhost";
    options.UserName = "Administrator";
    options.Password = "password";
});

// this adds auth to CMSprinkle
// if don't do this, it will be local only
// ExampleAuthClass enables anonymous public access, so don't use it as-is!
// builder.Services.AddTransient<ICMSprinkleAuth, ExampleAuthClass>();

// this adds CMSprinkle to your project
builder.Services.AddCMSprinkle(options =>
{
    // changes URL for cmsprinkle pages
    // if not specified, default is "cmsprinkle"
    // then URLs would be /cmsprinkle/home, etc
    options.RoutePrefix = "managecontent";

    // what message you want to show up when the
    // content hasn't been created yet
    // there is a default message if you don't specify this
    options.ContentNotFoundMessage = (contentKey) => $"ERROR: Can't find {contentKey}, did you add it yet?";
});

// this adds a Couchbase connection to CMSprinkle
builder.Services.AddCMSprinkleCouchbase("Example","_default","_default", createCollectionIfNecessary: true);

// or here's the SQLServer provider
// builder.Services.AddCMSprinkleSqlServer("Server=localhost;Database=Example;User Id=sa;Password=yourStrong(!)Password;TrustServerCertificate=True;", "SprinkleContent", "dbo", createTableIfNecessary: true);Posts tagged with 'ASP.NET Core'
Today, I’m presenting my C# Advent entry for December 25th, a project that emerged from the C# Advent series: CMSprinkle. (By the way, C# Advent merch is still on sale, but not for much longer).
What is CMSprinkle?
CMSprinkle is a micro content management system I developed specifically for the C# Advent website. Its creation was driven by the need for a straightforward and efficient way to manage small bits of content without the overhead of a full-blown CMS or even a headless CMS.
Features and Functionality
CMSprinkle is now available on NuGet and GitHub. It’s designed for ASP.NET Core web applications, particularly MVC projects. (It may also be adaptable to other ASP.NET Core projects, though this remains untested).
Here’s a quick walkthrough of setting up a new project with CMSprinkle:
-
Creating a New Project: Start with a new ASP.NET Core web application, targeting .NET 8. (Alternatively, you should be able to add CMSprinkle to any existing ASP.NET Core web project that you already have available).
-
Installing CMSprinkle: Add CMSprinkle from NuGet to your project. (
dotnet add package CMSprinkle) -
Choosing a Data Provider: Select from available data providers like Couchbase (used by the C# Advent site) or SQL Server. The system is designed to be extensible, so feel free to contribute or request additional database support.
-
Setting Up: After adding CMSprinkle, you’ll configure it in the views and program files: set up a tag helpers, and add services in your startup.
Managing Content
CMSprinkle aims to reduce friction in adding a CMS to your site. You define content keys directly in tag helpers and configure options like custom error messages for unfound content.
<div class="text-center">
    <h1 class="display-4">Welcome</h1>
    <p>Learn about <a href="https://learn.microsoft.com/aspnet/core">building Web apps with ASP.NET Core</a>.</p>

    @* this is how you sprinkle managed content into your pages *@
    @* make sure you add CMSPrinkle in _ViewImports.cshtml first *@
    @* this will say "ERROR: Content Not Found (HelloWorld)" until you actually create the content.*@
    <CMSprinkle contentKey="HelloWorld" />
</div>
The system also includes a management console for easy content addition and editing.
A Focus on Minimalism
The guiding principle of CM Sprinkle is minimalism. It’s ideal for existing ASP.NET Core websites that require very modest content management capabilities without the complexity of a full CMS. If you have specific features in mind that would make CMSprinkle more suitable for your project, feel free to submit an issue to the GitHub repository.
Video Introduction
You can watch a video introduction to CMSprinkle here, showing a demo in action:
Join the C# Advent Celebration
I invite you to dive into the rich collection of C# Advent entries for 2023. With 50 total entries on https://csadvent.christmas, there’s something for everyone.
I wish everyone a Merry Christmas and a Happy New Year! Thank you for participating in the C# Advent, and I hope to see you again next year.

Kevin Griffin is using SignalR to update web pages live. This episode is not sponsored! Want to be a sponsor? You can contact me or check out my sponsorship gig on Fiverr
Show Notes:
- It's been a long time since Kevin Griffin has been on the show. Check out 13 Kevin Griffin on Twilio
- Make sure to check out Kevin's entry on the Second Annual C# Advent
- AJAX was coined in 2005
- Some techniques we didn't cover: the Forever Frame, Server-Sent Events, also explained in a Kevin Griffin blog post on SignalR Transports
- Discourse
- Azure SignalR Service
- Swift Kick
Want to be on the next episode? You can! All you need is the willingness to talk about something technical.

Chris Woodruff is building web APIs with ASP.NET Core. This episode is sponsored by Ivacy.
Show Notes:
-
IIS web server
-
Check out episode 94 with Jeremy Miller on Lamar for more discussion about dependency injection
-
Check out episode 22 with J. Tower on .NET Core for more about .NET Standard.
-
Chris’s baseball API
-
InfoQ stuff:
-
Project Rider from JetBrains
Want to be on the next episode? You can! All you need is the willingness to talk about something technical.
Want to be a sponsor? Check out my sponsorship gig on Fiverr
Merry Christmas! This is the last day of the C# Advent. Make sure to check out all of the other great posts from 2017 and 2018. If you want to be involved next year, look for C# Advent 2019 author sign ups at the end of October 2019, and look for blog posts to start showing up on December 1st, 2019.
What is a background job?
A background job is some code that runs apart from the normal flow of your program. It could be run asynchronously and/or on another thread. As an ASP.NET MVC developer, I tend to think of it as any task that runs outside of an MVC action being invoked.
There’s two kinds of background jobs that I’m aware of:
-
Scheduled - a task that runs every N minutes, or every Y hours, etc. This is what I’m going to show in this post today. It’s great for making periodic checks, ingesting data from some other source, etc.
-
Fire and forget - Some other piece of code kicks off a process to run in the background. It doesn’t block the code (fire), and the code doesn’t wait for a response (forget). This is great for potentially time consuming operations like checking inventory, sending emails, etc, that you don’t need a user to wait for.
What you usually need to do to create background jobs
In my experience, I’ve seen background jobs take a few different forms.
-
Separate Windows service (or Linux daemon, whatever). A console/service program that’s running in addition to your ASP.NET program. This works fine for scheduled jobs.
-
Queueing mechanisms like Kafka or Rabbit. The ASP.NET program will put messages into these queues, which will then be processed by some other program. This is fine for fire-and-forget.
-
Background jobs running within the ASP.NET process itself. In my experience, I’ve used Quartz.NET, which can run within the ASP.NET process. There’s also FluentScheduler (which I’ve not used, and doesn’t seem to come with database integration out of the box?)
With all these options in the past, I’ve experienced deployment difficulties. The wrong version of the service gets deployed, or isn’t running, or fails silently, or needs to be deployed on multiple servers in order to provide scalability/availability etc. It’s totally possible to overcome these challenges, of course. (I should also note that in my experience with Quartz.NET, I never used it in embedded form, and the last time I used it was probably 6+ years ago).
But if I just need a handful of background jobs, I’d much rather just make them part of the ASP.NET system. Yes, maybe this goes against the whole 'microservice' idea, but I don’t think it would be too hard to refactor if you decided you need to go that route. I solve my deployment problems, and as you’ll see with Hangfire (with Couchbase), it’s very easy to scale.
How hangfire works
You can find more details and documentation about Hangfire at Hangfire.io. Really, there are only three steps to setting up Hangfire with ASP.NET Core:
-
Tell ASP.NET Core about Hangfire
-
Tell Hangfire which database to use
-
Start firing off background jobs
In Startup.cs, in the ConfigureServices method:
services.AddHangfire(x => x.UseCouchbaseStorage(configuration, "familyPhotos_hangfire"));Then, in Startup.cs, in the Configure method:
app.UseHangfireServer();I’m using Couchbase in this example, but there are options for SQL Server and other databases too. I happen to think Couchbase is a great fit, because it can easily horizontally scale to grow with your ASP.NET Core deployments. It also has a memory-first architecture for low latency storage/retrieval of job data. Generally speaking, even if you use SQL Server as your "main" database, Couchbase makes a great companion to ASP.NET or ASP.NET Core as a cache, session store, or, in this case, backing for Hangfire.
The configuration variable is to tell Hangfire where to find Couchbase:
var configuration = new ClientConfiguration
{
    Servers = new List<Uri> { new Uri("http://localhost:8091") }
};
configuration.SetAuthenticator(new PasswordAuthenticator("hangfire", "password"));
(In my case, it’s just running locally).
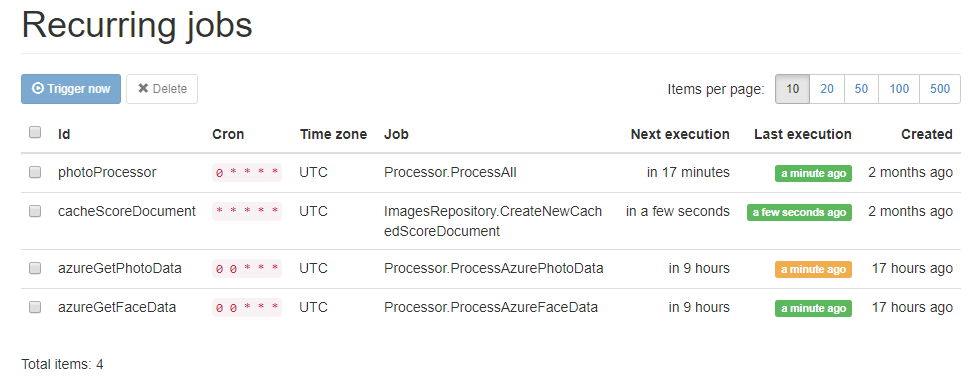
Steps 1 and 2 are down. Next, step 3 is to create some background jobs for Hangfire to process. I’ve created an ASP.NET Core app to assist me in the cataloging of all my family photographs. I want my application to scan for new files every hour or so. Here’s how I create that job in Hangfire:
RecurringJob.AddOrUpdate("photoProcessor", () => processor.ProcessAll(), Cron.Hourly);Note that I didn’t have to implement an IJob interface or anything like that. Hangfire will take any expression that you give it (at least, every expression that I’ve thrown at it so far).
Step 3 done.
Hangfire is just a NuGet package and not a separate process. So no additional deployment is needed.
How do I know it’s working?
Another great thing about Hangfire is that is comes with a built-in dashboard for the web. Back in Startup.cs, in Configure, add this code:
app.UseHangfireDashboard("/hangfire", new DashboardOptions
{
    Authorization = new[] {new HangfireAuthorization()}
});
I’m using my own HangfireAuthorization implementation because Hangfire only gives permission to local users by default.
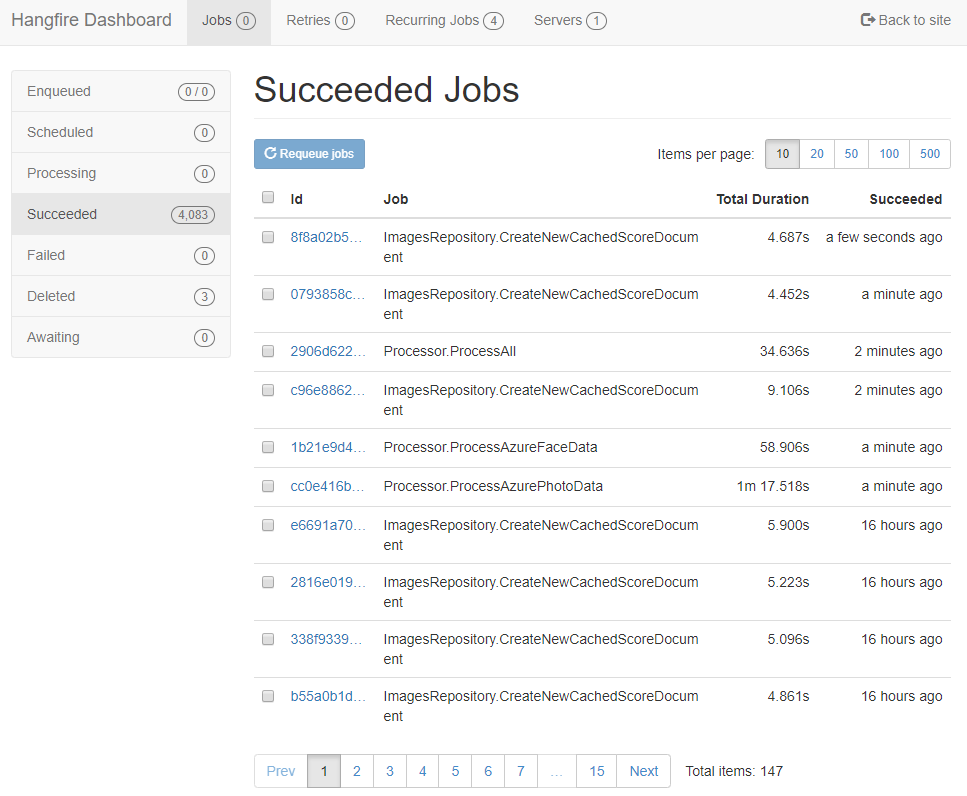
Then, you get a nice dashboard right out of the box, showing you a realtime and history graph.
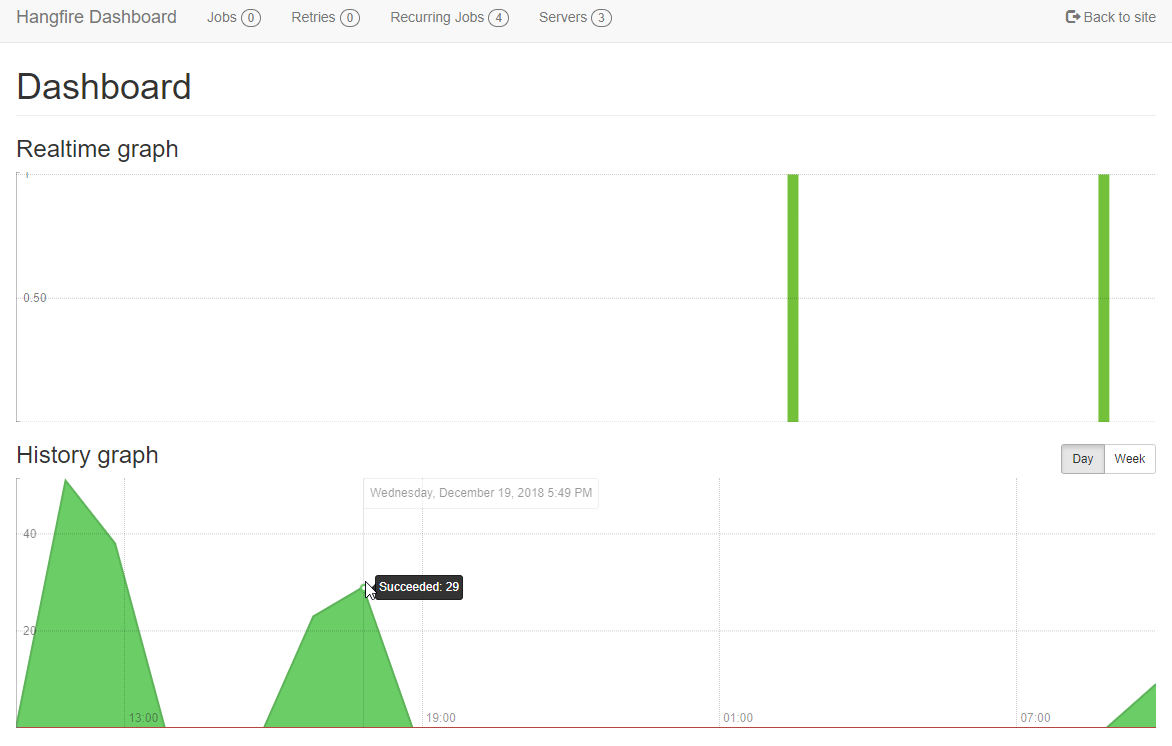
From this dashboard, you can also look at a more detailed history of what’s run and what’s failed.
You can even kick off recurring jobs manually.
This is only the start
If you’re thinking about adding background jobs to your ASP.NET Core solution, why not give Hangfire a try?
Some more things for you to explore:
-
Scaling: every ASP.NET Core site that gets deployed with Hangfire that points to the same database will be able to process jobs too. As your ASP.NET Core site scales out, hangfire scales out with it. This is another reason that Couchbase is a good fit, because it’s also easy to scale out as your site grows.
-
Cloud: If you are deploying your site as an app service, note that Azure will shut down ASP.NET processes if they haven’t been used in a while. This means Hangfire will shut down with them. There are a couple of ways to deal with this. Check out the Hangfire documentation.
-
Retries: Hangfire will retry failed jobs. Design your background job code to expect this.
-
Hangfire Pro: The commercial version of Hangfire is called Hangfire.Pro, and it comes with some interesting looking batch capabilities. I’ve not needed any of this functionality yet, but for more advanced cases you might need this.
-
Couchbase: a NoSQL data platform that has a built-in memory-first cache layer, SQL support, text search, analytics, and more. There are lots of options for working with Couchbase in .NET. For this post, I used the Hangfire.Couchbase library (available on NuGet).

Ed Charbeneau is creating and using ASP.NET tag helpers. This episode is sponsored by Smartsheet.
Show Notes:
-
Doom and web page size: I think this was originally pointed out by Ronan Cremin
-
(Doom is a 1993 PC game, here’s a video of Doom in action)
-
I also tweeted sarcastically about page footprint and client-side rendering recently.
-
-
Progress Telerik tools
-
Vue Vixens (I couldn’t find their Rick & Morty example though)
-
Docs: Tag Helpers
-
Scott Addie is on Twitter
-
-
Demos: Telerik ASP.NET Core demos
-
Eat Sleep Code podcast (also on Soundcloud)
Want to be on the next episode? You can! All you need is the willingness to talk about something technical.
Music is by Joe Ferg, check out more music on JoeFerg.com!
